SBC3003 - Getting Started
Set-up video for the PhidgetSBC4 (SBC3003_0)

Quantity Available: 43
| Qty | Price |
|---|---|
| 10 | $123.50 |
| 25 | $110.50 |
| 50 | $97.50 |
| 100 | $91.00 |
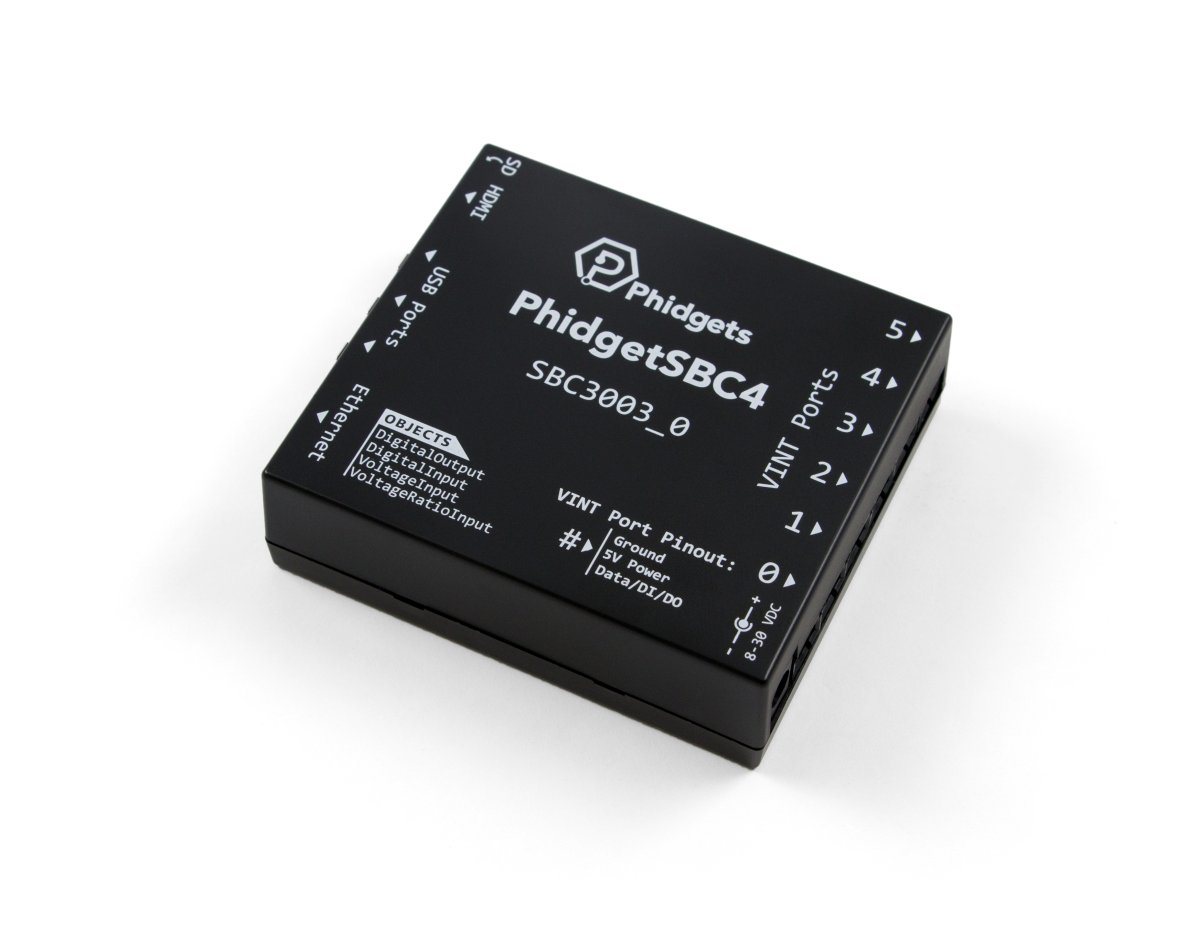
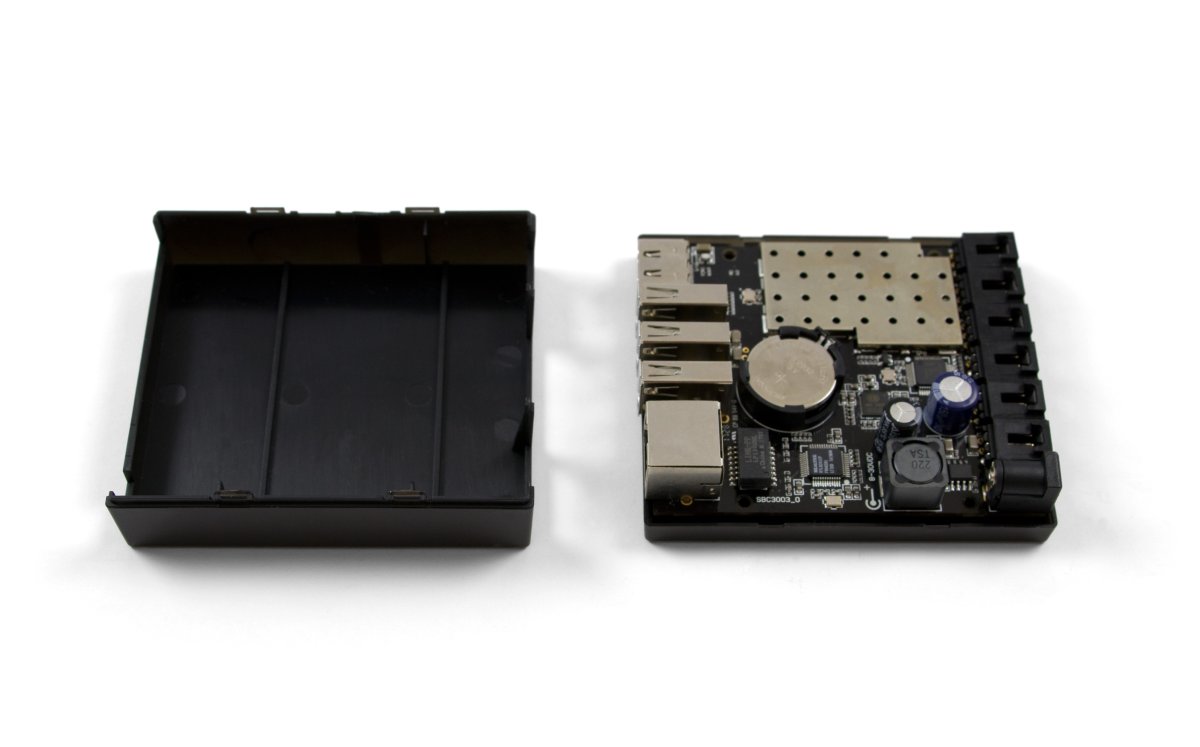
The Phidget SBC4 is a Single Board Computer with six integrated VINT ports. VINT Ports can be used in one of four ways: Communicating with an intelligent VINT Device, reading a 0-5V Voltage or ratiometric sensor, acting as a digital output, or reading switches as a digital input.
The SBC4 is an embedded computer that runs Debian GNU/Linux. It’s useful for long-running Phidgets applications or projects that need to be more portable.
You can connect a keyboard and monitor to work directly on the Phidget SBC using the pre-installed Linux terminal, or you can use an external computer to set up and run custom applications through the SBC’s web interface. You can even use the SBC4 as a remote server, accessing Phidgets connected to your SBC from programs running on other computers or devices on the network.
The SBC4 comes equipped with a 8GB card pre-loaded with Debian and our drivers. If you need additional space, you can flash the OS image to a higher capacity card.
Welcome to the user guide for the SBC3003. In this guide we will introduce you to your new Phidget and show you what it is capable of. To get started, make sure you have the following things available:
Ready? Then let's get started!
You can get set up using this video or by following the steps below:
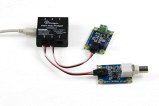
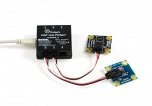
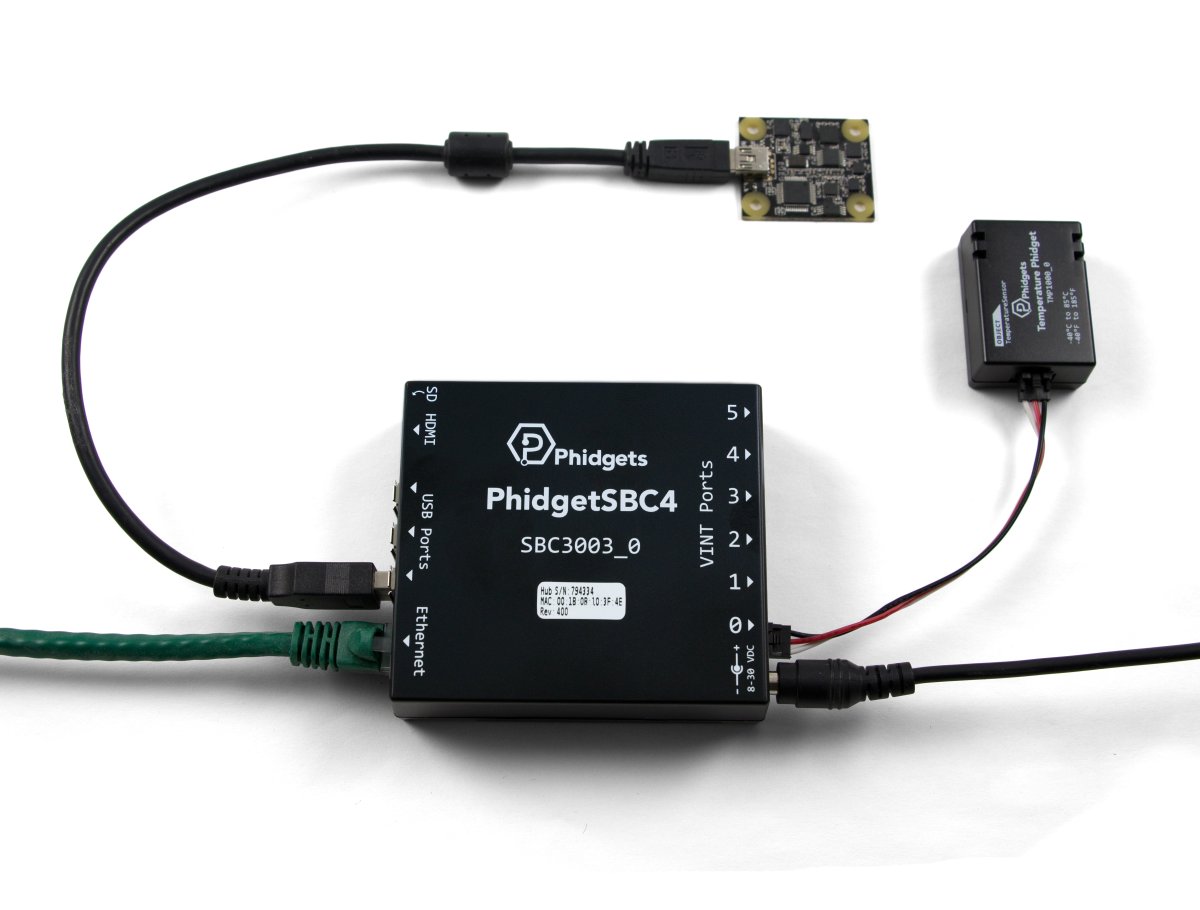
1. If you have any USB Phidgets, VINT Phidgets, or analog sensors, plug them into the SBC now.
2. Connect your SBC to your network using the Ethernet cable.
3. Connect your SBC to power. A red LED will immediately light up underneath the power barrel, indicating your SBC is receiving power. There is also a green LED that will briefly turn on when power is supplied, and then remain on after the SBC has fully booted.
The next step will be to access the SBC Web Interface. This process will vary slightly depending on what type of computer you use:
First things first: make sure you have the latest Phidget drivers installed on your machine. Download and run the installer:
You also need to download Bonjour on your Windows computer so that you can access your SBC over the network.
Now that you have the drivers installed, find the ![]() icon in the taskbar. If it is not there, open up the start menu and search for Phidget Control Panel
icon in the taskbar. If it is not there, open up the start menu and search for Phidget Control Panel
Double click on the icon to open the Phidget Control Panel and navigate to the Network Phidgets tab:
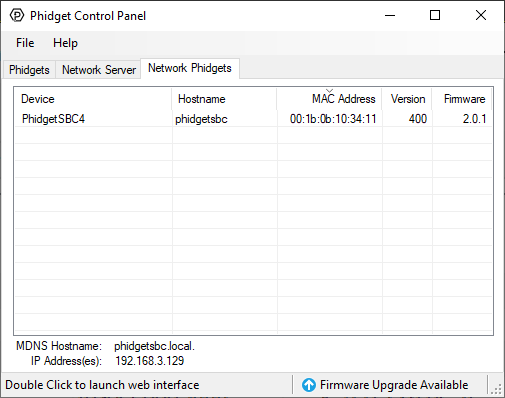
As shown in the image above, the Phidget Control Panel will relay the following information to you:
Next, double-click on your SBC in the Phidget Control Panel. This will automatically open the SBC Web Interface, which, conveniently enough, is our next topic! Jump ahead to the SBC Web Interface.
First things first: make sure you have the latest Phidget drivers installed on your machine. Download and run the installer:
Now that you have the drivers installed, open the Phidget Control Panel by finding the ![]() icon in your applications folder.
icon in your applications folder.
Open the Phidget Control Panel application and navigate to the PhidgetSBCs tab:
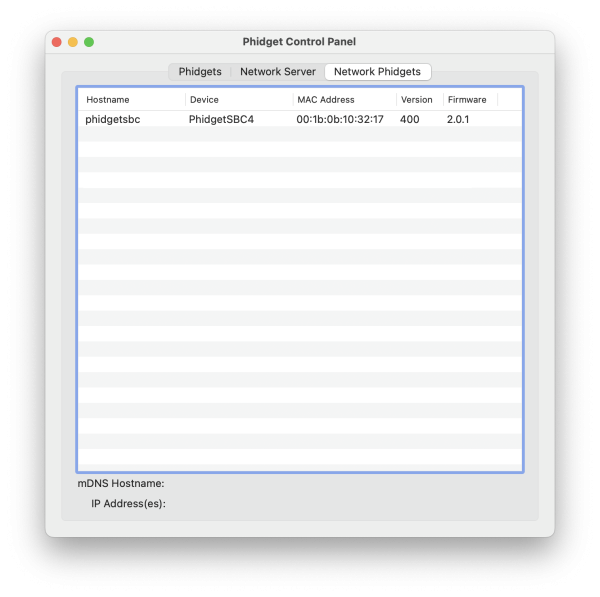
As shown in the image above, the Phidget Control Panel will relay the following information to you:
Next, double-click on your SBC in the Phidget Control Panel. This will automatically open the SBC Web Interface, which, conveniently enough, is our next topic! Jump ahead to the SBC Web Interface.
First things first: make sure you have the latest Phidget drivers installed on your machine. Head over to the getting started with Linux section on the Linux page in order to get everything installed.
Now that your machine is ready to go, type the following command into the terminal:
phidget22admin -s
Your terminal will look something like this:
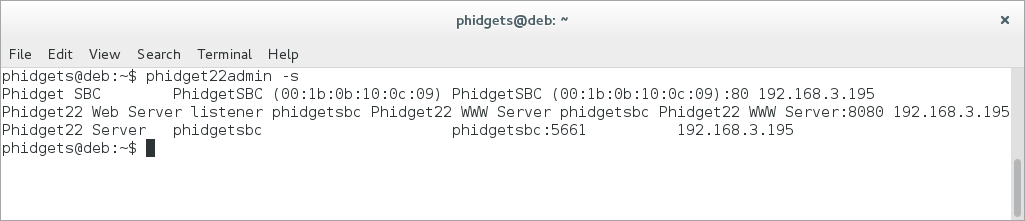
As shown in the image above, the phidget22admin call will relay the following information to you:
Now that you know the IP address that has been assigned to the SBC, type it into a web browser and hit enter. This will open the SBC Web Interface, which, conveniently enough, is our next topic!
The SBC Web Interface is a powerful tool that will prove invaluable when you begin development. You opened the SBC Web Interface in the previous step, so let`s jump right in and set a password!
The first time you open the SBC Web Interface, you will be greeted with this screen:
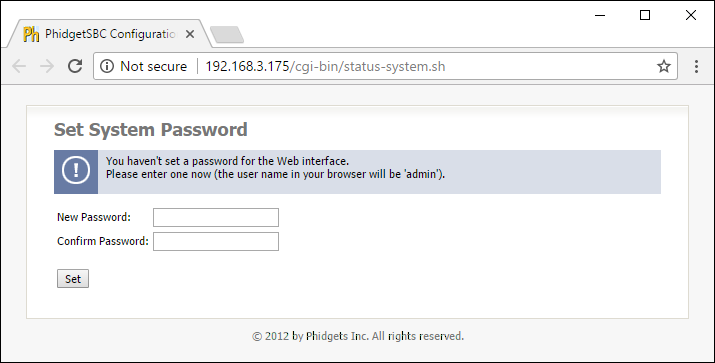
You will use this password in the following situations:
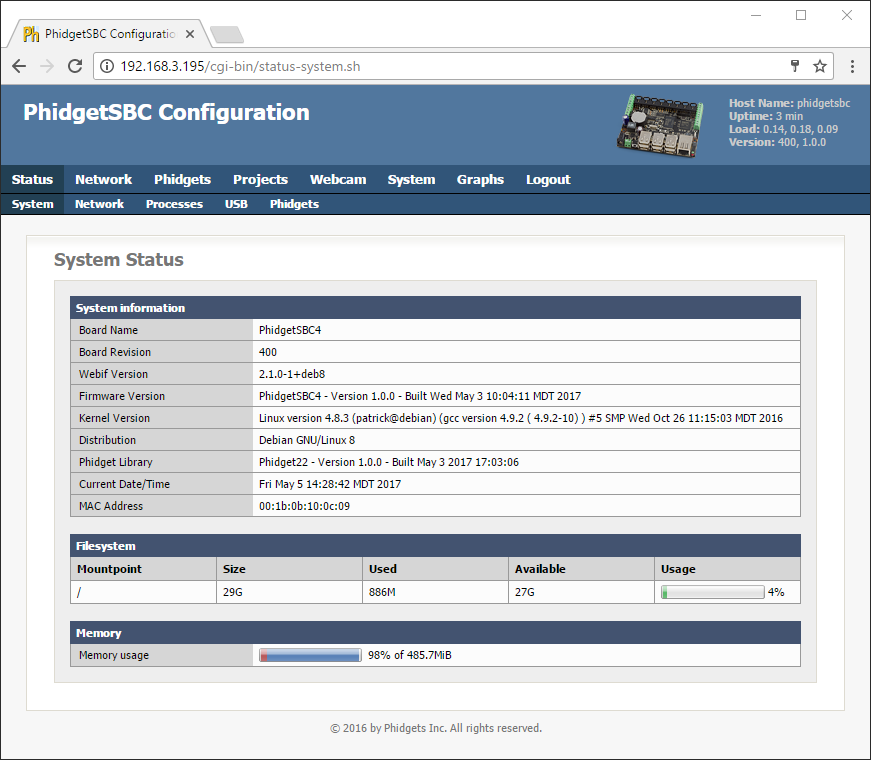
Welcome to the SBC homepage! Here you can view system information such as the firmware version, the amount of storage you have left, and more. Take a minute to look around, and, when you're ready, we will give an overview of the SBC Web Interface, starting with networking.
We strongly recommend you update your packages before you start using your SBC. This will make sure that all of the software is up to date and will fix many potential issues with compiling code and using the Phidget Control Panel. To update your packages, go to System -> Packages.

Then, scroll to the bottom of the list and click on "Refresh Available Packages". It will take a few minutes to refresh the packages. Then, click on "Upgrade All Packages".
You can connect to your network in two ways with the SBC:
The SBC will try to connect to Ethernet first. It can also switch between Wi-Fi and Ethernet on the fly. If you're following this guide, you've already set up your network using an Ethernet cable by simply plugging it in. Next, we will take a look at setting up Wi-Fi.
To set up Wi-Fi on the SBC, first plug in your Wi-Fi USB adapter. Next, navigate to Network->Wireless and your screen will look something like this:
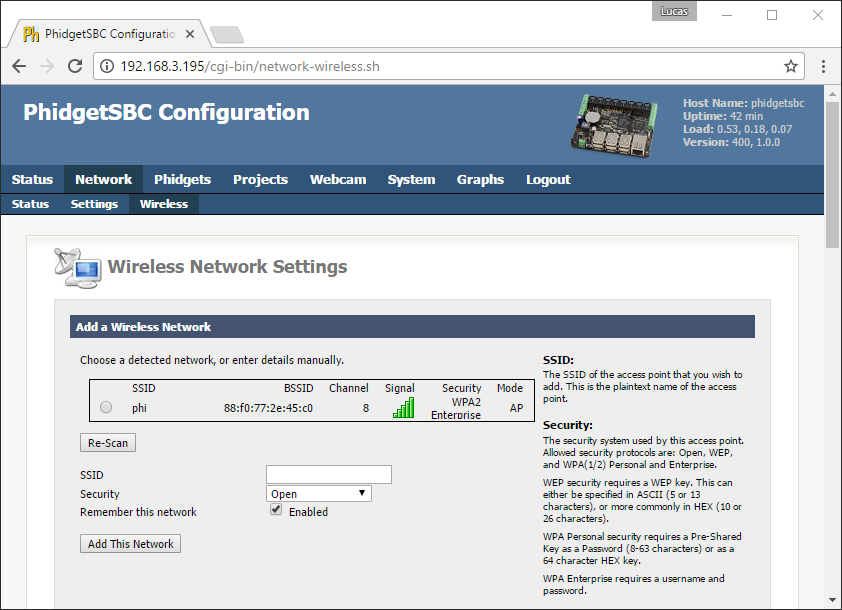
Add your Wi-Fi network by selecting it from the list, providing any necessary credentials, and clicking the Add This Network button.
Here are some useful Wi-Fi tips:
Next, we will cover setting a static IP with the SBC Web Interface.
Don't have DHCP on your main network? Not to worry, you can easily set up a static IP with the SBC:
Now simply enter your network configuration and save the changes. The SBC will immediately start to use the static IP.
Warning: setting a static IP improperly can make the SBC very hard to re-connect to depending on the routing within the rest of your network.
Now that your networking is set up, let's take a look at which Phidgets are attached to the SBC. Do this by navigating to Phidgets->Status. Your screen should look something like this:
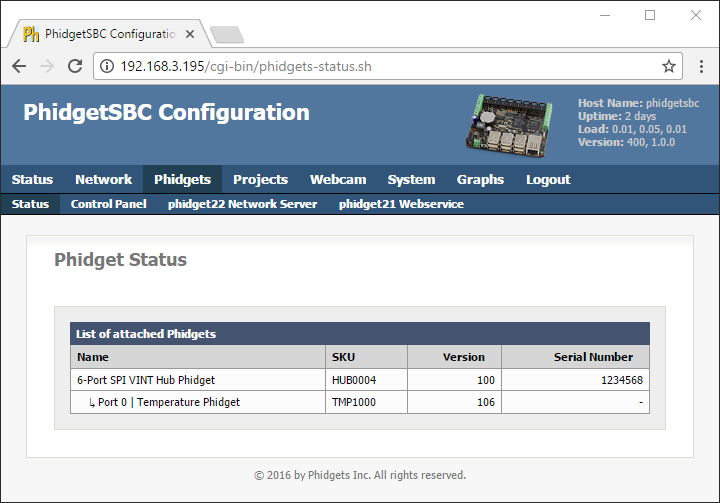
Notes about attached Phidgets:
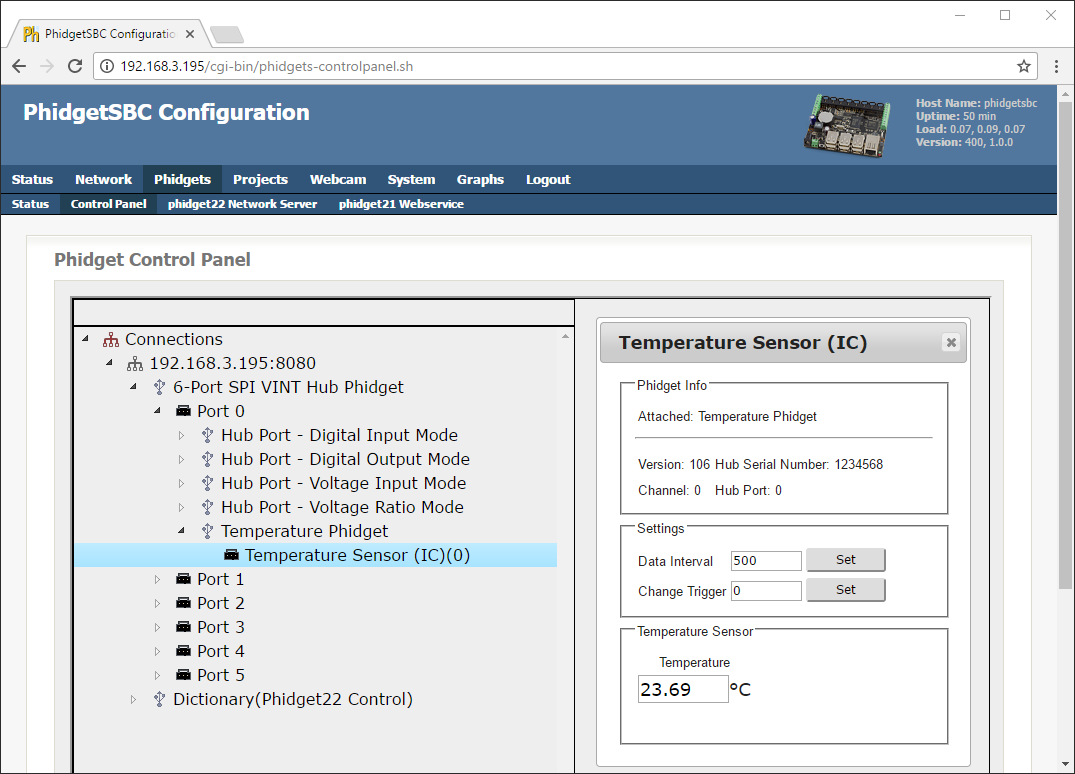
After you confirm which Phidgets are attached to your SBC, navigate to Phidgets->Control Panel. Here, you can test your Phidgets and learn more about their functionality.
If you would like to use a webcam with the SBC, ensure it is a UVC (USB Video Class) compatible webcam that supports MJPEG. Next, simply plug it into the SBC and navigate to the Webcam tab.
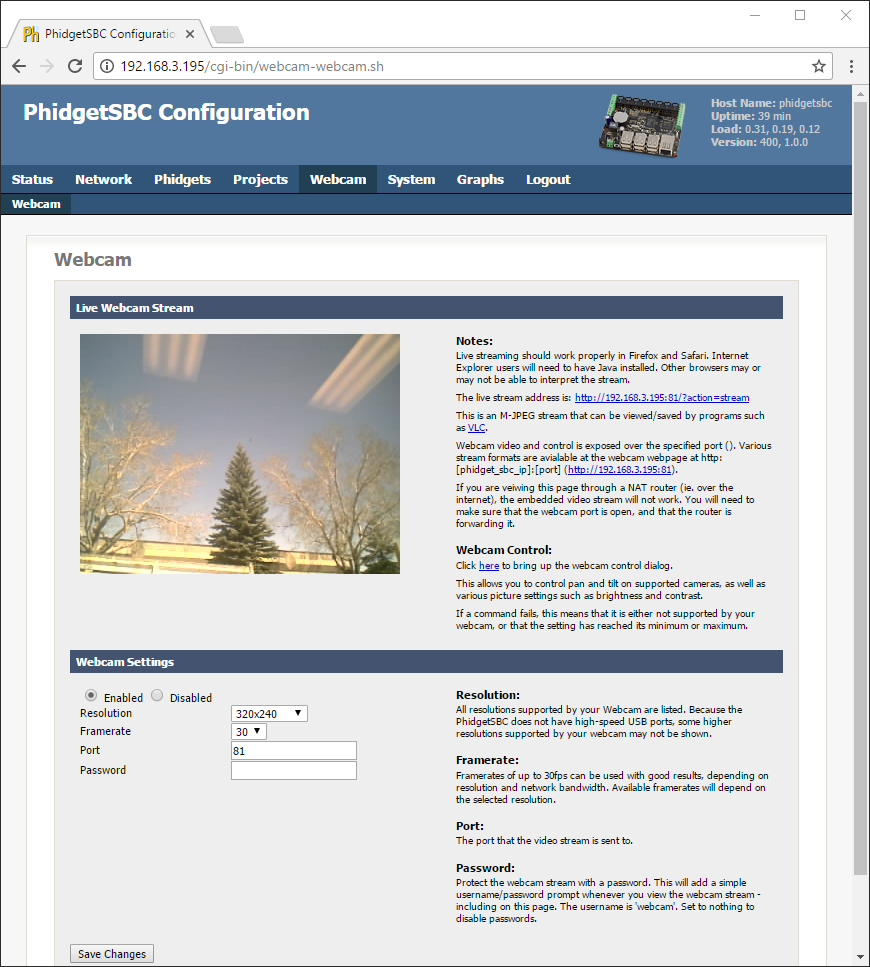
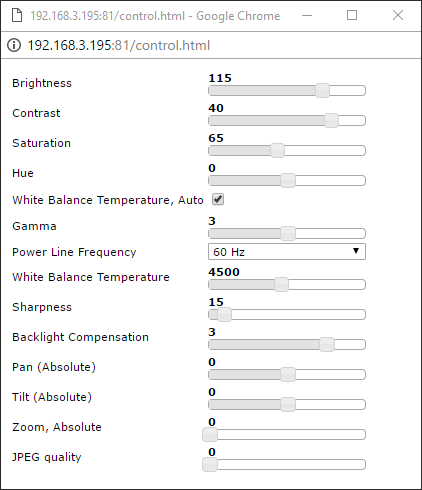
Take a minute to play around with the different resolutions and frame rates available. Also, be sure to check out the webcam control dialog shown below:
Notes about using a webcam:
For more in-depth information on developing on the PhidgetSBC, see the OS - Phidget SBC page.
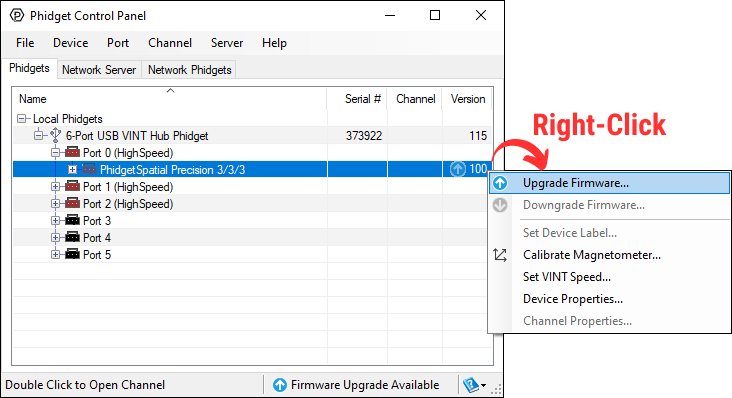
Firmware Upgrade
MacOS users can upgrade device firmware by double-clicking the device row in the Phidget Control Panel.
Linux users can upgrade via the phidget22admin tool (see included readme for instructions).
Windows users can upgrade the firmware for this device using the Phidget Control Panel as shown below.
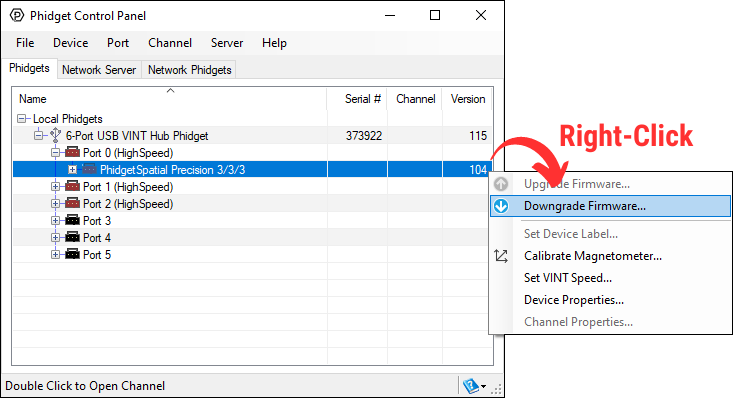
Firmware Downgrade
Firmware upgrades include important bug fixes and performance improvements, but there are some situations where you may want to revert to an old version of the firmware (for instance, when an application you're using is compiled using an older version of phidget22 that doesn't recognize the new firmware).
MacOS and Linux users can downgrade using the phidget22admin tool in the terminal (see included readme for instructions).
Windows users can downgrade directly from the Phidget Control Panel if they have driver version 1.9.20220112 or newer:
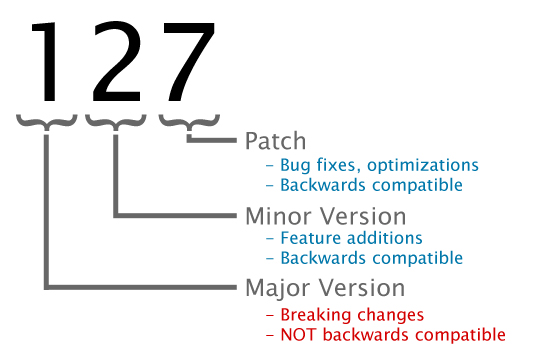
Firmware Version Numbering Schema
Phidgets device firmware is represented by a 3-digit number. For firmware patch notes, see the device history section on the Specifications tab on your device's product page.
You can find a directory of Armbian packages here.
We have both desktop and server versions available. The Armbian release is more like a general Linux release with the Phidget libraries bundled in, whereas the default OS on the PhidgetSBC is kept very minimal to improve boot time and performance for Phidget-focused tasks.
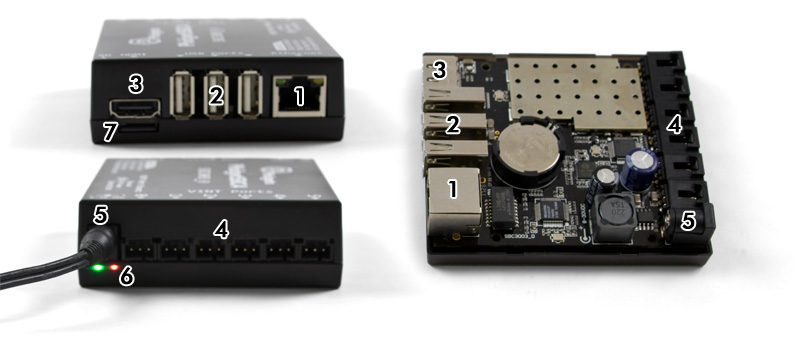
If you plan on connecting more than 3 USB devices to the SBC4, you'll need to use a USB Hub. If you do, make sure you plug it into one of the ports highlighted in green below:
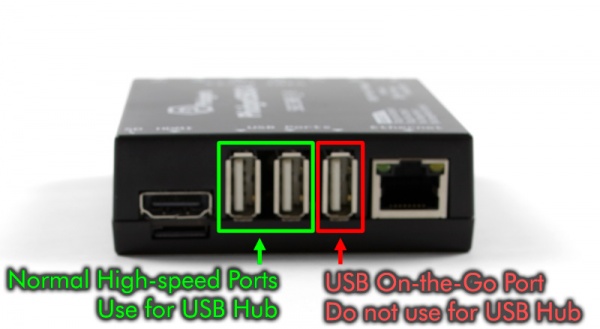
The port highlighted in red is a USB On-the-go port, which functions as a normal USB port except that connecting multiple devices to it using a USB hub will cause those devices to be unstable and to disconnect unexpectedly.
If the devices you're plugging into your hub are rated for a total of 500mA or more, you should use an externally powered USB hub.
The SBC4 is built around the A20 processor. This is an ARM Cortex-A7 based microprocessor from Allwinner Technology, which runs at 1 GHz. Connected to this is 512 MB of DDR3 SDRAM, and a 10/100baseT Ethernet controller. The microprocessors USB Host port is connected to 3 USB 2.0 High Speed ports.
The PhidgetSBC runs Debian/GNU Linux 9.0 as its operating system and gets booted with U-Boot.
The date and time are set using NTP (Network Time Protocol) at boot. A NTP daemon continues to run in the background and will periodically update the clock, ensuring the time is always accurate.
There is a real-time clock with battery backup which will preserve date/time across reboots and power removal. If power is suddenly lost, the real-time clock may not have the correct time.
The SBC3003 does not natively support factory reset functionality. However, if your SBC3003 becomes corrupt and needs to be reset to factory firmware, you can write a new image to the micro SD card (or a new card) to similar effect.
The 12V power supply is stepped down to 5V and distributed in the following way:
The configuration system used by the SBC Web Interface is stored in /etc/webif. It is not recommended to modify these files.
Check the Phidget SBC page next for a guide on how to start writing your own programs, and more!
| SBC | |
|---|---|
| CPU | Allwinner A20 |
| Core | Dual-Core ARM Cortex-A7 |
| CPU Speed | **Up to 960 MHz |
| SDRAM Size | 512 MiB |
| Boot Time | 20 s |
| Ethernet Cable | 10/100BASE-T |
| Electrical Properties | |
| Supply Voltage Min | 8 V DC |
| Supply Voltage Max | 30 V DC |
| Power Consumption Min | 1 W |
| Available External Voltage | 5 V DC |
| Available External Current | 500 mA |
| USB Hub | |
| Number of USB Ports | 3 |
| USB Speed | High Speed |
| Available Current per USB Port | 500 mA |
| Board Properties | |
| Number of VINT Ports | 6 |
| VINT Communication Speed Max | 100 kbit/s |
| Power Jack | 5.5x2.1mm, Center Positive |
| Operating Temperature Min | 0 °C |
| Operating Temperature Max | 70 °C |
| Driver Support | Phidget22 |
| Voltage Inputs | |
| Number of Voltage Inputs | 6 (Shared) |
| Voltage Input Resolution (bits) | * 16 bit |
| Sensor Input Impedance | 324 kΩ |
| Input Voltage Min (DC) | 0 V DC |
| Input Voltage Max (DC) | 5 V DC |
| Voltage Input Noise | ± 630 μV DC |
| Sampling Interval Max | 60 s/sample |
| Sampling Interval Min | 1 ms/sample |
| Digital Inputs | |
| Number of Digital Inputs | 6 (Shared) |
| Pull-up Resistance | 124 kΩ |
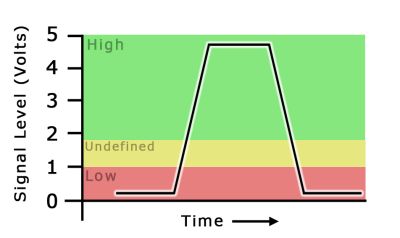
| Low Voltage Max (True) | 1 V DC |
| High Voltage Min (False) | 1.8 V DC |
| High Voltage Trigger Length Min | 3 ms |
| Low Voltage Trigger Length Min | 3 ms |
| Digital Input Voltage Max | 5.5 V DC |
| Digital Input Type | Switch (Active Low) |
| Digital Outputs | |
| Number of Digital Outputs | 6 (Shared) |
| Series Resistance | 510 Ω |
| Digital Output Available Current | 81 mA |
| Digital Output Voltage Min | 0 V DC |
| Digital Output Voltage Max | 3.3 V DC |
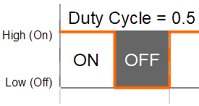
| PWM Frequency Max | 50 kHz |
| Duty Cycle Resolution | 0.8 % |
| Customs Information | |
| Canadian HS Export Code | 8471.80.00 |
| American HTS Import Code | 8471.80.40.00 |
| Country of Origin | CN (China) |
*Voltage measured with a 10-bit ADC, oversampled to 16-bits.
**This processor supports dynamic frequency scaling, which lowers the clock speed to save power depending on processing load.
| Date | Board Revision | Device Ver. | Card Image Ver. | Comment |
|---|---|---|---|---|
| September 2017 | 0 | 400 | 1.0.0 | Product Release |
| December 2017 | 0 | 400 | 1.0.1 | Updated packages; uboot for better HDMI and USB |
| March 2018 | 0 | 400 | 1.1.0 | Updated packages; Moved to 4.14.23 kernel |
| August 2018 | 0 | 400 | 1.2.0 | uboot fix (only one cpu core detected) |
| August 2018 | 0 | 400 | 1.2.1 | uboot upgraded; improved reliability |
| Date | Board Revision | Device Version | Comment |
|---|---|---|---|
| September 2017 | 0 | 101 | Product Release |
| September 2018 | 0 | 102 | Fixed spurious detach events from firing |
| January 2019 | 0 | 108 | Increased voltage input range to 5.25V |
| September 2019 | 0 | 109 | Fixed bug that reported false detaches |
| April 2020 | 0 | 110 | Added gap between wakeup pulse and sending data |
| December 2021 | 0 | 200 | Added failsafe to digital input API |
| December 2021 | 0 | 203 |
|
| January 2023 | 0 | 204 | Fixed bugs in communication between Hub and SBC |
| Digital Input | ||
|---|---|---|
| Date | Port Version | Comment |
| June 2017 | 100 | Product Release |
| Digital Output | ||
| Date | Port Version | Comment |
| June 2017 | 100 | Product Release |
| December 2021 | 110 | Added support for failsafe functionality |
| Voltage Input | ||
| Date | Port Version | Comment |
| June 2017 | 100 | Product Release |
| January 2019 | 110 | Increased input range from 5V to 5.25V |
| VoltageRatio Input | ||
| Date | Port Version | Comment |
| June 2017 | 100 | Product Release |
| Channel Name | API | Channel | Hub Port | Interface |
|---|---|---|---|---|
| Hub Port - Digital Input Mode | ||||
| Digital Input | DigitalInput | 0 | 0 - 5 | VINT |
| Hub Port - Digital Output Mode | ||||
| Digital Output | DigitalOutput | 0 | 0 - 5 | VINT |
| Hub Port - Voltage Input Mode | ||||
| Voltage Input | VoltageInput | 0 | 0 - 5 | VINT |
| Hub Port - Voltage Ratio Mode | ||||
| Voltage Ratio Input | VoltageRatioInput | 0 | 0 - 5 | VINT |
| 6-Port PhidgetSBC VINT Hub Phidget | ||||
| VINT Hub | Hub | 0 | SPI | |
| API | Detail | Language | OS | |
|---|---|---|---|---|
| DigitalInput | Visual Studio GUI | C# | Windows | Download |
| DigitalInput | Objective-C | macOS | Download | |
| DigitalInput | Swift | macOS | Download | |
| DigitalInput | Swift | iOS | Download | |
| DigitalInput | Visual Basic | Windows | Download | |
| DigitalInput | Max | Multiple | Download | |
| DigitalOutput | Visual Studio GUI | C# | Windows | Download |
| DigitalOutput | Objective-C | macOS | Download | |
| DigitalOutput | Swift | macOS | Download | |
| DigitalOutput | Swift | iOS | Download | |
| DigitalOutput | Visual Basic | Windows | Download | |
| DigitalOutput | Max | Multiple | Download | |
| VoltageInput | Visual Studio GUI | C# | Windows | Download |
| VoltageInput | Objective-C | macOS | Download | |
| VoltageInput | Swift | macOS | Download | |
| VoltageInput | Swift | iOS | Download | |
| VoltageInput | Visual Basic | Windows | Download | |
| VoltageInput | Max | Multiple | Download | |
| VoltageRatioInput | Visual Studio GUI | C# | Windows | Download |
| VoltageRatioInput | Load Cell Calibrator | C# | Windows | Download |
| VoltageRatioInput | Objective-C | macOS | Download | |
| VoltageRatioInput | Swift | macOS | Download | |
| VoltageRatioInput | Swift | iOS | Download | |
| VoltageRatioInput | Visual Basic | Windows | Download | |
| VoltageRatioInput | Max | Multiple | Download | |
| Hub | Visual Studio GUI | C# | Windows | Download |
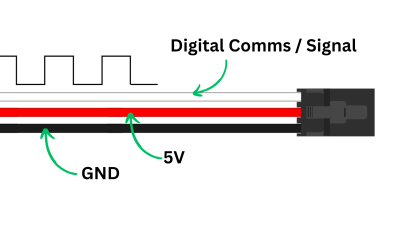
You can use Phidget cables to connect VINT devices, and analog sensors to the VINT ports on your SBC:
| Product | Physical Properties | |
|---|---|---|
| Part Number | Price | Cable Length |
 Phidget Cable 10cm
|
$1.50 | 100 mm |
 Phidget Cable 30cm
|
$1.75 | 300 mm |
 Phidget Cable 60cm
|
$2.00 | 600 mm |
 Phidget Cable 60cm
|
$2.00 | 600 mm |
 Phidget Cable 90cm
|
$2.00 | 900 mm |
 Phidget Cable 120cm
|
$2.25 | 1.2 m |
 Phidget Cable 150cm
|
$2.50 | 1.5 m |
 Phidget Cable 180cm
|
$2.75 | 1.8 m |
 Phidget Cable 350cm
|
$3.00 | 3.5 m |
 Phidget Cable Kit
|
$10.00 | 80 mm |
 Phidget Cable Extension Wire 22AWG
|
$0.75/Meter | — |
Use USB cables to connect Phidgets, keyboards, webcams or other devices to you SBC4's USB ports:
| Product | Physical Properties | |||
|---|---|---|---|---|
| Part Number | Price | Connector A | Connector B | Cable Length |
 USB-A to Mini-B Cable 28cm 24AWG
|
$3.00 | USB Type A | USB Mini-B | 280 mm |
 USB-A to Mini-B Cable 28cm Right Angle
|
$3.50 | USB Type A | USB Mini-B (90 degree) | 280 mm |
 USB-A to Mini-B Cable 60cm 24AWG
|
$3.50 | USB Type A | USB Mini-B | 600 mm |
 USB-A to Mini-B Cable 83cm Right Angle
|
$4.50 | USB Type A | USB Mini-B (90 degree) | 830 mm |
 USB-A to Mini-B Cable 120cm 24AWG
|
$4.00 | USB Type A | USB Mini-B | 1.2 m |
 USB-A to Mini-B Cable 180cm 24AWG
|
$4.00 | USB Type A | USB Mini-B | 1.8 m |
 USB-A to Mini-B Cable 450cm, 20 AWG 2C
|
$12.00 | USB Type A | USB Mini-B | 4.5 m |
 USB-C to Mini-B Cable 60cm 24AWG
|
$5.00 | USB Type C | USB Mini-B | 600 mm |
 USB-C to Mini-B Cable 180cm 24AWG
|
$6.00 | USB Type C | USB Mini-B | 1.8 m |
This Phidget requires a power supply between 6 and 30V DC. Select the power supply from the list below that matches your region's wall socket type.
| Product | Electrical Properties | Physical Properties | ||
|---|---|---|---|---|
| Part Number | Price | Power Supply Current | Output Voltage | Wall Plug Style |
 Power Supply 24VDC 14.6A
|
$40.00 | 14.6 A | 24 V | — |
 Power Supply 24VDC 25A Current Limiting
|
$120.00 | 25 A | 24 V | — |
 Power Supply 12VDC 0.5A - EU
|
$1.50 | 500 mA | 12 V | European |
 Power Supply 12VDC 0.5A - US
|
$1.50 | 500 mA | 12 V | North American |
 Power Supply 12VDC 2.0A - AU
|
$10.00 | 2 A | 12 V | Australian |
 Power Supply 12VDC 2.0A - EU
|
$10.00 | 2 A | 12 V | European |
 Power Supply 12VDC 2.0A - UK
|
$10.00 | 2 A | 12 V | British |
 Power Supply 12VDC 5A
|
$20.00 | 5 A | 12 V | — |
 Power Supply 24VDC 1.0A - US
|
$10.00 | 1 A | 24 V | North American |
 Power Supply 24VDC 2.5A
|
$20.00 | 2.5 A | 24 V | — |
 Power Supply 24VDC 5A
|
$40.00 | 5 A | 24 V | — |
 Power Supply-12VDC 2.0A - US
|
$10.00 | 2 A | 12 V | North American |
If you plan to use a power supply that doesn't have a barrel jack connection, you can use this adapter.
Connect the Phidget SBC4 to your home network with an ethernet cable:
| Product | |
|---|---|
| Part Number | Price |
 Ethernet Cable 2m
|
$3.50 |
If you need to go wireless, you can use a wifi adapter to connect to your network:
| Product | |
|---|---|
| Part Number | Price |
 Wi-Fi USB Adapter
|
$16.00 |
 Wi-Fi USB Adapter with Antenna
|
$16.00 |
This adapter allows your SBC4 to talk to serial devices:
| Product | |
|---|---|
| Part Number | Price |
 USB to Serial Converter
|
$4.00 |
 USB to Serial Converter PL2303 Chipset
|
$15.00 |
This adapter adds a speaker output and microphone input to your SBC4:
| Product | |
|---|---|
| Part Number | Price |
 USB Audio Adapter
|
$15.00 |
The following webcams are compatible with the SBC4:
| Product | |
|---|---|
| Part Number | Price |
 USB Webcam 720p
|
$45.00 |