Using Phidgets with Unity
by Brian
Unity is a development environment and game engine that runs on the .NET framework. As Phidgets has support for .NET we have had a number of users wanting to use some Phidgets products in applications built in Unity. Let's take this opportunity to see exactly how you can do that. This article assumes that you are at least somewhat familiar with both Phidgets and Unity so it won't be getting too deep into the basics of either.
Phidgets Used
Setting Up the Project
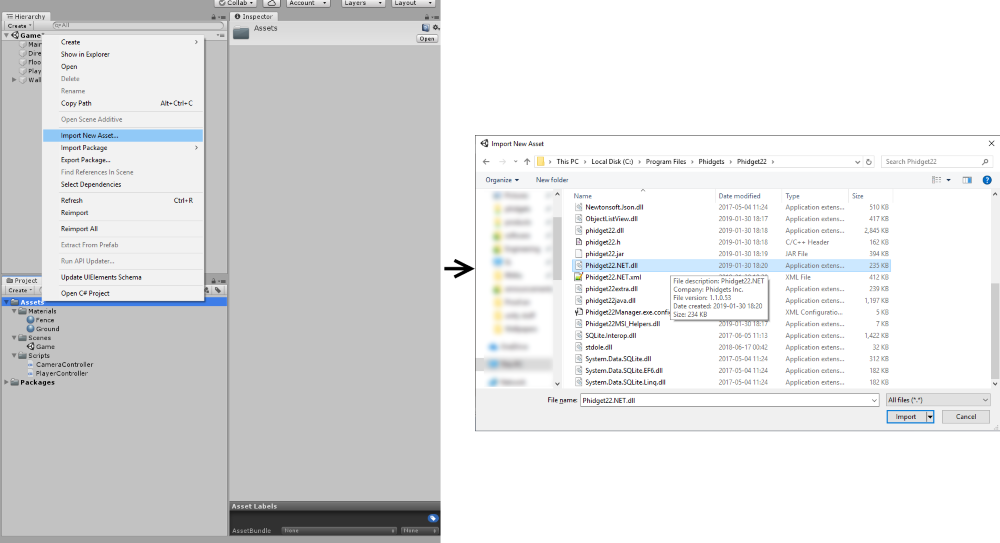
In this project I am going to adapt one of the Unity tutorial projects (Roll a Ball)) to use a Phidget thumbstick to control the ball rather than keyboard input. You should give that project at least a quick read through to understand what we are doing. Once we have our project created, we need to add a reference to the Phidget22.NET.dll in order for Unity to be able to use Phidget functions. To do this, just right click on our Assests folder under the project panel and import a new asset. Then navigate to your Phidgets installation folder and import the .NET library file.
Using Phidgets in the Project
Now we should be able to use Phidgets calls in our scripts. In order to get user input in Unity we would typically use the Input class and check on a regular interval via the Update() or FixedUpdate() routine. We could do this with Phidget code as well by polling the values in the Update() routine, but to get new input the fastest we'll just use the event handlers instead. We want to instantiate and initialize the Phidget objects in the Start() routine:
using Phidget22;
using Phidget22.Events;
void Start()
{
...
	jump.HubPort = Port;
	jump.Channel = 0;
	jump.StateChange += onStateChange;
	jump.Open();

	joystickX.HubPort = Port;
	joystickX.Channel = 0;
	joystickX.VoltageRatioChange += joystickChange;
	joystickX.Open();

	joystickY.HubPort = Port;
	joystickY.Channel = 1;
	joystickY.VoltageRatioChange += joystickChange;
	joystickY.Open();
...
}
Once we have created the objects in Start(), all that remains is to retrieve data from the device and use it as an output in Unity. To read the data we'll just use the VoltageRatioChange event handler. This code will run each time new data becomes available for this device. In that handler we'll just grab the value from the potentiometer and store it in a global variable for use in the Unity Update (or in this case FixedUpdate) routine.
private float moveHorizontal;
private float moveVertical;

...

void joystickChange(object sender, VoltageRatioInputVoltageRatioChangeEventArgs e)
{
	VoltageRatioInput axis = (VoltageRatioInput)sender;
	if(axis.Channel == 0) //X
	{
		moveHorizontal = (float)axis.VoltageRatio;
	}
	else //Y
	{
		moveVertical = -((float)axis.VoltageRatio); //inverting this axis due to orientation of my thumbstick
	}
}
Now that we have the position of the joystick we can apply this as our force value that we add to the ball:
void FixedUpdate()
{
	Vector3 movement = new Vector3(moveHorizontal, 0, moveVertical);
	player.AddForce(movement*speed);
}
The last thing that we need to do is ensure that the Phidget devices get closed properly when the program exits. Failure to do this can result in unstable behavior in the Unity editor since it doesn't unload the library and reload in between each instance of execution.
void OnApplicationQuit()
{
	joystickX.VoltageRatioChange -= joystickChange;
	joystickX.Close();
	joystickX = null;

	joystickY.VoltageRatioChange -= joystickChange;
	joystickY.Close();
	joystickY = null;

	if (Application.isEditor)
		Phidget.ResetLibrary();
	else
		Phidget.FinalizeLibrary(0);

}
That's It!
That's all there is to it. Include the .dll file, add "using Phidget22;" to the top of the script file and you're off to the races. The only other thing that might be a concern is what version of the .NET Framework you are using. Older versions of Unity are built with the .NET 2.0 framework in mind and so won't work with the default version of the Phidget22 libraries (which are on .NET 4.0). If that is the case for you then you will need to download a special version of the Phidget22.NET.dll file which you can find here.
Full Examples
Here is the complete project in case you want to try running it yourself.