MURVV Robot with JavaScript

Introduction
This project demonstrates how the Phidget JavaScript libraries can be used to control a robot.
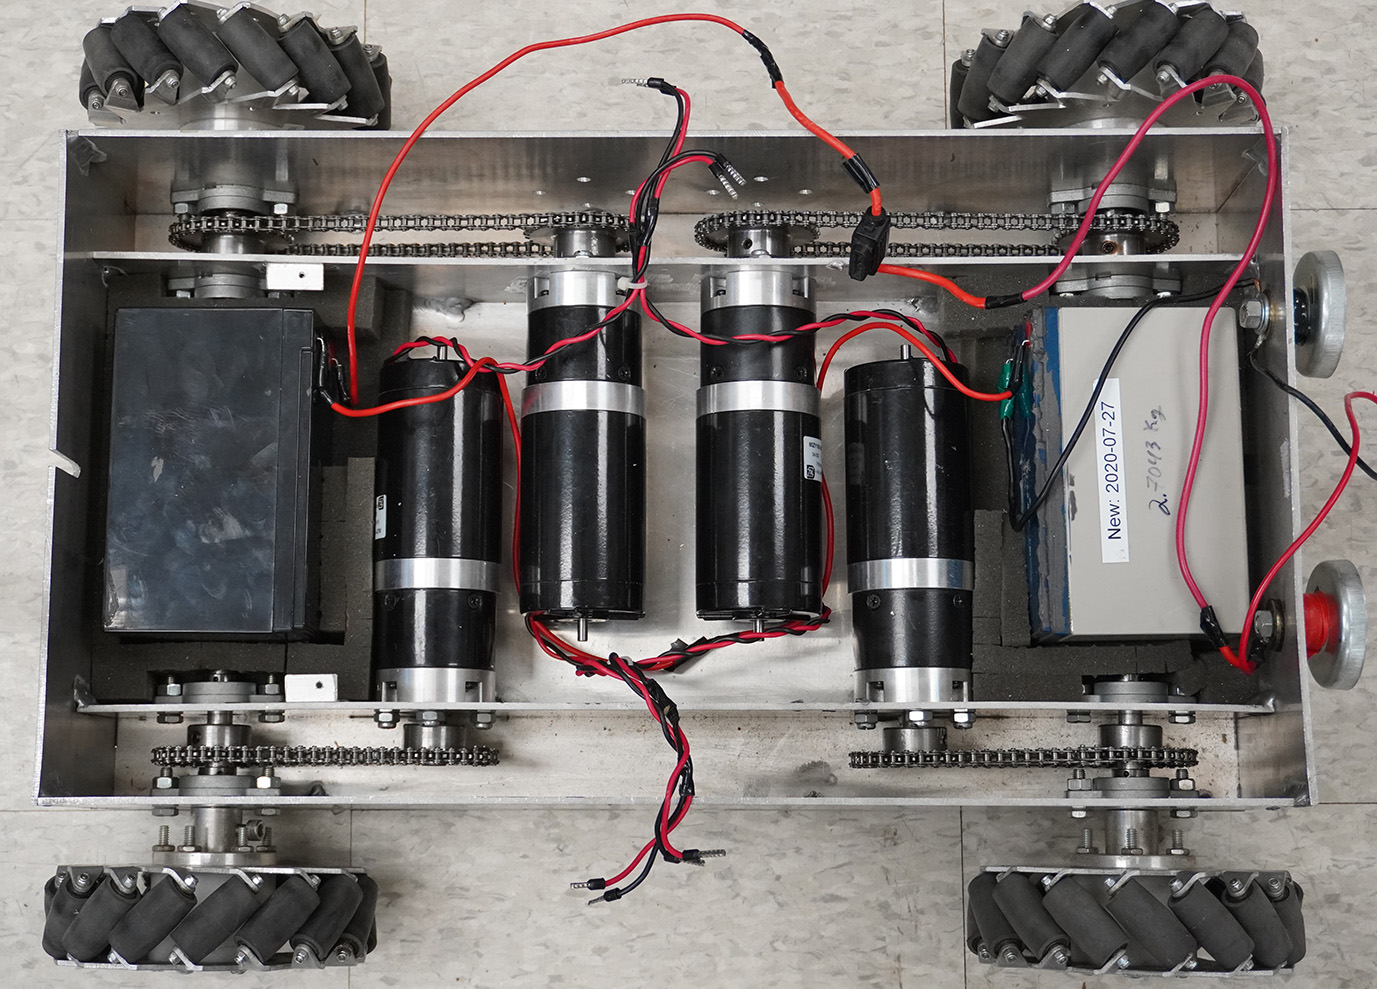
MURVV is a four-wheeled vehicle with independent motors controlling mecanum wheels. These wheels allow MURVV to move in almost any direction.
Parts
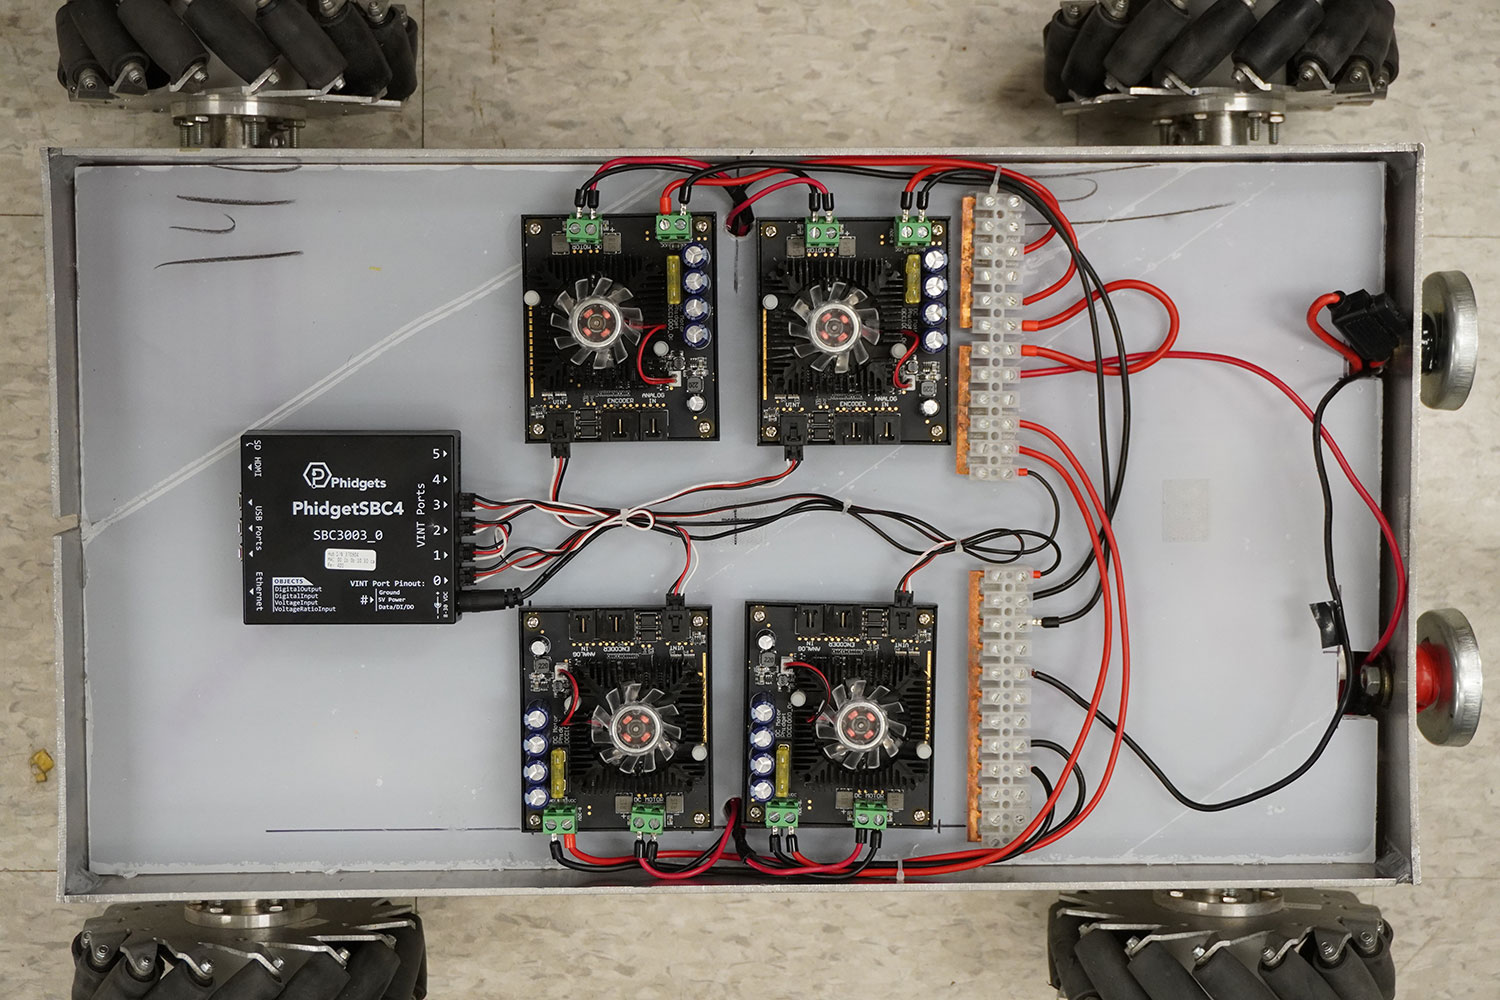
This project utilizes the following hardware:
- Phidget SBC4 - SBC3003_0
- 4x DC Motor Phidget - DCC1000_0
- WiFi USB Adapter - SBC4104_0
- USB webcam
- 4x 24V brushed DC motors
- 2x 12V lead acid batteries
A custom chassis was made for this project, including mecanum wheels, however, the components listed above can be used with any chassis.
Software
For this project, we will create a simple webpage that is hosted by the Phidget SBC4. Using the Phidget Network Server and the Phidget22 JavaScript libraries, we will send commands to the DC Motor Phidgets and remotely control the robot.
Configuration
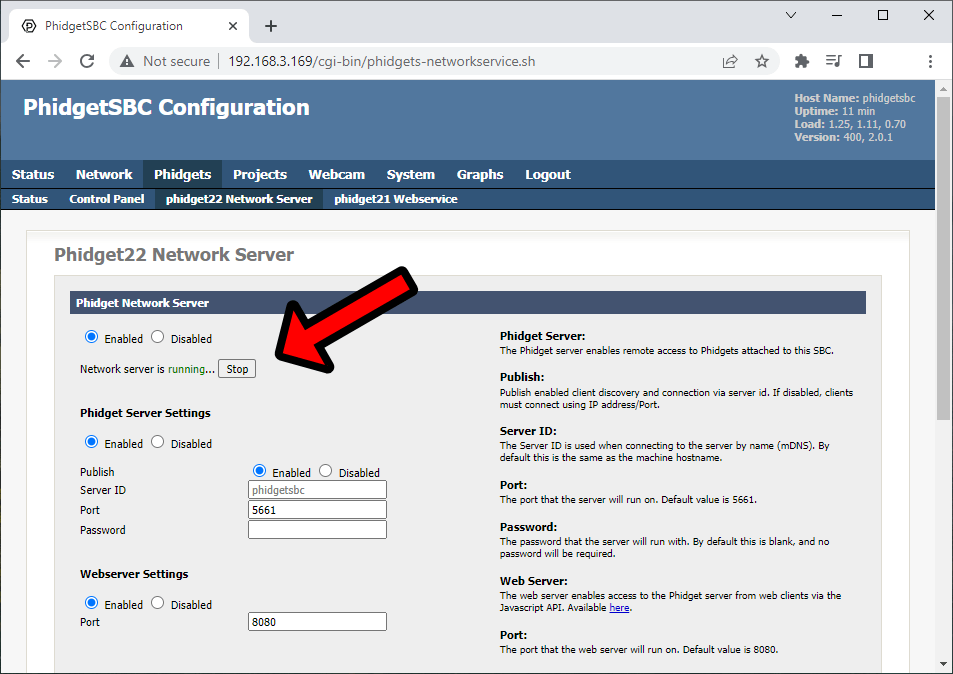
We will be using the Phidget Network Server to communicate with the DC Motor Phidgets connected to the Phidget SBC4. The Phidget Network Server can be enabled by navigating to Phidgets > phidget22 Network Server.
Webpage Code
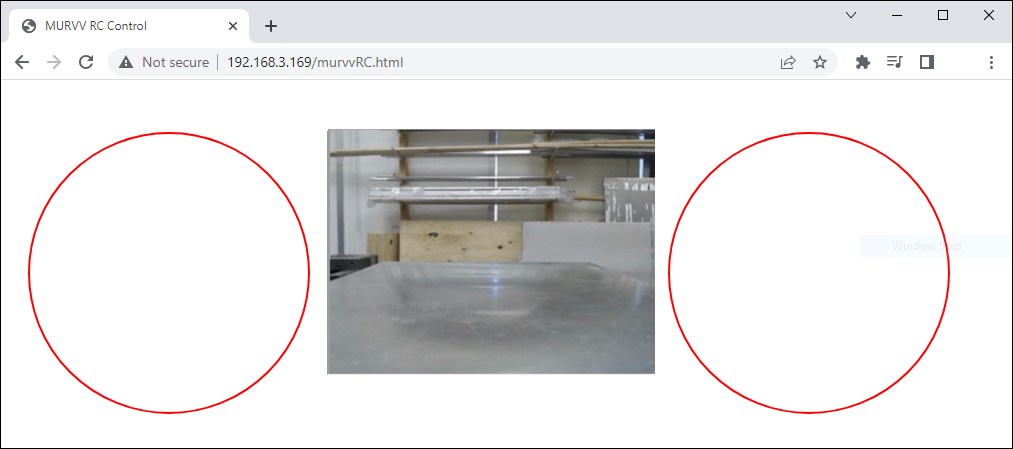
We will create an HTML file at /var/www/ titled murvvRC.html.
HTML Layout
<body>
	<div id="controlsContainer">
		<canvas id="controls" width="960" height="330" id="canvas"></canvas>
		<iframe id="iframe" width="320" height="240" src="http://phidgetsbc.local:81/?action=stream"></iframe>
	</div>
	<div class="info">
		Notice:<label id="notice"></label><br>
	</div>
</body>
JavaScript - Phidgets Init
This section of the code creates four DC Motor objects. Each object is mapped to a specific motor controller (and therefore, a specific motor) using setHubPort.
function onAttach(w) {
	console.log('Motor controller attached on hub port ', w.hubPort);
    //Make MURVV more responsive
	w.setAcceleration(50.0);
}

function onDetach (w) {
	console.log('Motor controller detached on hub port ', w.hubPort);
}

var conn = new phidget22.NetworkConnection({
	hostname: "phidgetsbc.local",
	port: 8080,
	name: "Phidget Server Connection",
	onError: function(code, msg) { console.error("Connection Error:", msg); },
	onConnect: function() { console.log("Connected"); },
	onDisconnect: function() { console.log("Disconnected"); }
});

conn.connect().catch(function(err) {
	console.error("Error during connect:", err);
});

//Create
var w_fr = new phidget22.DCMotor();
var w_fl = new phidget22.DCMotor();
var w_br = new phidget22.DCMotor();
var w_bl = new phidget22.DCMotor();

//Address
w_bl.setHubPort(0);
w_fl.setHubPort(1);
w_br.setHubPort(2);
w_fr.setHubPort(3);

//Handlers
w_bl.onAttach = onAttach;
w_bl.onDetach = onDetach;
w_fl.onAttach = onAttach;
w_fl.onDetach = onDetach;
w_br.onAttach = onAttach;
w_br.onDetach = onDetach;
w_fr.onAttach = onAttach;
w_fr.onDetach = onDetach;

//Open
w_fr.open();
w_fl.open();
w_br.open();
w_bl.open();
JavaScript - GUI Creation
This section of the code draws two red circles that will be used as virtual joysticks.
var canvas = document.getElementsByTagName('canvas')[0];
const ctx = canvas.getContext("2d");

var leftControl = {x: 0, y: 0, r: 0};
var rightControl = {x: 0, y: 0, r: 0};


leftControl.x = canvas.width / 4 - 80;
leftControl.y = canvas.height / 2 + 20;
leftControl.r = 140;
rightControl.x = canvas.width / 4 + canvas.width / 2 + 80;
rightControl.y = canvas.height / 2 + 20;
rightControl.r = 140;

//draws the control circles
ctx.lineWidth = 2;
ctx.clearRect(0, 0, canvas.width, canvas.height);
ctx.beginPath();

ctx.strokeStyle = '#FF0000';
ctx.arc(leftControl.x, leftControl.y, leftControl.r, 0, Math.PI * 2);
ctx.stroke();
ctx.beginPath();
ctx.arc(rightControl.x, rightControl.y, rightControl.r, 0, Math.PI * 2);
ctx.stroke();
JavaScript - Manage GUI
This section of the code handles touch events (this project is meant for use on a smartphone). If the intended use is a computer, you can modify this to mouse events. After a touch has been registered and the coordinates mapped, commands are sent to the DC Motor Phidgets using setTargetVelocity.
anvas.addEventListener('touchstart', handleStart, false);
canvas.addEventListener('touchend', handleEnd, false);
canvas.addEventListener('touchcancel', handleCancel, false);
canvas.addEventListener('touchmove', handleMove, false);

var x = 0;
var y = 0;

function handleStart(event) {
	x = event.touches[0].clientX;
	y = event.touches[0].clientY;
	mecanumDrive(inputCalculation());
}
function handleEnd(e) {
	x = leftControl.x;
	y = rightControl.y;
	mecanumDrive({x: 0,y: 0});
}

function handleCancel(e) {
	x = leftControl.x;
	y = rightControl.y;
	mecanumDrive({x: 0,y: 0});
}

function handleMove(e) {
	x = event.touches[0].clientX;
	y = event.touches[0].clientY;
	mecanumDrive(inputCalculation());
}


/*
* Determines which control the touch coordinates are for.
*/
function inputCalculation() {
  var cx = leftControl.x;
  var cy = leftControl.y;
  var side = 0;

  var c = { x: 0, y: 0 };
  var mag = Math.sqrt((x - cx) * (x - cx) + (y - cy) * (y - cy));

  if (mag < leftControl.r) {
    c.x = x - cx;
    c.y = y - cy;
	side = -1;
  }

  cx = rightControl.x;
  cy = rightControl.y;
  mag = Math.sqrt((x - cx) * (x - cx) + (y - cy) * (y - cy));
  if (mag < rightControl.r) {
    c.x = x - cx;
    c.y = y - cy;
	side = 1;
  }

  return [c, side];
}

function mecanumDrive(touchIn) {
	var c = touchIn[0];
	var side = touchIn[1];
	var vel = 0;

	var maxOutput = 0.4;	/* speed limiting coeff. */
		if (side == -1) {

			vel = maxOutput*c.x/140;
			$('#notice').text("turning, x: "+String(c.x)+", y: "+String(c.y));

			w_fr.setTargetVelocity(-vel);
			w_fl.setTargetVelocity(-vel);
			w_br.setTargetVelocity(-vel);
			w_bl.setTargetVelocity(-vel);

		}
		else if (side == 1) {
			if (Math.abs(c.y) >= Math.abs(c.x)) {
				vel = maxOutput*c.y/140;
				$('#notice').text("Forward / backwards, x: "+String(c.x)+", y: "+String(c.y));
				w_fr.setTargetVelocity(-vel);
				w_fl.setTargetVelocity(vel);
				w_br.setTargetVelocity(vel);
				w_bl.setTargetVelocity(-vel);
			}
			else {
				vel = maxOutput*c.x/140;
				$('#notice').text("strafing, x: "+String(c.x)+", y: "+String(c.y));
				w_fr.setTargetVelocity(vel);
				w_fl.setTargetVelocity(-vel);
				w_br.setTargetVelocity(vel);
				w_bl.setTargetVelocity(-vel);
			}
		}
		else {
				$('#notice').text("No input detected");
				w_fr.setTargetVelocity(0);
				w_fl.setTargetVelocity(0);
				w_br.setTargetVelocity(0);
				w_bl.setTargetVelocity(0);
		}
}
Result
Now MURVV can be controlled anywhere within our WiFi network! Note that the performance of this WiFi-based control is highly dependent on the signal strength of your local network.