Compass Calibration
Compass Calibration How-To Guide
Step 1: Open the Calibration Program
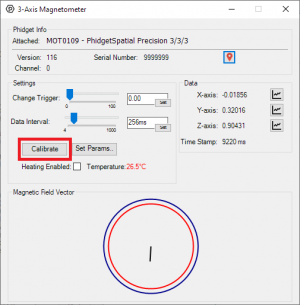
In order for your magnetometer to provide accurate heading information, it must be calibrated.
To open the Compass Calibrator, open the Magnetometer example for your device, and click the Calibrate button. This will open the Compass Calibration tool.
Step 2: Enable Heating (If applicable)
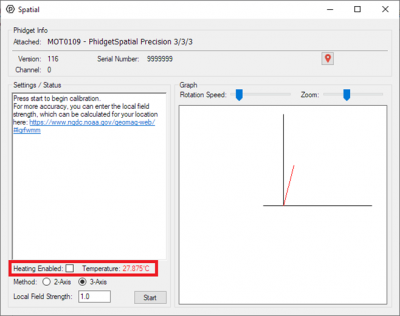
If your Spatial device supports heating, we recommend checking the HeatingEnabled checkbox and waiting for the sensor to heat up before calibrating the compass. You will know the sensor has adequately heated up once the Temperature reading to the right turns green.
If your Spatial does not support heating, you can skip this step. Neither the temperature indicator, nor the HeatingEnabled checkbox will be available in cases where they are unsupported.
Step 3: Choose Axes

Once you are ready to begin calibration, you will need to decide whether you are using 2 or 3-axis calibration. In general, if you are able to rotate your application in all directions, use 3-axis calibration. If you are limited to keeping the structure flat (e.g. in a car), we recommend 2-axis calibration.
Step 4: Set Field Strength (If required)
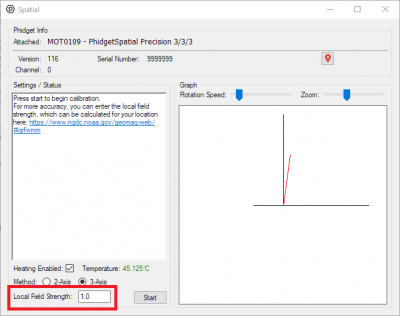
If your intended use for the magnetometer to simply get a readout of the device’s heading, you are all set to start calibrating your compass and can proceed to the next step.
If you instead want to use your magnetometer for more quantitative measurements of the actual magnetic field strength, you will need to input the local field strength in the box provided. Assuming no effects other than earth’s magnetic field, the result you obtain should be somewhere between 0.25 – 0.65 Gauss. Otherwise, since the specific magnitude doesn’t affect heading calculations, we have settled on a default assumed local field “strength” of 1.0
Step 5: Start Calibration
Once you are ready to begin calibration, click Start.
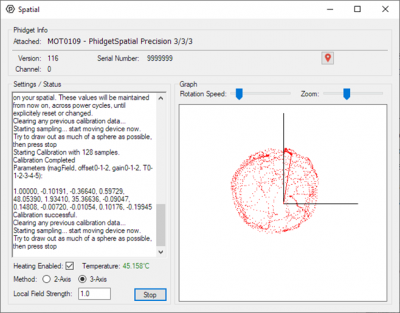
Once calibration is started, begin rotating the structure your compass is mounted to. You will notice dots on the graph indicating all the measurements taken. In 3-axis calibration, be sure to rotate the compass enough to fill out as much of a sphere as possible. In 2-axis mode, rotate so you complete a circle. Don’t worry if the shape appears squished, this is what we are compensating for.
Once you are satisfied you have enough measurements, click Stop.
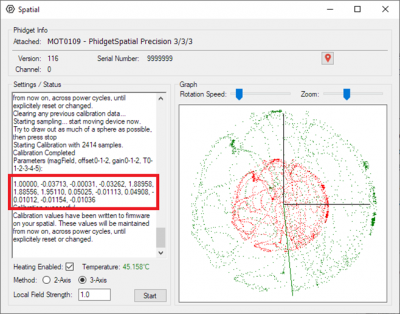
Step 6: Verifying Results

You should now see red and green spheres (or circles) depicted on the graph. The red sphere is the one you drew with the device’s raw measurements, and the green sphere is the results of those same measurements after calibration.
You should notice the green sphere is more centered than the red one. If not, try repeating calibration. New calibrated measurements from your magnetometer will be indicated by a green line, that should match the green sphere.
On most Phidget Spatials, the calibration values shown here will be saved in flash, and your compass is now calibrated to its environment, even across power cycles.
Step 7: Numerical Results (as necessary)
If, for some reason, you need the calibration parameters to send your compass again, the calibration values are listed in the text box. You can use these values in the setMagnetometerCorrectionParameters method. See our API Documentation for more details.