Read Button
In this lesson, you’ll learn how to write a program that gets input from a button!
Write Code (Java)
Copy the code below into the project you created. If you don't have a project or forgot how to create one, revisit the Configure section.
Not your programming language? Set your preferences so we can display relevant code examples
package gettingstarted;
//Add Phidgets Library | You added a file called phidget22 when configuring your project. Import gives you access to the Phidgets library code inside that file.
import com.phidget22.*;
public class GettingStarted {
//Handle Exceptions | Exceptions will happen in your code from time to time. These are caused by unexpected things happening. Make sure you’ve added "throws Exception" to your main method.
public static void main(String[] args) throws Exception{
//Create | Here you've created a DigitalInput object for your button. An object represents how you interact with your device. DigitalInput is a class from the Phidgets library that's used to read the state of your button.
DigitalInput redButton = new DigitalInput();
//Address | This tells your program where to find the device you want to work with. Your button is connected to port 0 and your code reflects that. IsHubPortDevice must be set if you are not using a Smart Phidget (more on this later).
redButton.setHubPort(0);
redButton.setIsHubPortDevice(true);
//Open | Open establishes a connection between your object and your physical Phidget. You provide a timeout value of 1000 to give the program 1000 milliseconds (1 second) to locate your Phidget. If your Phidget can't be found, an exception will be thrown.
redButton.open(1000);
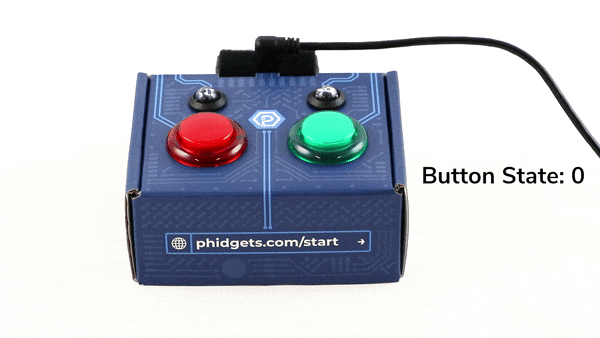
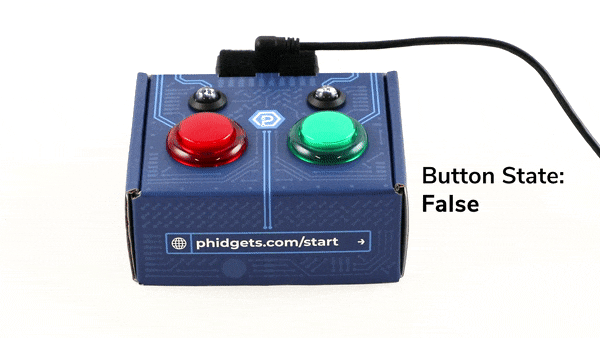
//Use your Phidgets | Here is where you use your Phidgets! This code checks the state of the button and prints true/false when the button is pressed/released. The sleep function means the button state is only checked every 150 milliseconds. Sleeping is used to make it easier to read the console output and to put less stress on your CPU.
while(true){
System.out.println("Button State: " + redButton.getState());
Thread.sleep(150);
}
}
}
//Add Phidgets Library | You added a file called phidget22 when configuring your project. Import gives you access to the Phidgets library code inside that file.
import com.phidget22.*;

public class GettingStarted {
    //Handle Exceptions | Exceptions will happen in your code from time to time. These are caused by unexpected things happening. Make sure you’ve added "throws Exception" to your main method.
    public static void main(String[] args) throws Exception{

        //Create | Here you've created a DigitalInput object for your button. An object represents how you interact with your device. DigitalInput is a class from the Phidgets library that's used to read the state of your button.
        DigitalInput redButton = new DigitalInput();

        //Address | This tells your program where to find the device you want to work with. Your button is connected to port 0 and your code reflects that. IsHubPortDevice must be set if you are not using a Smart Phidget (more on this later).
        redButton.setHubPort(0);
        redButton.setIsHubPortDevice(true);

        //Open | Open establishes a connection between your object and your physical Phidget. You provide a timeout value of 1000 to give the program 1000 milliseconds (1 second) to locate your Phidget. If your Phidget can't be found, an exception will be thrown.
        redButton.open(1000);

        //Use your Phidgets | Here is where you use your Phidgets! This code checks the state of the button and prints true/false when the button is pressed/released. The sleep function means the button state is only checked every 150 milliseconds. Sleeping is used to make it easier to read the console output and to put less stress on your CPU.
        while(true){
            System.out.println("Button State: " + redButton.getState());
            Thread.sleep(150);
        }
    }
}
//Add Phidgets Library | You added a file called phidget22 when configuring your project. Import gives you access to the Phidgets library code inside that file.
import com.phidget22.*;

//Define
DigitalInput redButton;

void setup(){
  try{

    //Create | Here you've created a DigitalOutput object for your LED. An object represents how you interact with your device. DigitalOutput is a class from the Phidgets library that's used to provide a voltage to things like LEDs.
     redButton = new DigitalInput();

    //Address | This tells your program where to find the device you want to work with. Your LED is connected to port 1 and your code reflects that. IsHubPortDevice must be set if you are not using a Smart Phidget (more on this later).
    redButton.setHubPort(0);
    redButton.setIsHubPortDevice(true);

    //Open | Open establishes a connection between your object and your physical Phidget. You provide a timeout value of 1000 to give the program 1000 milliseconds (1 second) to locate your Phidget. If your Phidget can't be found, an exception will be thrown.
    redButton.open(1000);

  }catch(Exception e){
    //Handle Exceptions | Exceptions will happen in your code from time to time. These are caused by unexpected things happening. Make sure you’ve surrounded your code with a try-catch.
    e.printStackTrace();
  }
}

void draw(){
  try{
    //Use your Phidgets | Here is where you use your Phidgets! This code checks the state of the button and prints true/false when the button is pressed/released. The sleep function means the button state is only checked every 150 milliseconds. Sleeping is used to make it easier to read the console output and to put less stress on your CPU.
    println(redButton.getState());
    delay(150);

  }catch(Exception e){
    //Handle Exceptions | Exceptions will happen in your code from time to time. These are caused by unexpected things happening. Make sure you’ve surrounded your code with a try-catch.
    e.printStackTrace();
  }
}
Write Code (Python)
Copy the code below into the project you created. If you don't have a project or forgot how to create one, revisit the Configure section.
Not your programming language? Set your preferences so we can display relevant code examples
#Add Phidgets Library | You used Python's package manager to install the Phidget libraries on your computer. The import statements below give your program access to that code.
from Phidget22.Phidget import *
from Phidget22.Devices.DigitalInput import *
#Required for sleep statement
import time

#Create | Here you've created a DigitalOutput object for your LED. An object represents how you interact with your device. DigitalOutput is a class from the Phidgets library that's used to provide a voltage to things like LEDs.
redButton = DigitalInput()

#Address | This tells your program where to find the device you want to work with. Your LED is connected to port 1 and your code reflects that. IsHubPortDevice must be set if you are not using a Smart Phidget (more on this later).
redButton.setHubPort(0)
redButton.setIsHubPortDevice(True)

#Open | Open establishes a connection between your object and your physical Phidget. You provide a timeout value of 1000 to give the program 1000 milliseconds (1 second) to locate your Phidget. If your Phidget can't be found, an exception will occur.
redButton.openWaitForAttachment(1000)

#Use your Phidgets | Here is where you use your Phidgets! This code checks the state of the button and prints true/false when the button is pressed/released. The sleep function means the button state is only checked every 150 milliseconds. Sleeping is used to make it easier to read the console output and to put less stress on your CPU.
while (True):
    print("Button State: " + str(redButton.getState()));
    time.sleep(0.15)
Write Code (C#)
Copy the code below into the project you created. If you don't have a project or forgot how to create one, revisit the Configure section.
Not your programming language? Set your preferences so we can display relevant code examples
//Add Phidgets Library | You used NuGet to install the Phidget package. The statement below give your program access to that package.
using Phidget22;

namespace GettingStarted{
    class Program{
        static void Main(string[] args){

            //Create | Here you’ve created a DigitalInput object for your Button. An object represents how you interact with your device. DigitalInput is a class from the Phidgets library that's used to read the state of your button.
            DigitalInput redButton = new DigitalInput();

            //Address | This tells your program where to find the device you want to work with. Your LED is connected to port 1 and your code reflects that. IsHubPortDevice must be set if you are not using a Smart Phidget (more on this later).
            redButton.HubPort = 0;
            redButton.IsHubPortDevice = true;

            //Open | Open establishes a connection between your object and your physical Phidget. You provide a timeout value of 1000 to give the program 1000 milliseconds (1 second) to locate your Phidget. If your Phidget can't be found, an exception will occur.
            redButton.Open(1000);

            //Use your Phidgets | Here is where you use your Phidgets! This code checks the state of the button and prints true/false when the button is pressed/released. The sleep function means the button state is only checked every 150 milliseconds. Sleeping is used to make it easier to read the console output and to put less stress on your CPU.
            while (true){
                System.Console.WriteLine("Button State: " + redButton.State);
                System.Threading.Thread.Sleep(150);
            }
        }
    }
}
Write Code (Swift)
Create a label in your window and copy the code below into the project you created. If you don't have a project or forgot how to create one, revisit the Configure section.
Not your programming language? Set your preferences so we can display relevant code examples
Create a label
import Cocoa
//Add Phidgets Library | You used cocoapods to install the Phidget library. The statement below give your program access to that code.
import Phidget22Swift
class ViewController: NSViewController {
@IBOutlet weak var buttonLabel: NSTextField!
//Create | Here you've created a DigitalOutput object for your LED. An object represents how you interact with your device. DigitalOutput is a class from the Phidgets library that's used to provide a voltage to things like LEDs.
let redButton = DigitalInput()
override func viewDidLoad() {
super.viewDidLoad()
do{
//Address | This tells your program where to find the device you want to work with. Your LED is connected to port 1 and your code reflects that. IsHubPortDevice must be set if you are not using a Smart Phidget (more on this later).
try redButton.setHubPort(0)
try redButton.setIsHubPortDevice(true)
//Subscribe to event
let _ = redButton.stateChange.addHandler(state_change)
//Open | Open establishes a connection between your object and your physical Phidget.
try redButton.open()
}catch{
print(error)
}
}
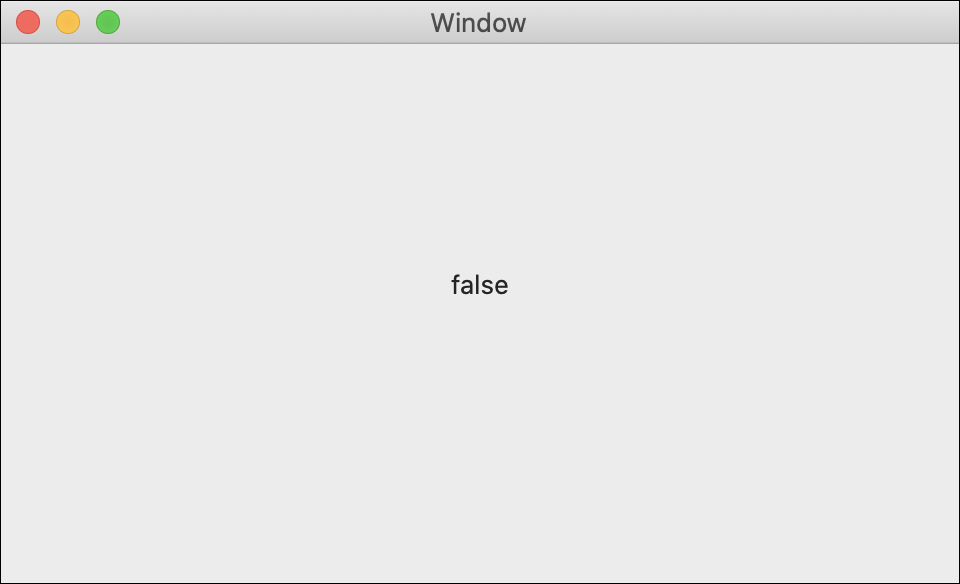
func state_change(sender:DigitalInput, state: Bool){
DispatchQueue.main.async {
//Use your Phidget | Here is where you use your Phidgets! This code will print the state of your button to the label you created.
self.buttonLabel.stringValue = String(state)
}
}
}
Run Your Program
When you press the red button, you will see the button state change.
Practice
- Modify the loop to repeat every 10ms, 1000ms, 5000ms. Note how the behavior of your program changes with the different times.
- Modify your code to print the state of your green button (Hint: Address).
- Modify your code to only print when the button state changes.
Practice
- Modify the loop to repeat every 10ms, 1000ms, 5000ms. Note how the behavior of your program changes with the different times.
- Modify your code to print the state of your green button (Hint: Address).
- Modify your code to only print when the button state changes.
Practice
- Modify the loop to repeat every 10ms, 1000ms, 5000ms. Note how the behavior of your program changes with the different times.
- Modify your code to print the state of your green button (Hint: Address).
- Modify your code to only print when the button state changes.
Practice
- Modify your program to change the label to “Pressed” and “Released” instead of true and false.
- Modify your code to print the state of your green button (Hint: Address).
Troubleshoot
I am getting a "Timed Out" exception.
- Make sure the USB cable from your VINT Hub to your computer is attached properly.
- Make sure you are connected to the correct port on your VINT Hub. In this case your red button should be connected to port 0.
- Make sure no other program is running that uses Phidgets. If a Phidget is already in use in another program, it will be busy and won't respond to this one.
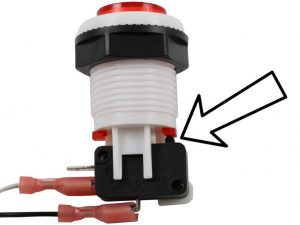
The button is not working properly.
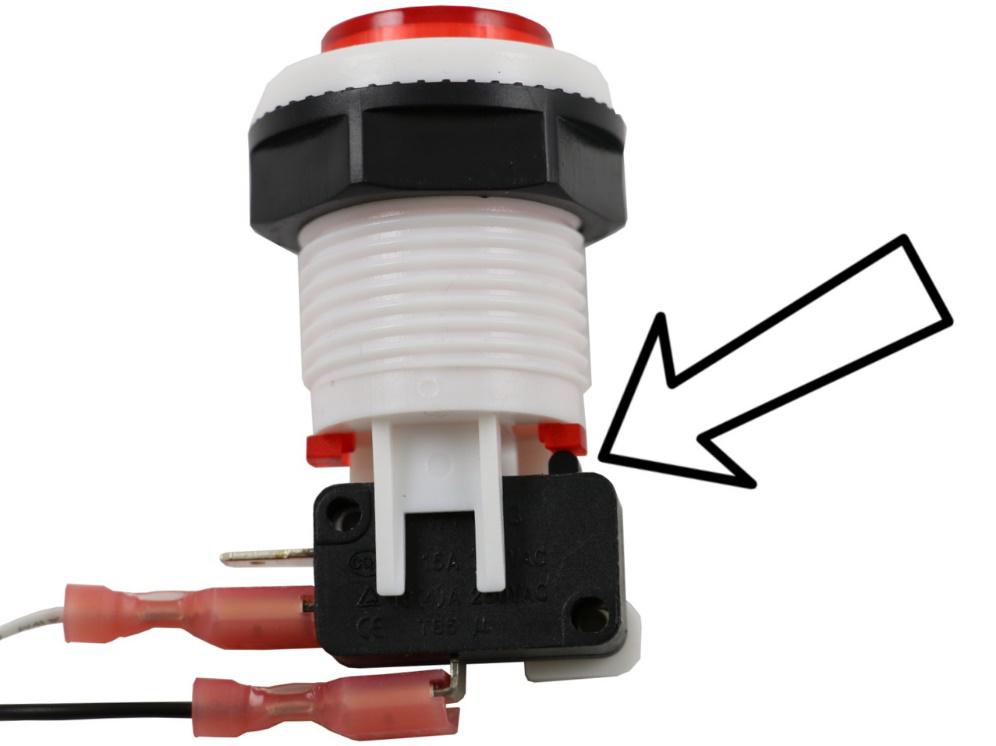
- Check the button assembly. If the switch and button are not assembled correctly your program will not work properly. The plastic plunger should align with the activator as shown below.
Still having issues?
Visit the Advanced Troubleshooting Page or contact us (education@phidgets.com).