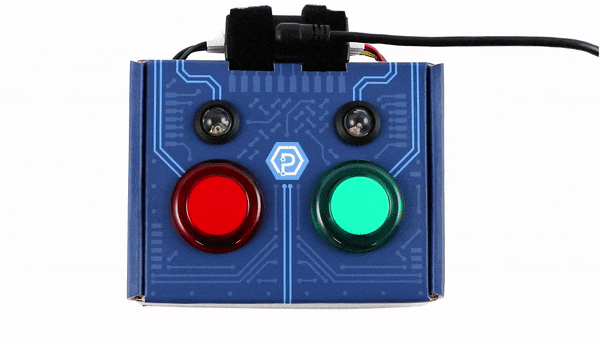
Lesson 1

Blink LED

In this lesson, you’ll learn how to write a program that blinks an LED!

Write Code (Java)

Copy the code below into the project you created. If you don't have a project or forgot how to create one, revisit the Configure section.

Not your programming language? Set your preferences so we can display relevant code examples

  
package gettingstarted;

//Add Phidgets Library | You added a file called phidget22 when configuring your project. Import gives you access to the Phidgets library code inside that file. 
import com.phidget22.*;

public class GettingStarted {
    //Handle Exceptions | Exceptions will happen in your code from time to time. These are caused by unexpected things happening. Make sure you’ve added "throws Exception" to your main method.
    public static void main(String[] args) throws Exception{

        //Create | Here you've created a DigitalOutput object for your LED. An object represents how you interact with your device. DigitalOutput is a class from the Phidgets library that's used to provide a voltage to things like LEDs.
        DigitalOutput redLED = new DigitalOutput();

        //Address | This tells your program where to find the device you want to work with. Your LED is connected to port 1 and your code reflects that. IsHubPortDevice must be set if you are not using a Smart Phidget (more on this later).
        redLED.setHubPort(1);
        redLED.setIsHubPortDevice(true);

        //Open | Open establishes a connection between your object and your physical Phidget. You provide a timeout value of 1000 to give the program 1000 milliseconds (1 second) to locate your Phidget. If your Phidget can't be found, an exception will be thrown.
        redLED.open(1000);

        //Use your Phidgets | Here is where you can have some fun and use your Phidgets! You can turn your LED on/off by setting the state to true/false. The sleep command keeps your LED on by letting 1000 milliseconds pass before turning the LED off.
        while(true){
            redLED.setState(true);
            Thread.sleep(1000);
            redLED.setState(false);
            Thread.sleep(1000);
        }
    }
}
  
  
//Add Phidgets Library | You added a file called phidget22 when configuring your project. Import gives you access to the Phidgets library code inside that file. 
import com.phidget22.*;

//Define
DigitalOutput redLED;

void setup(){
  try{
    
    //Create | Here you've created a DigitalOutput object for your LED. An object represents how you interact with your device. DigitalOutput is a class from the Phidgets library that's used to provide a voltage to things like LEDs.
    redLED = new DigitalOutput();
    
    //Address | This tells your program where to find the device you want to work with. Your LED is connected to port 1 and your code reflects that. IsHubPortDevice must be set if you are not using a Smart Phidget (more on this later). 
    redLED.setHubPort(1);
    redLED.setIsHubPortDevice(true);
    
    //Open | Open establishes a connection between your object and your physical Phidget. You provide a timeout value of 1000 to give the program 1000 milliseconds (1 second) to locate your Phidget. If your Phidget can't be found, an exception will be thrown.
    redLED.open(1000);
    
  }catch(Exception e){
    //Handle Exceptions | Exceptions will happen in your code from time to time. These are caused by unexpected things happening. Make sure you’ve surrounded your code with a try-catch.
    e.printStackTrace();
  }
}

void draw(){
  try{
    
    //Use your Phidgets | Here is where you can have some fun and use your Phidgets! You can turn your LED on/off by setting the state to true/false. The sleep command keeps your LED on by letting 1000 milliseconds pass before turning the LED off.
    redLED.setState(true);
    delay(1000);
    redLED.setState(false);
    delay(1000);
    
  }catch(Exception e){
    //Handle Exceptions | Exceptions will happen in your code from time to time. These are caused by unexpected things happening. Make sure you’ve surrounded your code with a try-catch.
    e.printStackTrace();
  }
}
  

Write Code (Python)

Copy the code below into the project you created. If you don't have a project or forgot how to create one, revisit the Configure section.

Not your programming language? Set your preferences so we can display relevant code examples

  
#Add Phidgets Library | You used Python's package manager to install the Phidget libraries on your computer. The import statements below give your program access to that code.
from Phidget22.Phidget import *
from Phidget22.Devices.DigitalOutput import *
#Required for sleep statement
import time

#Create | Here you've created a DigitalOutput object for your LED. An object represents how you interact with your device. DigitalOutput is a class from the Phidgets library that's used to provide a voltage to things like LEDs.
redLED = DigitalOutput()

#Address | This tells your program where to find the device you want to work with. Your LED is connected to port 1 and your code reflects that. IsHubPortDevice must be set if you are not using a Smart Phidget (more on this later).
redLED.setHubPort(1)
redLED.setIsHubPortDevice(True)

#Open | Open establishes a connection between your object and your physical Phidget. You provide a timeout value of 1000 to give the program 1000 milliseconds (1 second) to locate your Phidget. If your Phidget can't be found, an exception occurs.
redLED.openWaitForAttachment(1000)

#Use your Phidgets | Here is where you can have some fun and use your Phidgets! You can turn your LED on/off by setting the state to true/false. The sleep command keeps your LED on by letting 1 second pass before turning the LED off.
while(True):
    redLED.setState(True)
    time.sleep(1)
    redLED.setState(False)
    time.sleep(1)
  

Write Code (C#)

Copy the code below into the project you created. If you don't have a project or forgot how to create one, revisit the Configure section.

Not your programming language? Set your preferences so we can display relevant code examples

  
//Add Phidgets Library | You used NuGet to install the Phidget package. The statement below give your program access to that package.
using Phidget22;

namespace GettingStarted{
    class Program{
        static void Main(string[] args){
            
            //Create | Here you've created a DigitalOutput object for your LED. An object represents how you interact with your device. DigitalOutput is a class from the Phidgets library that's used to provide a voltage to things like LEDs.
            DigitalOutput redLED = new DigitalOutput();

            //Address | This tells your program where to find the device you want to work with. Your LED is connected to port 1 and your code reflects that. IsHubPortDevice must be set if you are not using a Smart Phidget (more on this later).
            redLED.HubPort = 1;
            redLED.IsHubPortDevice = true;

            //Open | Open establishes a connection between your object and your physical Phidget. You provide a timeout value of 1000 to give the program 1000 milliseconds (1 second) to locate your Phidget. If your Phidget can't be found, an exception will occur.
            redLED.Open(1000);

            //Use your Phidgets | Here is where you can have some fun and use your Phidgets! You can turn your LED on/off by setting the state to true/false. The sleep command keeps your LED on by letting 1000 milliseconds pass before turning the LED off.
            while (true)
            {
                redLED.State = true;
                System.Threading.Thread.Sleep(1000);
                redLED.State = false;
                System.Threading.Thread.Sleep(1000);
            }
        }
    }
}
  

Write Code (Swift)

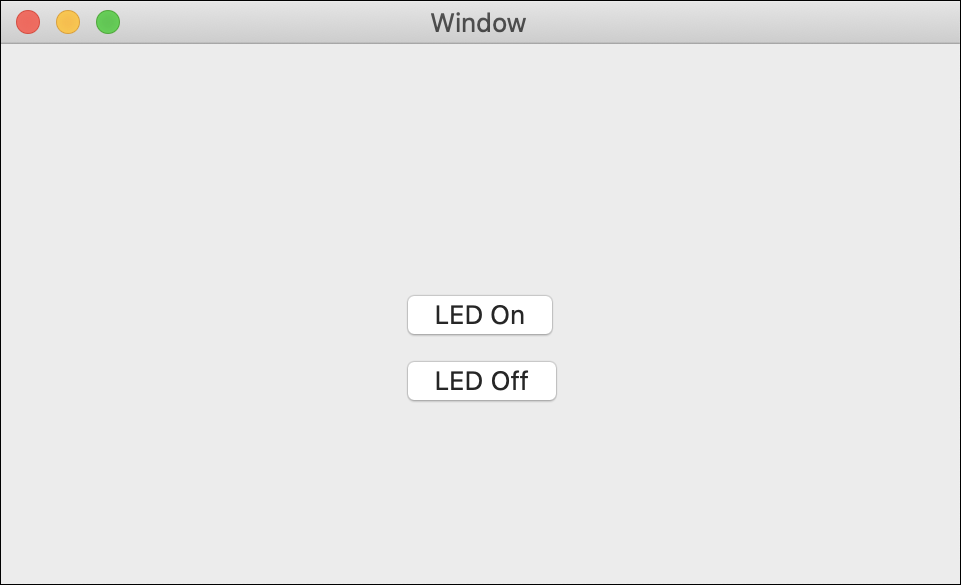
Create two buttons in your window and copy the code below into the project you created. If you don't have a project or forgot how to create one, revisit the Configure section.

Not your programming language? Set your preferences so we can display relevant code examples

Create two buttons

  
import Cocoa
//Add Phidgets Library | You used cocoapods to install the Phidget library. The statement below give your program access to that code.
import Phidget22Swift

class ViewController: NSViewController {

    //Create | Here you've created a DigitalOutput object for your LED. An object represents how you interact with your device. DigitalOutput is a class from the Phidgets library that's used to provide a voltage to things like LEDs.
    let redLED = DigitalOutput()
    
    override func viewDidLoad() {
        super.viewDidLoad()
        do{
            //Address | This tells your program where to find the device you want to work with. Your LED is connected to port 1 and your code reflects that. IsHubPortDevice must be set if you are not using a Smart Phidget (more on this later).
            try redLED.setHubPort(1)
            try redLED.setIsHubPortDevice(true)
            
            //Open | Open establishes a connection between your object and your physical Phidget.
            try redLED.open()
        }catch{
            print(error)
        }
    }
    
    @IBAction func turnLEDOn(_ sender: Any) {
        do{
            //Use your Phidgets | Here is where you can have some fun and use your Phidgets! You can turn your LED on by setting the state to true.
            try redLED.setState(true)
        }catch{
            print(error)
        }
    }
    
    @IBAction func turnLEDOff(_ sender: Any) {
        do{
            //Use your Phidgets | Here is where you can have some fun and use your Phidgets! You can turn your LED off by setting the state to false.
            try redLED.setState(false)
        }catch{
            print(error)
        }
    }   
}
  

Run Your Program

You will see the red LED blink.

Run Your Program

You will see the red LED blink.

Run Your Program

You will see the red LED blink.

Run Your Program

Click on the buttons to turn the red LED on and off.

Practice

  1. Modify your code so the LED stays on for 2 seconds.
  2. Modify your code so the LED flashes on and off 3 times.
  3. Modify your code to flash the green LED. (Hint: Address)
Solutions available for educators. Email us for access.

Practice

  1. Modify your code so the LED stays on for 2 seconds.
  2. Modify your code so the LED flashes on and off 3 times.
  3. Modify your code to flash the green LED. (Hint: Address)
Solutions available for educators. Email us for access.

Practice

  1. Modify your code so the LED stays on for 2 seconds.
  2. Modify your code so the LED flashes on and off 3 times.
  3. Modify your code to flash the green LED. (Hint: Address)
Solutions available for educators. Email us for access.

Practice

  1. Modify your code so only one button is used to turn the LED on and off.
  2. Modify your code to flash the green LED. (Hint: Address)
Solutions available for educators. Email us for access.
Troubleshoot

I am getting a "Timed Out" exception.

  1. Make sure the USB cable from your VINT Hub to your computer is attached properly.
  2. Make sure you are connected to the correct port on your VINT Hub. In this case your red LED should be connected to port 1.
  3. Make sure no other program is running that uses Phidgets. If a Phidget is already in use in another program, it will be busy and won't respond to this one.

I can't see the LED flash.

  1. The LED flash is quick, make sure you are looking the the Getting Started Kit when you run your program.
  2. If you think you have a defective LED, try swapping it out for another (a classmates or the green LED). If you do have a defective LED, take one from your classroom's spare kits or contact us.
  3. If you are using PyCharm make sure you have the correct script selected. Sometimes, if you have more than one Python file in your project, you may be running the wrong script. You can select the script from the drop-down menu in the top right corner.

Still having issues?

Visit the Advanced Troubleshooting Page or contact us (education@phidgets.com).

What are Phidgets?

Phidgets are programmable USB sensors. Simply plug in your sensor, write code in your favorite language and go!

Phidgets have been used by STEM professionals for over 20 years and are now available to students.

Learn more

Set your preferences

Windows

Mac OS

Raspberry Pi

Java

Python

C#

Swift

NetBeans

Processing

Eclipse

Thonny

PyCharm

PyScripter

Visual Studio

Xcode

Setting your preferred operating system, programming language and environment lets us display relevant code samples for the Getting Started Tutorial, Device Tutorials and Projects

Done