<metadesc>Control the position, velocity, and acceleration of a stepper from your VINT port with the 2.5A Stepper Phidget. Connects to a port on your VINT Hub.</metadesc>
<metadesc>Control the position, velocity, and acceleration of a stepper from your VINT port with the 2.5A Stepper Phidget. Connects to a port on your VINT Hub.</metadesc>
For installation instructions for these packages, see the README file included with each one.
Step 2: Connect Devices
● Connect USB Cable to your Linux Computer
● Connect VINT Device(s)
Step 3: Verify Connection
1. The easiest way to verify that your libraries are working properly is to compile and run an example program. Download and unpack this C example that will
detect any Phidget:
2. Next, open the terminal in the location where you unpacked the example. Compile and run using:
gcc HelloWorld.c -o HelloWorld -lphidget22
sudo ./HelloWorld
ou should receive a “Hello” line for each Phidget channel that is discovered:
I don’t see any Phidgets show up in the HelloWorld example
You need to run it with sudo in order to be able to access USB devices. In order to use
Phidgets without sudo, you need to set your udev rules. See the Advanced Information page on the final slide of this guide for details.
Done!
If you're able to see your devices in the Hello World example, you're done with the Setup part of this guide.
Scroll down to Part 2: Using Your Phidget for the next step.
For more info installing in Linux (e.g. Udev rules, old versions, etc.), visit this page:
If you're unsure which one you should get, press ⊞ WIN + Pause/Break:
Before installing our libraries, be sure to read our Software License.
Step 1: Install Phidgets Library
2. Open the download. If it asks you for permission, select Run
Step 1: Install Phidgets Library
3a. Select Next
Step 1: Install Phidgets Library
3b. Read the Licence Agreement. Select Next.
Step 1: Install Phidgets Library
3c. Choose Installation Location. Select Next.
Step 1: Install Phidgets Library
3d. Select Next to confirm install.
Step 1: Install Phidgets Library
3e. Wait for Installation to complete. This should only take a few moments.
Step 1: Install Phidgets Library
3f. Installation Complete. Close installation Window.
Step 2: Connect Devices
● Connect Power Jack
● Connect VINT Device(s)
● Connect Ethernet to a Router or Switch (optional)
Step 3: Verify Connection
Choose a setup method:
Configure with mobile device
Connect with ethernet cable
(Requires physical access to router or switch)
«
»
Connection (Mobile)
Step 3: Connect Wireless
1. When you connect the power supply to the HUB5000, the red LED should turn on.
Step 3: Connect Wireless
2. On your mobile device, go to the Wi-Fi settings and connect to the HUB5000:
Step 3: Connect Wireless
3. When asked for a password, enter the password printed on the HUB5000’s label.
Step 3: Connect Wireless
4. Once your device is connected to the HUB5000’s WiFi signal:
Click on the WiFi network and find an option that says “Manage router” or “Visit homepage”.
Go to your internet browser and type 192.168.100.1 in the address bar.
Step 3: Connect Wireless
5. Create a password for your HUB5000. You'll use it to access the Configure Page from now on.
Step 3: Connect Wireless
6. Navigate to the network page. Change the Mode to Client.
Step 3: Connect Wireless
7. Enter your Wifi Network details and click Save & Apply. It may take a few minutes for your Phidgets to appear in the Phidget Control Panel, which
we’ll check in the next step.
Step 4: Verify Connection
1. Open the Phidgets Control Panel:
If your Control Panel does not open, look in your taskbar. Double click the Phidget Icon.
Step 4: Verify Connection
2. If connected, your Phidgets will appear in the Phidget Control Panel.
Step 5: Update
Now that you've confirmed that you have access to your Phidgets, you should ensure the HUB5000 is fully updated. You can update the firmware of the VINT Hub by
going back to the Phidget Control Panel. If there's a blue arrow beside the version number, it means an update is available:
Right-click anywhere on that row and select Upgrade Firmware. When it's done, the number in the Version column will change.
Step 5: Update
Next, to update the OS firmware, go to the Network Phidgets tab in the control panel, find your HUB5000 and double-click on it. If the OS firmware is out
of date, you'll see the following window pop up with steps to follow:
1. Download the firmware (you can get it here if the button does not
work)
2. Open the web interface by clicking the button or entering the HUB5000's IP address in your web browser.
3. Go to the System tab and scroll down to the Upgrade Firmware section. Select the file you just downloaded and click Upgrade and Restart.
You'll be instructed to wait a few minutes before logging back into the web interface.
Step 5: Update
When you log back in, you can confirm that the new version has successfully installed by checking to see if the firmware version listed in the
Status section matches the first three numbers in the firmware file name that you downloaded. You can also check the version in the
Network Phidgets tab on the Phidget Control Panel.
Done!
Now that you're able to see and interact with your devices in the Phidget Control Panel and they're fully updated, you're done with the Setup part of this
guide.
Scroll down to Part 2: Using Your Phidget for the next step.
For more help installing in Windows (e.g. manual install, using a VM, etc.), visit this page:
1. When you connect the power supply to the HUB5000, the red LED should turn on.
Step 3: Connect Wireless
2. In your Web Browser, enter hub5000.local
Step 3: Connect Wireless
3. Create a password for your HUB5000. You'll use this password to access the Configure Page from now on.
Step 3: Connect Wireless
4. Navigate to the network page. Change the Mode to Client.
Step 3: Connect Wireless
5. Enter your Wifi Network details to use your Hub wirelessly and click Save & Apply. You can then disconnect the ethernet cable.
It may take a few minutes for your Phidgets to appear in the Phidget Control Panel, which we’ll check in the next step.
Step 4: Verify Connection
1. Open the Phidgets Control Panel:
If your Control Panel does not open, look in your taskbar. Double click the Phidget Icon.
Step 4: Verify Connection
2. If connected, your Phidgets will appear in the Phidget Control Panel.
Step 5: Update
Now that you've confirmed that you have access to your Phidgets, you should ensure the HUB5000 is fully updated. You can update the firmware of the VINT Hub by
going back to the Phidget Control Panel. If there's a blue arrow beside the version number, it means an update is available:
Right-click anywhere on that row and select Upgrade Firmware. When it's done, the number in the Version column will change.
Step 5: Update
Next, to update the OS firmware, go to the Network Phidgets tab in the control panel, find your HUB5000 and double-click on it. If the OS firmware is out
of date, you'll see the following window pop up with steps to follow:
1. Download the firmware (you can get it here if the button does not
work)
2. Open the web interface by clicking the button or entering the HUB5000's IP address in your web browser.
3. Go to the System tab and scroll down to the Upgrade Firmware section. Select the file you just downloaded and click Upgrade and Restart.
You'll be instructed to wait a few minutes before logging back into the web interface.
Step 5: Update
When you log back in, you can confirm that the new version has successfully installed by checking to see if the firmware version listed in the
Status section matches the first three numbers in the firmware file name that you downloaded. You can also check the version in the
Network Phidgets tab on the Phidget Control Panel.
Done!
Now that you're able to see and interact with your devices in the Phidget Control Panel and they're fully updated, you're done with the Setup part of this
guide.
Scroll down to Part 2: Using Your Phidget for the next step.
For more help installing in Windows (e.g. manual install, using a VM, etc.), visit this page:
Before installing our libraries, be sure to read our Software License.
Step 1: Install Phidgets Library
2. Open the download and double click on Phidgets.pkg
Step 1: Install Phidgets Library
3a. Select Continue
Step 1: Install Phidgets Library
3b. Read and continue. Read the License and click Agree.
Step 1: Install Phidgets Library
3c. Here, you have the option to select the installation location. Select Install.
Step 1: Install Phidgets Library
3d. MacOS may ask for permission to install. Enter your username and password and Install Software.
Step 1: Install Phidgets Library
3e. Wait for Installation to complete. This should only take a few moments.
Step 1: Install Phidgets Library
3f. You may see a message that the extension has been blocked. Select Open Security Preferences.
Step 1: Install Phidgets Library
3g. Beside the message for Phidgets Inc, Click Allow.
Step 1: Install Phidgets Library
3h. Installation Complete, Click Close.
Step 1: Install Phidgets Library
3i. To delete the installer, click Move to Trash.
Step 2: Connect Devices
● Connect Power Jack
● Connect VINT Device(s)
● Connect Ethernet to a Router or Switch (optional)
Step 3: Verify Connection
Choose a setup method:
Configure with mobile device
Connect with ethernet cable
(Requires physical access to router or switch)
«
»
Connection (Mobile)
Step 3: Connect Wireless
1. When you connect the power supply to the HUB5000, the red LED should turn on.
Step 3: Connect Wireless
2. On your mobile device, go to the Wi-Fi settings and connect to the HUB5000:
Step 3: Connect Wireless
3. When asked for a password, enter the password printed on the HUB5000’s label.
Step 3: Connect Wireless
4. Once your device is connected to the HUB5000’s WiFi signal:
Click on the WiFi network and find an option that says “Manage router” or “Visit homepage”.
Go to your internet browser and type 192.168.100.1 in the address bar.
Step 3: Connect Wireless
5. Create a password for your HUB5000. You'll use this password to access the Configure Page from now on.
Step 3: Connect Wireless
6. Navigate to the network page. Change the Mode to Client.
Step 3: Connect Wireless
7. Enter your Wifi Network details and click Save & Apply. It may take a few minutes for your Phidgets to appear in the Phidget Control Panel, which
we’ll check in the next step.
Step 4: Verify Connection
1. Open the Phidget Control Panel:
Step 4: Verify Connection
2. If connected, your Phidgets will appear in the Phidget Control Panel.
Step 5: Update
Now that you've confirmed that you have access to your Phidgets, you should ensure the HUB5000 is fully updated. You can update the firmware of the VINT Hub by
going back to the Phidget Control Panel. If the name of the device is red, it means an update is available:
Double click on the device in the control panel to update the VINT Hub firmware. When it's finished, the text will turn from red to black and the number in the
Version column will change.
Step 5: Update
To upgrade the firmware of the operating system on the HUB5000, download the most recent file
here.
Next, go back to the web configuration page and click on the System tab. Scroll down to Upgrade Firmware and select the file you download and hit
Upgrade & Restart. You'll be instructed to wait a few minutes before logging back into the web interface.
When you log back in, you can confirm that the new version has successfully installed by checking to see if the firmware version listed in the
Status section matches the first three numbers in the firmware file name that you downloaded.
Done!
Now that you're able to see and interact with your devices in the Phidget Control Panel, you're done with the Setup part of this guide.
Scroll down to Part 2: Using Your Phidget for the next step.
For more info installing in MacOS (e.g. developer tools, driver extension, etc.), visit this page:
1. When you connect the power supply to the HUB5000, the red LED should turn on.
Step 3: Connect Wireless
2. In your Web Browser, enter hub5000.local
Step 3: Connect Wireless
3. Create a password for your HUB5000. You'll use this password to access the Configure Page from now on.
Step 3: Connect Wireless
4. Navigate to the network page. Change the Mode to Client.
Step 3: Connect Wireless
5. Enter your Wifi Network details to use your Hub wirelessly and click Save & Apply. You can then disconnect the ethernet cable.
It may take a few minutes for your Phidgets to appear in the Phidget Control Panel, which we’ll check in the next step.
Step 4: Verify Connection
1. Open the Phidget Control Panel:
Step 4: Verify Connection
2. If connected, your Phidgets will appear in the Phidget Control Panel.
Step 5: Update
Now that you've confirmed that you have access to your Phidgets, you should ensure the HUB5000 is fully updated. You can update the firmware of the VINT Hub by
going back to the Phidget Control Panel. If the name of the device is red, it means an update is available:
Double click on the device in the control panel to update the VINT Hub firmware. When it's finished, the text will turn from red to black and the number in the
Version column will change.
Step 5: Update
To upgrade the firmware of the operating system on the HUB5000, download the most recent file
here.
Next, go back to the web configuration page and click on the System tab. Scroll down to Upgrade Firmware and select the file you download and hit
Upgrade & Restart. You'll be instructed to wait a few minutes before logging back into the web interface.
When you log back in, you can confirm that the new version has successfully installed by checking to see if the firmware version listed in the
Status section matches the first three numbers in the firmware file name that you downloaded.
Done!
Now that you're able to see and interact with your devices in the Phidget Control Panel, you're done with the Setup part of this guide.
Scroll down to Part 2: Using Your Phidget for the next step.
For more info installing in MacOS (e.g. developer tools, driver extension, etc.), visit this page:
For installation instructions for these packages, see the README file included with each one.
Step 2: Connect Devices
● Connect Power Jack
● Connect VINT Device(s)
● Connect Ethernet to a Router or Switch (optional)
Step 3: Verify Connection
Choose a setup method:
Configure with mobile device
Connect with ethernet cable
(Requires physical access to router or switch)
«
»
Connection (Mobile)
Step 3: Connect Wireless
1. When you connect the power supply to the HUB5000, the red LED should turn on.
Step 3: Connect Wireless
2. On your mobile device, go to the Wi-Fi settings and connect to the HUB5000:
Step 3: Connect Wireless
3. When asked for a password, enter the password printed on the HUB5000’s label.
Step 3: Connect Wireless
4. Once your device is connected to the HUB5000’s WiFi signal:
Click on the WiFi network and find an option that says “Manage router” or “Visit homepage”.
Go to your internet browser and type 192.168.100.1 in the address bar.
Step 3: Connect Wireless
5. Create a password for your HUB5000. You'll use this password to access the Configure Page from now on.
Step 3: Connect Wireless
6. Navigate to the network page. Change the Mode to Client.
Step 3: Connect Wireless
7. Enter your Wifi Network details and click Save & Apply. It may take a few minutes for your Phidgets to appear in the Phidget Control Panel, which
we’ll check in the next step.
Step 4: Verify Connection
1. The easiest way to verify that your libraries are working properly is to compile and run an example program. Download and unpack this C example that will
detect any Phidget:
2. Next, open the terminal in the location where you unpacked the example. Compile and run using:
gcc HelloWorld.c -o HelloWorld -lphidget22
sudo ./HelloWorld
ou should receive a “Hello” line for each Phidget channel that is discovered:
I don’t see any Phidgets show up in the HelloWorld example
You need to run it with sudo in order to be able to access USB devices. In order to use
Phidgets without sudo, you need to set your udev rules. See the Advanced Information page on the final slide of this guide for details.
Step 5: Update
Now that you've confirmed that you have access to your Phidgets, you should ensure the HUB5000 is fully updated. You can update the firmware of the VINT Hub
using the phidget22admin tool (see included readme for further
instructions).
To upgrade the firmware of the operating system on the HUB5000, download the most recent file
here.
Next, go back to the web configuration page and click on the System tab. Scroll down to Upgrade Firmware and select the file you download and hit
Upgrade & Restart. You'll be instructed to wait a few minutes before logging back into the web interface.
When you log back in, you can confirm that the new version has successfully installed by checking to see if the firmware version listed in the
Status section matches the first three numbers in the firmware file name that you downloaded.
Done!
Now that you're able to see your devices in the Hello World example and the device is fully updated, you're done with the Setup part of this guide.
Scroll down to Part 2: Using Your Phidget for the next step.
For more info installing in Linux (e.g. Udev rules, old versions, etc.), visit this page:
1. When you connect the power supply to the HUB5000, the red LED should turn on.
Step 3: Connect Wireless
2. In your Web Browser, enter hub5000.local
Step 3: Connect Wireless
3. Create a password for your HUB5000. You'll use this password to access the Configure Page from now on.
Step 3: Connect Wireless
4. Navigate to the network page. Change the Mode to Client.
Step 3: Connect Wireless
5. Enter your Wifi Network details to use your Hub wirelessly and click Save & Apply. You can then disconnect the ethernet cable.
It may take a few minutes for your Phidgets to appear in the Phidget Control Panel, which we’ll check in the next step.
Step 4: Verify Connection
1. The easiest way to verify that your libraries are working properly is to compile and run an example program. Download and unpack this C example that will
detect any Phidget:
2. Next, open the terminal in the location where you unpacked the example. Compile and run using:
gcc HelloWorld.c -o HelloWorld -lphidget22
sudo ./HelloWorld
You should receive a “Hello” line for each Phidget channel that is discovered:
I don’t see any Phidgets show up in the HelloWorld example
You need to run it with sudo in order to be able to access USB devices. In order to use
Phidgets without sudo, you need to set your udev rules. See the Advanced Information page on the final slide of this guide for details.
Step 5: Update
Now that you've confirmed that you have access to your Phidgets, you should ensure the HUB5000 is fully updated. You can update the firmware of the VINT Hub
using the phidget22admin tool (see included readme for further
instructions).
To upgrade the firmware of the operating system on the HUB5000, download the most recent file
here.
Next, go back to the web configuration page and click on the System tab. Scroll down to Upgrade Firmware and select the file you download and hit
Upgrade & Restart. You'll be instructed to wait a few minutes before logging back into the web interface.
When you log back in, you can confirm that the new version has successfully installed by checking to see if the firmware version listed in the
Status section matches the first three numbers in the firmware file name that you downloaded.
Done!
Now that you're able to see your devices in the Hello World example and the device is fully updated, you're done with the Setup part of this guide.
Scroll down to Part 2: Using Your Phidget for the next step.
For more info installing in Linux (e.g. Udev rules, old versions, etc.), visit this page:
For installation instructions for these packages, see the README file included with each one.
Step 2: Connect Devices
● Connect Power Jack
● Connect VINT Device(s)
● Connect Ethernet to a Router or Switch in the same network as your Linux machine
Step 3: Verify Connection
1. The easiest way to verify that your libraries are working properly is to compile and run an example program. Download and unpack this C example that will
detect any Phidget:
2. Next, open the terminal in the location where you unpacked the example. Compile and run using:
gcc HelloWorld.c -o HelloWorld -lphidget22
sudo ./HelloWorld
If everything is working, you should receive a “Hello” line for each Phidget channel that is discovered:
I don’t see any Phidgets show up in the HelloWorld example
You need to run it with sudo in order to be able to access USB devices. In order to use
Phidgets without sudo, you need to set your udev rules. See the Advanced Information page on the final slide of this guide for details.
Now that the SBC's ethernet connection is verified, it can be connected to wifi.
If you don't have a USB wifi adapter or you're planning to stay on ethernet, you can scroll down to
Part 2: Using Your Phidget
Step 4: Connect Wireless
1. In your web browser, enter phidgetsbc.local
If you're using a terminal-only Linux machine, use the browser on your phone instead.
(If you use a phone, you need to enter the IP address your router assigned to the SBC instead of phidgetsbc.local)
Step 4: Connect Wireless
2. Create a password for your SBC. You will use this to access the configuration page from now on.
Step 4: Connect Wireless
3. Navigate to Network -> Wireless. Select your Network, enter the wifi password and select Add This Network.
Step 4: Connect Wireless
4. Scroll down to your saved networks, click on your network and select Join This Network.
Step 4: Connect Wireless
5. It should now say connected in the status column.
You can now unplug the ethernet cable.
Step 4: Connect Wireless
6. Run the HelloWorld example again to confirm that your Phidgets are accessible over wifi.
Done!
If you're able to see your devices in the Hello World example, you're done with the Setup part of this guide.
Scroll down to Part 2: Using Your Phidget for the next step.
For more info installing in Linux (e.g. Udev rules, old versions, etc.), visit this page:
In order to demonstrate the functionality of the STC1001, the Phidget Control Panel running on a Windows machine will be used.
The Phidget Control Panel is available for use on both macOS and Windows machines.
Windows
To open the Phidget Control Panel on Windows, find the icon in the taskbar. If it is not there, open up the start menu and search for Phidget Control Panel
macOS
To open the Phidget Control Panel on macOS, open Finder and navigate to the Phidget Control Panel in the Applications list. Double click on the icon to bring up the Phidget Control Panel.
For more information, take a look at the getting started guide for your operating system:
Linux users can follow the getting started with Linux guide and continue reading here for more information about the STC1001.
First Look
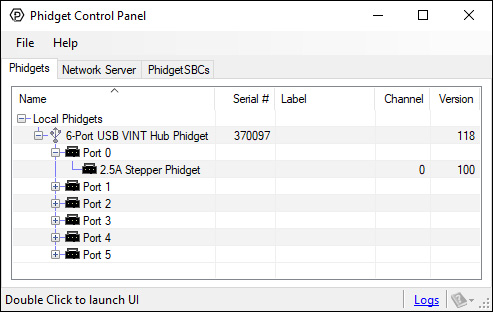
After plugging the STC1001 into your computer and opening the Phidget Control Panel, you will see something like this:
The Phidget Control Panel will list all connected Phidgets and associated objects, as well as the following information:
Serial number: allows you to differentiate between similar Phidgets.
Channel: allows you to differentiate between similar objects on a Phidget.
Version number: corresponds to the firmware version your Phidget is running. If your Phidget is listed in red, your firmware is out of date. Update the firmware by double-clicking the entry.
The Phidget Control Panel can also be used to test your device. Double-clicking on an object will open an example.
Stepper Motor
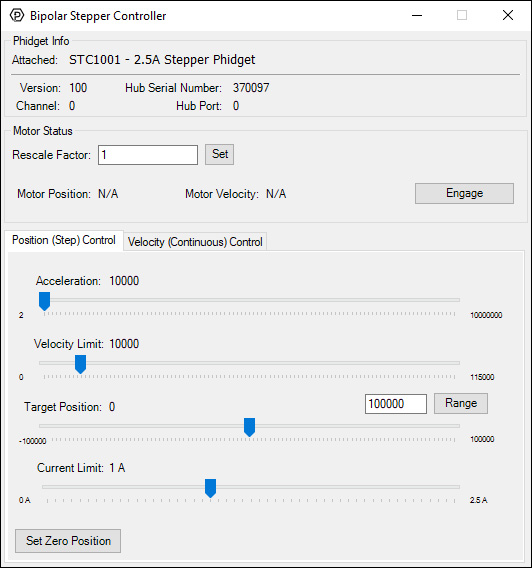
Double-click on the Stepper object, labelled Stepper Phidget, in order to run the example:
General information about the selected object will be displayed at the top of the window. You can also experiment with the following functionality:
Toggle the Engage button to provide power to the motor coils.
By default, motor position, velocity, and acceleration are measured in sixteenths of a step. If you want to use different units, change the value in the Rescale Factor textbox.
Use the Target Position slider to set a new target position. Change the Acceleration and Velocity sliders to speed up or slow down the STC1001's approach.
Select the Velocity (Continuous) Control tab for continuous rotation instead of specifiying a position.
Finding The Addressing Information
Before you can access the device in your own code, and from our examples, you'll need to take note of the addressing parameters for your Phidget. These will indicate how the Phidget is physically connected to your application. For simplicity, these parameters can be found by clicking the button at the top of the Control Panel example for that Phidget.
In the Addressing Information window, the section above the line displays information you will need to connect to your Phidget from any application. In particular, note the Channel Class field as this will be the API you will need to use with your Phidget, and the type of example you should use to get started with it. The section below the line provides information about the network the Phidget is connected on if it is attached remotely. Keep track of these parameters moving forward, as you will need them once you start running our examples or your own code.
Using Your Own Program
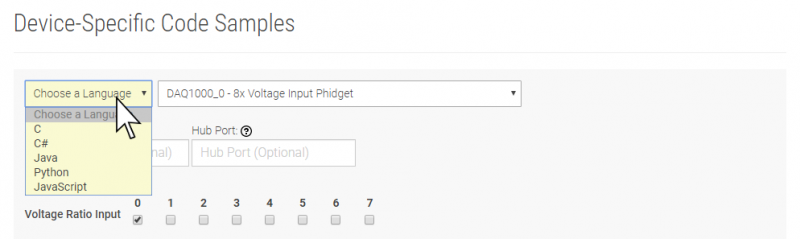
You are now ready to start writing your own code for the device. The best way to do that is to start from our Code Samples.
Select your programming language of choice from the drop-down list to get an example for your device. You can use the options provided to further customize the example to best suit your needs.
Once you have your example, you will need to follow the instructions on the page for your programming language to get it running. To find these instructions, select your programming language from the Programming Languages page.
Programming Languages - Find your preferred programming language here and learn how to write your own code with Phidgets!
Phidget Programming Basics - Once you have set up Phidgets to work with your programming environment, we recommend you read our page on to learn the fundamentals of programming with Phidgets.