|
|
| (236 intermediate revisions by 11 users not shown) |
| Line 1: |
Line 1: |
| [[File:icon-C++.png|64x64px]] C++ is a general purpose, cross-platform programming language with a vast user base.
| | {{#seo:|description=Learn how to use Phidget USB devices with C and C++.}} |
| | [[Category:Language]] |
|
| |
|
| __TOC__
| | == Get Started == |
| | With the Phidget22 library, it's easy to create C or C++ applications that work with Phidget devices. |
|
| |
|
| ==Introduction== | | == C Libraries == |
| | If you've installed the Phidget drivers for [[OS - Windows|Windows]], [[OS - macOS|macOS]], or [[OS - Linux|Linux]], then you already have the files you need for your C project. |
|
| |
|
| {{LanguageSupport|C/C++|the complete Phidget API, including events|all Phidget devices.|various Windows compilers (including Borland, Cygwin, and MinGW), Mac OS X, and Linux}}
| | ==== Windows Considerations ==== |
| | When adding directories for your project dependencies, add |
| | <syntaxhighlight> |
| | C:/Program Files/Phidgets/Phidget22 |
| | </syntaxhighlight> |
| | And for the linker, you can add |
| | <syntaxhighlight> |
| | C:/Program Files/Phidgets/Phidget22/phidget22.lib}} #(for 64-bit systems) |
| | C:/Program Files/Phidgets/Phidget22/x86/phidget22.lib}} #(for 32-bit systems) |
| | </syntaxhighlight> |
|
| |
|
| ==Quick Downloads== | | ====macOS Considerations==== |
| | Legacy Phidgets running a HID USB stack require a driver extension (macOS 10.15 and newer) or a kernel extension (macOS 10.14 and earlier). During development, we recommend downloading the appropriate [https://www.phidgets.com/docs/OS_-_macOS#Quick_Downloads package] which will install the extension. When deploying applications, review the README in the [https://cdn.phidgets.com/downloads/phidget22/libraries/macos/Phidget22_macosdevel.zip macOS Development Files] for information about bundling the extension with your application. |
|
| |
|
| Just need the C/C++ drivers, libraries, and examples? Here they are:
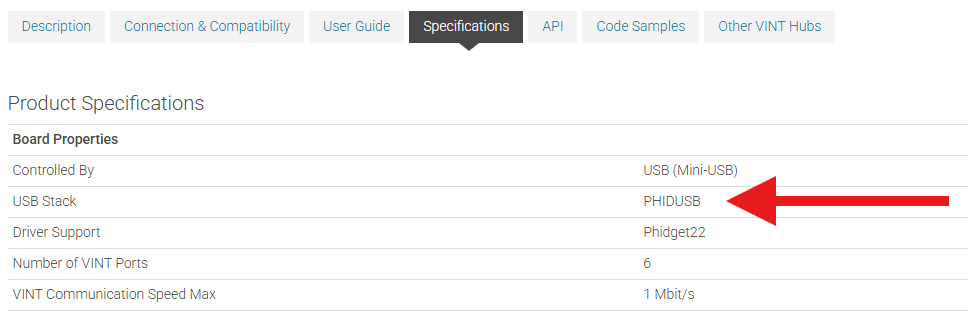
| | =====Determining USB Stack===== |
| | To determine which USB stack your device is running, navigate to the product page and then to the specification tab, and look for the ''USB Stack'' specification. If you are using a VINT device, navigate to the product page for the VINT Hub you are using. |
|
| |
|
| ===C/C++ API Documentation:===
| | [[Image:Javascript_networkserver_webusb_spec.png|center|600px|link=https://cdn.phidgets.com/docs/images/8/80/Javascript_networkserver_webusb_spec.png]] |
| *[http://www.phidgets.com/documentation/Phidget21_C_Doc.zip C/C++ API Manual Download] or [http://www.phidgets.com/documentation/web/cdoc/index.html (HTML online version)]
| |
| *[[General API]] (more help on functions common to all Phidgets)
| |
| *[[Device List | Device Specific APIs]] (more help on functions specific to your Phidget)
| |
|
| |
|
| ===C/C++ Example Code:=== | | ====Linux Considerations==== |
| *[http://www.phidgets.com/downloads/examples/VCpp_2.1.8.20110615.zip Visual Studio for C/C++ Example Code:] Written in Visual Studio 2005, and Visual Studio 2008/2010 will easily upgrade them.
| | Linux restricts access to USB devices to the root user. |
| *[http://www.phidgets.com/downloads/examples/phidget21-c-examples_2.1.8.20110615.tar.gz Generic C/C++ Example Code:] For Mac OS X, Linux, and other IDEs(i.e., Visual Studio 6 and 2003)
| |
|
| |
|
| ===Libraries and Drivers:===
| | To run your C application as a regular user, you'll need to [{{SERVER}}/docs/OS_-_Linux#Setting_udev_Rules set up udev rules] on your system. |
| *[http://www.phidgets.com/downloads/libraries/phidget21-x86_2.1.8.20110615.zip 32 bit Windows (drivers, with libraries)]
| |
| *[http://www.phidgets.com/downloads/libraries/phidget21-x64_2.1.8.20110615.zip 64 bit Windows (drivers, with libraries)]
| |
| *[http://www.phidgets.com/downloads/libraries/phidget21bcc_2.1.8.20110615.zip Borland C++ Libraries] (You also need one of the two Windows drivers [[#Libraries_and_Drivers:|above]])
| |
| *[http://www.phidgets.com/downloads/libraries/libphidget_2.1.8.20111028.tar.gz General Linux Libraries] ([[OS - Linux | Linux Library Setup Instructions]])
| |
| *[http://www.phidgets.com/downloads/libraries/Phidget_2.1.8.20111103.dmg General Mac OSX Libraries] ([[OS - Mac OS X | Mac OS X Library Setup Instructions]])
| |
|
| |
|
| ==Getting started with C/C++== | | === Library Files === |
| | If you would like to manually manage the Phidget22 library files, you can download them [https://cdn.phidgets.com/downloads/phidget22/libraries/windows/Phidget22-windevel.zip here]. |
|
| |
|
| If you are new to writing code for Phidgets, we recommend starting by running, then modifying existing examples. This will allow you to:
| | == Development Environment Configuration == |
| {{ExampleCodeReasons}}
| |
|
| |
|
| Instructions are divided up by operating system. Choose:
| | === GCC === |
| *[[#Windows(2000/XP/Vista/7)|Windows 2000 / XP / Vista / 7]]
| | {| style="margin:auto;" class="table-no-border mw-collapsible mw-collapsed" |
| *[[#Mac OS X |Mac OS X]]
| | |+ '''Instructions''' |
| *[[#Linux | Linux]] (including PhidgetSBC)
| | | |
| | The most common tool for C development is GCC, whether used in the command line or through an IDE. GCC is packaged with many other IDEs and packages, so you may already have it installed. |
|
| |
|
| ==Windows(2000/XP/Vista/7)==
| | {{hiddenh4|Windows}} |
| | We recommend installing [https://www.cygwin.com/ Cygwin] or [https://sourceforge.net/projects/mingw/ MinGW], ensuring you select all gcc packages when prompted by the installer. |
|
| |
|
| ===Description===
| | To compile your code, go to the folder where your code is and open the command prompt by typing 'cmd' in the address bar. |
| C/C++ programs on Windows depend on three files, which the installers [[#Libraries_and_Drivers:|above]] put onto your system:
| |
| * <b><code>phidget21.dll</code></b> contains the actual Phidgets library, which is used at run-time. If you used our installer, it's already correctly placed in <code>C:\Windows\System32</code>. It can be manually installed - check our [[Manual Installation instructions]].
| |
| * <b><code>phidget21.lib</code></b> is used by your compiler to link to the dll. Your compiler has to know where this file is. Our installer puts <code>phidget21.lib</code> into <code>C:\Program Files\Phidgets</code>, so you can either point your compiler to that location, or copy and link to it in a directory for your project workspace. <code>phidget21.lib</code> is written to be compatible with most compilers - but your specific compiler may need a different format. Check our documentation for your specific compiler below for details. Please note that for 64 bit versions of Windows, we provide a version of the <code>phidget21.lib</code> that is specifically optimized for 64 bit systems. The 32 bit version of <code>phidget21.lib</code> will also work for 64 bit systems. If you used our 64 bit installer, the 64 bit version of <code>phidget21.lib</code> is placed in <code>C:\Program Files\Phidgets</code>; The 32 bit version of <code>phidget21.lib</code> is placed in <code>C:\Program Files\Phidgets\x86</code>. If you do not want to use our installer, you can get the file [[#Libraries | here]].
| |
| * <b><code>phidget21.h</code></b> lists all the Phidget API function calls available to your code. Your compiler also has to know where this file is. By default, our installer puts <code>phidget21.h</code> into <code>C:\Program Files\Phidgets</code> so you can either point your compiler to that location, or copy and link to it in a directory for your project workspace. If you do not want to use our installer, you can get the file [[#Libraries | here]].
| |
|
| |
|
| Running the examples and writing your own code can be fairly compiler-specific, so we include instructions for each compiler below.
| | The specific command you will use depends on your compiler of choice: |
| | <syntaxhighlight lang=bash> |
| | #Cygwin x86: |
| | gcc example.c -o example -I"/cygdrive/c/Program Files/Phidgets/Phidget22"-L"/cygdrive/c/Program Files/Phidgets/Phidget22/x86" -lphidget22 |
|
| |
|
| ===Visual Studio===
| | #Cygwin x64: |
| | gcc example.c -o example -I"/cygdrive/c/Program Files/Phidgets/Phidget22" -L"/cygdrive/c/Program Files/Phidgets/Phidget22" -lphidget22 |
|
| |
|
| '''Note:''' C++/CLI (which used to be called Managed C++) is very different from mainstream C/C++. If you must use C++/CLI, consider calling the .NET library, instead of the C API normally used from C/C++. We have no documentation for using C++/CLI.
| | #MinGW: |
| | gcc example.c -o example -I"C:/Program Files/Phidgets/Phidget22" -L"C:/Program Files/Phidgets/Phidget22/x86" -lphidget22 |
| | </syntaxhighlight> |
|
| |
|
| Microsoft makes free versions of Visual Studio available known as Express Editions. The Express editions are suitable for most applications, but are limited in features for more complex applications. Please see [http://www.microsoft.com/visualstudio Microsoft Visual Studio] for more information.
| | After running the commands above for either Cygwin or MinGW, an executable file called example.exe will be created. Enter the following command to run the program: |
| | <syntaxhighlight lang=bash> |
| | ./example.exe |
| | </syntaxhighlight> |
| | {{hiddenh4|MacOS}} |
| | If you don't already have gcc installed, you can get it by installing [https://developer.apple.com/xcode/ Xcode]. |
|
| |
|
| | To compile the program, enter the following command in the terminal, substituting "example" for the name of your C file: |
| | <syntaxhighlight lang=bash> |
| | gcc example.c -o example -F /Library/Frameworks -framework Phidget22 -I /Library/Frameworks/Phidget22.framework/Headers |
| | </syntaxhighlight> |
| | Finally, run the program by entering the following command in the terminal: |
| | <syntaxhighlight lang=bash> |
| | ./example |
| | </syntaxhighlight> |
| | Success! The project is now running with Phidgets. |
|
| |
|
| ====Visual Studio 2005/2008/2010====
| | {{hiddenh4|Linux}} |
| | | On Linux, gcc is installed through the package manager: |
| =====Use Our Examples=====
| | <syntaxhighlight lang=bash> |
| | | apt-get install gcc |
| To run the examples, you first [http://www.phidgets.com/downloads/examples/VCpp_2.1.8.20110615.zip download] them and unpack them into a folder. To load all projects in Visual Studio, go to File → Open → Project → Solution, and open <code>Visual Studio Phidgets Examples.sln</code> in the VCpp folder of the examples.
| | </syntaxhighlight> |
| | | To compile the program, enter the following command in the terminal, substituting "example" for the name of your C file: |
| If you are opening the Phidget examples in Visual Studio 2008/2010, you will need to go through the Visual Studio Conversion Wizard to convert the 2005 project.
| | <syntaxhighlight lang=bash> |
| <br/><br/>[[File:VS2005 Conversion Wizard.PNG]]<br/><br/>
| | gcc example.c -o example -lphidget22 |
| | | </syntaxhighlight> |
| This will load all of the examples available for C/C++, and then you can set your main project to be the one that matches your device. If you aren't sure what the software example for your device is called, check the software object listed in the [[Device List | Getting Started guide for your device]].
| | After compiling, you can run the program by entering the following command in the terminal: |
| | |
| The only thing left to do is to run the examples! Click on Debug → Start Debugging. Please note that the projects, by default try to find the <code>phidget21.h</code> and <code>phidget21.lib</code> in the <code>$(SystemDrive)\Program Files\Phidgets</code>. If you have these files installed in another location, please change the path accordingly. Please see the [[#Write Your Own Code | Write Your Own Code section]] for details.
| |
| <br/><br/>
| |
| [[File:VS2005 Run.PNG]]
| |
| <br/><br/>
| |
| Once you have the C/C++ examples running, we have a [[#Follow The Examples|teaching section]] below to help you follow them.
| |
| | |
| =====Write Your Own Code=====
| |
| | |
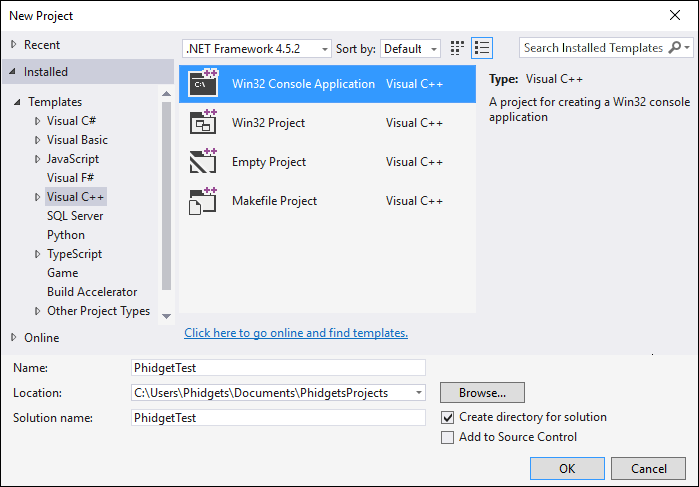
| When you are building a project from scratch, or adding Phidget function calls to an existing project, you'll need to configure your compiler / development environment to properly link the Phidget C/C++ libraries. To begin:
| |
| | |
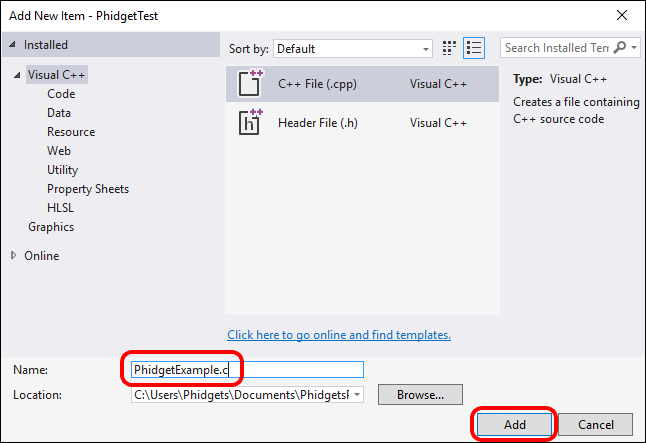
| * Generate a new Visual C++: Win32 Console Application project with a descriptive name such as PhidgetTest.
| |
| <br/>[[File:VS2005 New Project.PNG]]
| |
| <br/><br/>Next, select Console Application<br/><br/>
| |
| [[File:VS2005 New Project 2.PNG]]
| |
| <br/><br/> | |
| | |
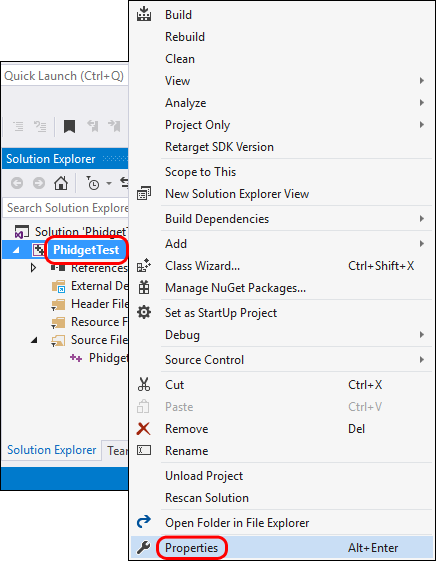
| * Open the project properties window.
| |
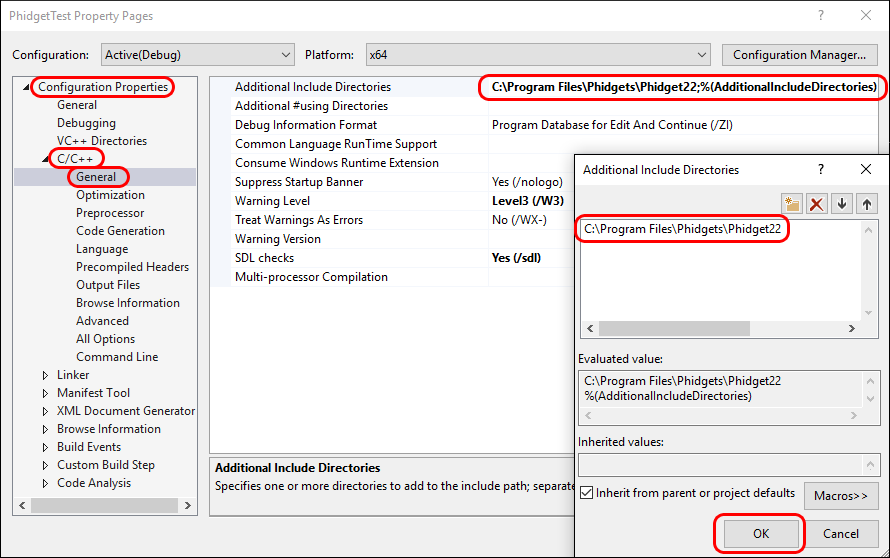
| * Navigate to Configuration Properties → C/C++.
| |
| * Add <code>"C:\Program Files\Phidgets"</code> to the additional directories field. This step will find the <code>phidget21.h</code> file in the corresponding directory. If the file is placed in another location, please adjust the path accordingly.
| |
| <br/>[[File:VS2005 Header.PNG]]
| |
| <br/><br/>
| |
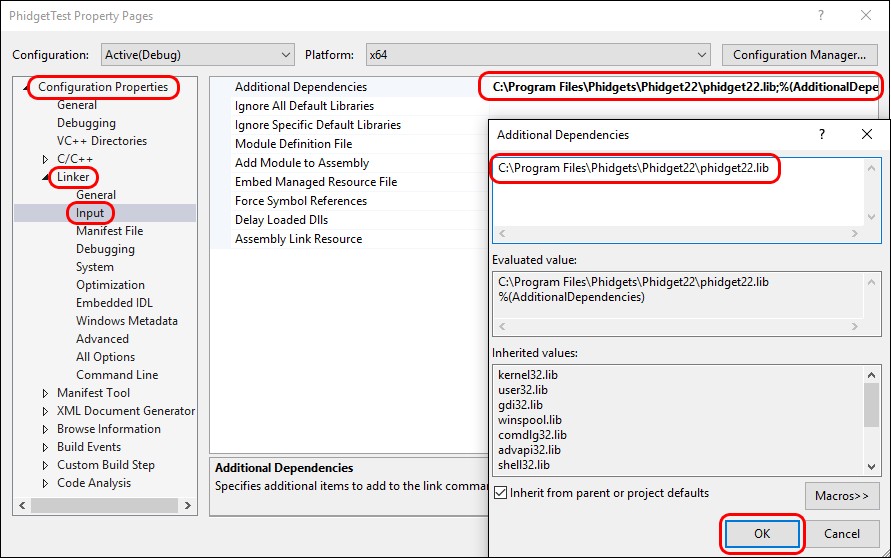
| * Navigate to Configuration Properties → Linker → Input.
| |
| * Edit the additional dependencies and add <code>"C:\Program Files\Phidgets\phidget21.lib"</code>. This step will find the <code>phidget21.lib</code> file in the corresponding directory. If the file is placed in another location, please adjust the path accordingly.
| |
| <br/>[[File:VS2005 Library.PNG]]
| |
| <br/><br/>
| |
| The project now has access to the Phidget21 function calls and you are ready to begin coding.
| |
| | |
| Then, in your code, you will need to include the Phidget library:
| |
| | |
| <div style="background-color: #f3f3f3; border-color: #1c9edb; border-width:1px; border-style: dashed;">
| |
| <font size="3">
| |
| <source lang=cpp>
| |
| | |
| #include <phidget21.h>
| |
| | |
| </source>
| |
| </font>
| |
| </div>
| |
| | |
| The same [[#Follow The Examples|teaching section]] which describes the examples also has further resources for programming your Phidget.
| |
| | |
| ====Visual Studio 2003====
| |
| | |
| Start by downloading the Generic C/C++ Examples. You can import these examples into a Visual Studio 2003 C++ project.
| |
| *[http://www.phidgets.com/downloads/examples/phidget21-c-examples_2.1.8.20111028.tar.gz Generic C/C++ Examples]
| |
| | |
| =====Use Our Examples=====
| |
| <br/> | |
| [[#Visual Studio 2003|Download]] the examples and unpack them into a folder. Here, you can find example programs for all the devices. If you aren't sure what the software example for your device is called, check the software object listed in the [[Device List | Getting Started guide for your device]]. You will need this example source code to be copied into your C++ project later on.
| |
| | |
| Next, a new project will need to be created.
| |
| * Generate a new Visual C++ empty project(.NET) with a descriptive name such as PhidgetTest.
| |
| <br/>[[File:VS2003 New Project.PNG]]<br/><br/>
| |
| | |
| To import the example program into your project, please: | |
| * Create a new C++ file by adding a new item to the source files folder.
| |
| <br/>[[File:VS2003 New File.PNG]]<br/>
| |
| <br/>[[File:VS2003 New File 2.PNG]]<br/><br/>
| |
| * An empty C++ file will pop up. Please copy and paste the contents of the example program into here.
| |
| <br/>[[File:VS2003 Source.PNG]]<br/><br/>
| |
| | |
| Next, the project setting needs to be set up.
| |
| * Open the project properties window.
| |
| * Navigate to Configuration Properties → C/C++.
| |
| * Add <code>"C:\Program Files\Phidgets"</code> to the additional include directories field. This step will find the <code>phidget21.h</code> file in the corresponding directory. If the file is placed in another location, please adjust the path accordingly.
| |
| <br/>[[File:VS2003 Header.PNG]]<br/><br/>
| |
| * Navigate to Configuration Properties → Linker → Input.
| |
| * Add <code>"C:\Program Files\Phidgets\phidget21.lib"</code> to the additional dependencies field. This step will find the <code>phidget21.lib</code> file in the corresponding directory. If the file is placed in another location, please adjust the path accordingly.
| |
| <br/>[[File:VS2003 Library.PNG]]<br/><br/>
| |
| The project now has access to the Phidget21 function calls and you are ready to begin coding.
| |
| | |
| Now, you can run the example. Click on Debug → Start Without Debugging.
| |
| <br/><br/>[[File:VS2003 Run.PNG]]<br/><br/>
| |
| | |
| Once you have the C/C++ examples running, we have a [[#Follow The Examples|teaching section]] below to help you follow them.
| |
| | |
| =====Write Your Own Code=====
| |
| | |
| When you are building a project from scratch, or adding Phidget function calls to an existing project, you'll need to configure your compiler / development environment to properly link the Phidget C/C++ libraries. Please see the [[#Use Our Examples 2 | Use Our Examples section]] for instructions.
| |
| | |
| ====Visual Studio C++ 6.0====
| |
| | |
| =====Use Our Examples=====
| |
| <br/>
| |
| [http://www.phidgets.com/downloads/examples/phidget21-c-examples_2.1.8.20110615.tar.gz Download] the generic examples and unpack them into a folder. Here, you can find example programs for all the devices. If you aren't sure what the software example for your device is called, check the software object listed in the [[Device List | Getting Started guide for your device]]. You will need this example source code to be copied into your C++ project later on.
| |
| | |
| Next, a new project will need to be created.
| |
| * Generate a new Win32 Console Application project with a descriptive name such as PhidgetTest.
| |
| <br/>[[File:VS6 New Project.PNG]]<br/><br/>
| |
| * Create an empty project.
| |
| <br/>[[File:VS6 New Project 2.PNG]]<br/><br/>
| |
| | |
| Next, the project settings needs to be set up.
| |
| * Navigate to Project → Settings → C/C++ → Preprocessor.
| |
| * Add <code>C:\Program Files\Phidgets</code> to the additional include directories field. This step will find the <code>phidget21.h</code> file in the corresponding directory. If the file is placed in another location, please adjust the path accordingly.
| |
| <br/>[[File:VS6 Header.PNG]]<br/><br/>
| |
| * Navigate to Project → Settings → Link → Input → Additional library Path.
| |
| * Add <code>phidget21.lib</code> to the object/library modules field.
| |
| * Add <code>C:\Program Files\Phidgets</code> to the additional library path. This step will find the <code>phidget21.lib</code> file in the corresponding directory. If the file is placed in another location, please adjust the path accordingly.
| |
| <br/>[[File:VS6 Library.PNG]]<br/><br/>
| |
| The project now has access to the Phidget21 function calls and you are ready to begin coding.
| |
| | |
| To import the example program into your project, please:
| |
| * Create a new C++ file by navigating to File → New → Files → C++ Source File and enter a descriptive name such as Example
| |
| <br/>[[File:VS6 New File.PNG]]<br/><br/>
| |
| * An empty C++ file will pop up. Please copy and paste the contents of the example program here.
| |
| <br/>[[File:VS6 Source.PNG]]<br/><br/> | |
| Now, you can run the example. Click on Build → Execute.
| |
| <br/><br/>[[File:VS6 Run.PNG]]<br/><br/>
| |
| | |
| Once you have the C/C++ examples running, we have a [[#Follow The Examples|teaching section]] below to help you follow them.
| |
| | |
| =====Write Your Own Code=====
| |
| | |
| When you are building a project from scratch, or adding Phidget function calls to an existing project, you'll need to configure your compiler / development environment to properly link the Phidget C/C++ libraries. Please see the [[#Use Our Examples 3 | Use Our Examples section]] for instructions.
| |
| | |
| In your '''<code>.c</code>''' source code file, you must include a reference to the library header:
| |
| | |
| <div style="background-color: #f3f3f3; border-color: #1c9edb; border-width:1px; border-style: dashed;">
| |
| <font size="3">
| |
| <source lang=cpp>
| |
| | |
| #include <phidget21.h>
| |
| | |
| </source>
| |
| </font>
| |
| </div> | |
| | |
| Then, you would compile your completed C/C++ code the same way as shown in the [[#Use Our Examples 3 | Use Our Examples section]].
| |
| | |
| To learn how to write your own code for your Phidget, and to learn more about our API, we have a [[#Follow The Examples|teaching section]] to help you follow the provided C/C++ examples and which has resources such as the API reference.
| |
| | |
| ===Borland===
| |
| | |
| ====Use Our Examples====
| |
| | |
| In addition to running one of the two [[#Libraries and Drivers:| Windows Installers above]] (which you probably already have if you worked through the ''Getting Started'' page [[Device List | for your device]]), you will need the [http://www.phidgets.com/downloads/libraries/phidget21bcc_2.1.8.20110615.zip Borland C++ Libraries]. <code>phidget21bcc.lib</code> is typically placed in <code>C:\Program Files\Phidgets</code>, but you are free to place it in any directory you wish.
| |
| | |
| After installing the Phidget libraries, you're ready to [http://www.phidgets.com/downloads/examples/phidget21-c-examples_2.1.8.20111028.tar.gz download] and run the examples:<br/> | |
| | |
| To run the example code, you'll need to download and unpack the examples, and then find the source code ''for your specific device''. If you aren't sure what the software example for your device is called, check the software object listed in the [[Device List | Getting Started guide for your device]]. Then, compile the code and run it. When compiling, you need to link to the Phidget21 library.
| |
| To compile, link the Phidget libraries and build a binary executable, enter the following in a command line prompt in the directory with <code>example.c</code>:
| |
| <div class="source">
| |
| <syntaxhighlight lang=bash> | | <syntaxhighlight lang=bash> |
| | ./example |
| | </syntaxhighlight> |
| | Success! The project is now running with Phidgets. |
| | |- |
| | |} |
|
| |
|
| bcc32 -eexample -I"C:\Program Files\Phidgets" -L"C:\Program Files\Phidgets" phidget21bcc.lib example.c
| | === Visual Studio === |
| | {| style="margin:auto;" class="table-no-border mw-collapsible mw-collapsed" |
| | |+ '''Instructions''' |
| | | If you want to jump right into a pre-configured project, you can download one on our [https://www.phidgets.com/?view=code_samples&lang=C Code Sample Generator] page. || [[Image:Language_C_VSProject.jpg|center|link=https://cdn.phidgets.com/docs/images/f/f1/Language_C_VSProject.jpg|350px]] |
| | |- |
| | | To configure a new project, follow these steps. || |
| | |- |
| | | First, create a new Win32 Console Application: || [[Image:Language_C_VS_step1.jpg|center|link=https://cdn.phidgets.com/docs/images/a/a1/Language_C_VS_step1.jpg|350px]] |
| | |- |
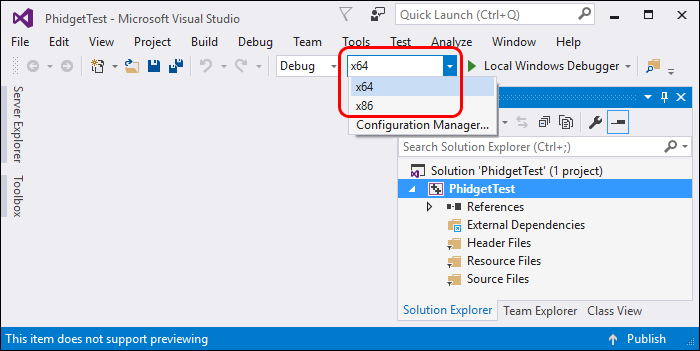
| | | If you are using a 64-bit machine, select x64, otherwise, select x86: || [[Image:Language_C_VS_step2.jpg|center|link=https://cdn.phidgets.com/docs/images/6/6b/Language_C_VS_step2.jpg|350px]] |
| | |- |
| | | Next, right click on the source folder and click New Item: || [[Image:Language_C_VS_step3.jpg|center|link=https://cdn.phidgets.com/docs/images/e/e1/Language_C_VS_step3.jpg|350px]] |
| | |- |
| | | Give the source file a name and click Add: || [[Image:Language_C_VS_step4.jpg|center|link=https://cdn.phidgets.com/docs/images/e/e5/Language_C_VS_step4.jpg|350px]] |
| | |- |
| | | Right click your project and access its properties: || [[Image:Language_C_VS_step5.jpg|center|link=https://cdn.phidgets.com/docs/images/1/1e/Language_C_VS_step5.jpg|350px]] |
| | |- |
| | | Go to Configuration Properties -> C/C++ -> General and add this to the additional include directories: |
| | <syntaxhighlight> |
| | C:\Program Files\Phidgets\Phidget22 |
| </syntaxhighlight> | | </syntaxhighlight> |
| </div>
| | || [[Image:Language_C_VS_step6.jpg|center|link=https://cdn.phidgets.com/docs/images/d/d3/Language_C_VS_step6.jpg|350px]] |
| In this case, <code>example.c</code> would be the '''.c''' file specific to your device. After using <code>bcc32</code>, you will have an executable named <code>example</code> that you can run.
| | |- |
| It is assumed that <code>phidget21bcc.lib</code> and <code>phidget21.h</code> are placed in <code>C:\Program Files\Phidgets</code>. If the files are placed in another location, please adjust the paths accordingly.
| | | Go to Configuration Properties -> Linker -> Input and add the appropriate line to additional dependencies: |
| | | <syntaxhighlight> |
| ====Write Your Own Code====
| | C:\Program Files\Phidgets\Phidget22\phidget22.lib #(for 64-bit systems) |
| | | C:\Program Files\Phidgets\Phidget22\x86\phidget22.lib #(for 32-bit systems) |
| When writing your code from scratch, you start it as you would any C/C++ code with Borland. In your '''<code>.c</code>''' source code file, you must include a reference to the library header:
| | </syntaxhighlight> |
| | | || [[Image:Language_C_VS_step7.jpg|center|link=https://cdn.phidgets.com/docs/images/0/09/Language_C_VS_step7.jpg|350px]] |
| <div style="background-color: #f3f3f3; border-color: #1c9edb; border-width:1px; border-style: dashed;">
| | |- |
| <font size="3">
| | | Lastly, include the Phidget library at the beginning of your program: |
| <source lang=cpp>
| |
| | |
| #include <phidget21.h>
| |
| | |
| </source>
| |
| </font>
| |
| </div>
| |
| | |
| Then, you would compile your completed C/C++ code the same way as the examples [[#Use Our Examples 4 |above]].
| |
| | |
| To learn how to write your own code for your Phidget, and to learn more about our API, we have a [[#Follow The Examples|teaching section]] to help you follow the provided C/C++ examples and which has resources such as the API reference.
| |
| | |
| ===GCC on Windows===
| |
| | |
| When you use gcc on Windows, you will use the general C/C++ examples:
| |
| | |
| *[http://www.phidgets.com/downloads/examples/phidget21-c-examples_2.1.8.20111028.tar.gz Generic C/C++ Examples]
| |
| | |
| ====Cygwin/MinGW====
| |
| | |
| =====Use Our Examples=====
| |
| | |
| [[#GCC on Windows|Download]] the examples and unpack them into a folder. <br/>
| |
| | |
| To run the example code, you'll need to download and unpack the examples, and then find the source code ''for your specific device''. If you aren't sure what the software example for your device is called, check the software object listed in the [[Device List | Getting Started guide for your device]]. Then, compile the code and run it. When compiling, you need to link to the phidget21 library.
| |
| To compile, link the Phidget libraries and build a binary executable, enter the following in a command line prompt in the directory with <code>example.c</code>:
| |
| <br/><b>Cygwin</b><br/>
| |
| <div style="background-color: #f3f3f3; border-color: #1c9edb; border-width:1px; border-style: dashed;">
| |
| <font size="3">
| |
| <source lang=bash>
| |
| gcc example.c -o example -I"/cygdrive/c/Program Files/Phidgets" -L"/cygdrive/c/Program Files/Phidgets" -lphidget21
| |
| </source>
| |
| </font>
| |
| </div>
| |
| | |
| <b>MinGW</b><br/>
| |
| <div style="background-color: #f3f3f3; border-color: #1c9edb; border-width:1px; border-style: dashed;">
| |
| <font size="3">
| |
| <source lang=bash>
| |
| gcc example.c -o example -I"C:\Program Files\Phidgets" -L"C:\Program Files\Phidgets" -lphidget21
| |
| </source>
| |
| </font>
| |
| </div>
| |
| | |
| In this case, <code>example.c</code> would be the '''.c''' file specific to your device. After using gcc, you will have an executable named <code>example</code> that you can run.
| |
| It is assumed that <code>phidget21.h</code> and <code>phidget21.lib</code> are placed in <code>C:\Program Files\Phidgets</code>. If the files are placed in another location, please adjust the paths accordingly.
| |
| | |
| =====Write Your Own Code=====
| |
| | |
| When writing your code from scratch, you start it as you would any C/C++ code with Cygwin/MinGW in your favourite text editor. In your '''<code>.c</code>''' source code file, you must include a reference to the library header:
| |
| | |
| <div style="background-color: #f3f3f3; border-color: #1c9edb; border-width:1px; border-style: dashed;">
| |
| <font size="3">
| |
| <source lang=cpp>
| |
| | |
| #include <phidget21.h>
| |
| | |
| </source>
| |
| </font>
| |
| </div>
| |
| | |
| Then, you would compile your completed C/C++ code the same way as shown in the [[#Use Our Examples 5| Use Our Examples section]] above.
| |
| | |
| To learn how to write your own code for your Phidget, and to learn more about our API, we have a [[#Follow The Examples|teaching section]] to help you follow the provided C/C++ examples and which has resources such as the API reference.
| |
| | |
| ===Dev C++===
| |
| | |
| Start by downloading the Generic C/C++ Examples. You can import these examples into a Dev C++ project.
| |
| *[http://www.phidgets.com/downloads/examples/phidget21-c-examples_2.1.8.20111028.tar.gz Generic C/C++ Examples]
| |
| | |
| =====Use Our Examples=====
| |
| | |
| [[#Dev C++|Download]] the examples and unpack them into a folder. Here, you can find example programs for all the devices. If you aren't sure what the software example for your device is called, check the software object listed in the [[Device List | Getting Started guide for your device]]. You will need this example source code to be copied into your Dev C++ project later on.
| |
| <br/>
| |
| | |
| In order to control Phidgets with Dev C++, the <code>phidget21.lib</code> file will need to be converted to a format that Dev C++ accepts, as described in the following steps:
| |
| * [http://www.phidgets.com Download the reimp tool]
| |
| * Open up command line and traverse to the directory containing the reimp tool. Type the following command to create <code>libphidget21.a</code>
| |
| <div style="background-color: #f3f3f3; border-color: #1c9edb; border-width:1px; border-style: dashed;">
| |
| <font size="3">
| |
| <source lang=bash> | |
| reimp.exe "C:\Program Files\Phidgets\phidget21.lib"
| |
| </source>
| |
| </font>
| |
| </div>
| |
| The command above assumes that the <code>phidget21.lib</code> is in the corresponding directory. If the file is placed in another location, please adjust the path accordingly. Please note that the 64 bit version of <code>phidget21.lib</code> is not supported on Dev C/C++. Please use the 32 bit version of <code>phidget21.lib</code>.
| |
| * Place <code>libphidget21.a</code> in <code><Dev-Cpp Install Directory>/lib</code>.
| |
| | |
| Next, a new project will need to be created. The following steps are written under Dev-C++ 4.9.9.2.
| |
| * Generate a new console application with a descriptive name such as PhidgetTest. Please select C as the project type.
| |
| <br/>[[File:DevC New Project.PNG]]<br/><br/>
| |
| | |
| Next, the project settings needs to be set up.
| |
| * Navigate to Project Options → Directories → Include Directories.
| |
| * Add a new path to <code>C:\Program Files\Phidgets</code>. This step will find the <code>phidget21.h</code> file in the corresponding directory. If the file is placed in another location, please adjust the path accordingly.
| |
| <br/>[[File:DevC Header.PNG]]<br/><br/>
| |
| * Navigate to Project Options → Parameters → Linker.
| |
| * Add <code>-lphidget21</code> to the field. This step will find the <code>libphidget21.a</code> file in <code><Dev-Cpp Install Directory>/lib</code>.
| |
| <br/>[[File:DevC Library.PNG]]<br/><br/>
| |
| The project now has access to the Phidget21 function calls and you are ready to begin coding.
| |
| | |
| To import the example program into your project, please:
| |
| * Open up <code>main.c</code> in the editor.
| |
| * An empty C file will pop up. Please copy and paste the contents of the example program here.
| |
| <br/>[[File:DevC Source.PNG]]<br/><br/>
| |
| Now, you can run the example. Click on Execute → Compile & Run.
| |
| <br/><br/>[[File:DevC Run.PNG]]<br/><br/>
| |
| | |
| Once you have the C/C++ examples running, we have a [[#Follow The Examples|teaching section]] below to help you follow them.
| |
| | |
| =====Write Your Own Code=====
| |
| | |
| When you are building a project from scratch, or adding Phidget function calls to an existing project, you'll need to configure your compiler / development environment to properly link the Phidget C/C++ libraries. Please see the [[#Use Our Examples 6 | Use Our Examples section]] for instructions.
| |
| | |
| In your '''<code>.c</code>''' source code file, you must include a reference to the library header:
| |
| | |
| <div style="background-color: #f3f3f3; border-color: #1c9edb; border-width:1px; border-style: dashed;">
| |
| <font size="3">
| |
| <source lang=cpp>
| |
| | |
| #include <phidget21.h>
| |
| | |
| </source> | |
| </font>
| |
| </div>
| |
| | |
| Then, you would compile your completed C/C++ code the same way as the [[#Use Our Examples 6 | examples above]].
| |
| | |
| To learn how to write your own code for your Phidget, and to learn more about our API, we have a [[#Follow The Examples|teaching section]] to help you follow the provided C/C++ examples and which has resources such as the API reference.
| |
| | |
| ==Mac OS X==
| |
| | |
| C/C++ has excellent support on Mac OS X through the gcc compiler.
| |
| | |
| The first step in using C/C++ on Mac is to install the Phidget libraries. Compile and install them as explained on the [[Device List|getting started guide for your device]]. Then, the [[OS - Mac OS X]] page also describes the different Phidget files, their installed locations, and their roles.
| |
| | |
| {{ContentNeeded|The information we say that we say on the OS - Mac OS X page (i.e. the different files, locations, and roles) should actually be added there}}
| |
| | |
| ===Use Our Examples===
| |
| | |
| After installing the Phidget libraries for Linux as above, you're ready to run the examples:
| |
| *[http://www.phidgets.com/downloads/examples/phidget21-c-examples_2.1.8.20111028.tar.gz Generic C/C++ Examples]
| |
| | |
| To run the example code, you'll need to find the source code ''for your specific device''. Then, compile the code under your platform and run it.
| |
| | |
| The examples assume that the compiled libraries have been set up properly. To set them up on Mac OS X, follow the ''Getting Started'' page for [[Device List | your specific device]]
| |
| | |
| To compile, link the Phidget libraries, and build an executable binary on Mac OS X, do (for example, depending on the Headers location):
| |
| | |
| <div class="source">
| |
| <syntaxhighlight lang=bash> | | <syntaxhighlight lang=bash> |
| | | #include < phidget22.h > |
| gcc example.c -o example -framework Phidget21 -I/Library/Frameworks/Phidget21.framework/Headers
| |
| </syntaxhighlight> | | </syntaxhighlight> |
| </div>
| | || |
| | | |- |
| | | |} |
| After using gcc, you will have an executable named <code>example</code> that you can run.
| |
| | |
| ===Write Your Own Code===
| |
| | |
| When writing your code from scratch, you must include a reference to the library header:
| |
| | |
| <div style="background-color: #f3f3f3; border-color: #1c9edb; border-width:1px; border-style: dashed;">
| |
| <font size="3">
| |
| <source lang=cpp>
| |
| | |
| #include <phidget21.h>
| |
| | |
| </source>
| |
| </font>
| |
| </div>
| |
| | |
| Then, you would compile your completed C/C++ code the same way as shown in the [[#Use Our Examples 7|Use Our Example section]] above.
| |
| | |
| To learn how to write your own code for your Phidget, and to learn more about our API, we have a [[#Follow The Examples|teaching section]] to help you follow the provided C/C++ examples. Even more help and references are provided from there.
| |
| | |
| ==Linux==
| |
| | |
| C/C++ has support on Linux through the gcc compiler.
| |
| | |
| The first step in using C/C++ on Linux is to install the Phidget libraries. Compile and install them as explained on the main [[OS - Linux | Linux page]]. That Linux page also describes the different Phidget files, their installed locations, and their roles.
| |
| | |
| ===Use Our Examples===
| |
| | |
| After installing the Phidget libraries for Linux as above, you're ready to download and run the examples:
| |
| *[http://www.phidgets.com/downloads/examples/phidget21-c-examples_2.1.8.20111028.tar.gz Generic C/C++ Examples]
| |
| | |
| To run the example code, you'll need to download and unpack the examples, and then find the source code for your device. The source file will be named the same as the ''software object'' for your device. If you are not sure what the software object for your device is, it can be found in the Software/API section on the [[#Device List|product page for your device]]. Then, compile the code under your platform and run it. When compiling, you need to link to the phidget21 library.
| |
| | |
| To compile, link the Phidget libraries and build a binary executable on Linux, do the following in a terminal in the directory with <code>example.c</code>:
| |
| | |
| <div style="background-color: #f3f3f3; border-color: #1c9edb; border-width:1px; border-style: dashed;">
| |
| <font size="3">
| |
| <source lang=bash>
| |
| gcc example.c -o example -lphidget21
| |
| </source>
| |
| </font>
| |
| </div>
| |
| | |
| In this case, <code>example.c</code> would be the '''.c''' file specific to your device. After using gcc, you will have an executable named <code>example</code> that you can run.
| |
| | |
| On Linux, if you have not set up [[OS - Linux | your udev rules for USB access]], you will need to run the program '''as root''':
| |
| | |
| <div style="background-color: #f3f3f3; border-color: #1c9edb; border-width:1px; border-style: dashed;">
| |
| <font size="3">
| |
| <source lang=bash>
| |
| | |
| sudo ./example
| |
| | |
| </source>
| |
| </font>
| |
| </div>
| |
| | |
| ===Write Your Own Code===
| |
| | |
| When writing your code from scratch, you start it as you would any C/C++ code on Linux, such as within a text editor like Emacs, Vi, Gedit, or Kate. In your '''<code>.c</code>''' source code file, you must include a reference to the library header:
| |
| | |
| <div style="background-color: #f3f3f3; border-color: #1c9edb; border-width:1px; border-style: dashed;">
| |
| <font size="3">
| |
| <source lang=cpp>
| |
| | |
| #include <phidget21.h>
| |
| | |
| </source>
| |
| </font>
| |
| </div>
| |
| | |
| Then, you would compile your completed C/C++ code the same way as the examples above.
| |
| | |
| To learn how to write your own code for your Phidget, and to learn more about our API, we have a [[#Follow The Examples|teaching section]] to help you follow the provided C/C++ examples and which has resources such as the API reference.
| |
| | |
| ==Follow The Examples==
| |
| | |
| By following the instructions for your operating system and compiler above, you probably now have a working example and want to understand it better so you can change it to do what you want. This teaching section has resources for you to learn from the examples and write your own.
| |
| | |
| Next comes our C/C++ API information, with syntax for all of our functions:
| |
|
| |
|
| {{UsingAPhidgetInCodeGeneral|both of which are available in C/C++|[http://www.phidgets.com/documentation/Phidget21_C_Doc.zip C/C++ API]}} | | === PhidgetSBC Web Interface === |
| | {| style="margin:auto;" class="table-no-border mw-collapsible mw-collapsed" |
| | |+'''Instructions''' |
| | |<center>{{#ev:youtube|2hTlVexctqY|rel=0}}</center> |
| | |} |
|
| |
|
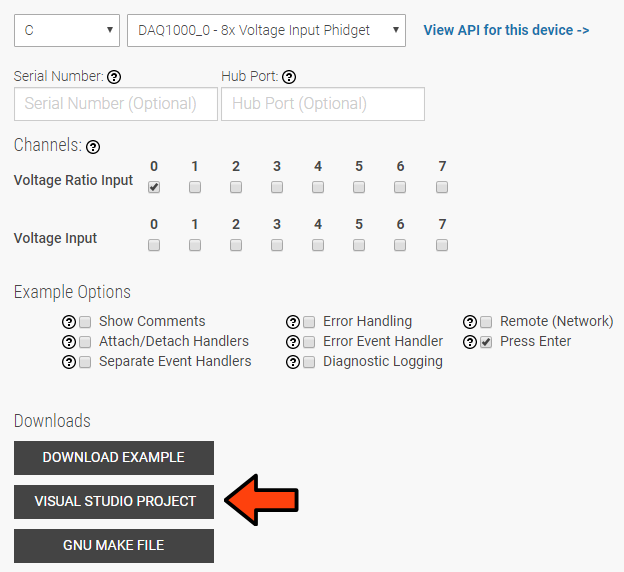
| ===Example Flow=== | | == Example Code == |
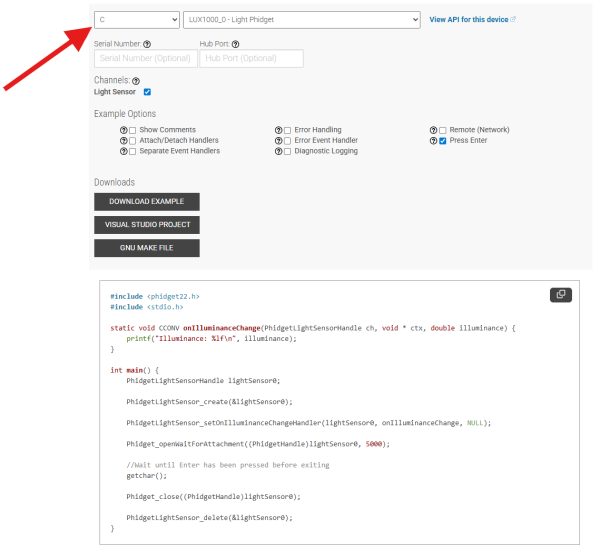
| | Navigate to our [https://www.phidgets.com/?view=code_samples&lang=C Code Sample Generator] to view and download code samples that are tailored to your specific device. |
|
| |
|
| {{ExamplePseudocode|In C/C++, you can name these '''event''' functions whatever you like. You will then pass them as function pointers to the Phidget library below in the Main Code section. This hooks them into the actual events when they occur. <br>
| | [[Image:Language_c_codesample2.png|center|600px|link=]] |
| In the example code, the event functions common to all Phidgets are called things like '''AttachHandler()''' and '''DetachHandler()''', etc.<br><br>
| |
| Some event functions will be specific to each device, like when a tag is read on an RFID board, or when a sensor value changes on an Interface Kit.
| |
| Other functions are given in the examples to show you more detail on using your Phidget. For example, '''DeviceInitialize()''' will show what needs to be set up for your Phidget before using it.
| |
| |Creating a Phidget software object in C is specific to the Phidget. For a Phidget Spatial, for example, this would involve creating an object with the <code>CPhidgetSpatialHandle</code> type, and then initializing it using the <code>CPhidgetSpatial_create</code> function. The examples show how to do this and other API functions.<br><br> | |
| Other C calls follow a similar syntax - <code>CPhidgetXXX_function</code>, where XXX is the name of your device, and function is an action available from the API for your specific Phidget.|
| |
| [http://www.phidgets.com/documentation/Phidget21_C_Doc.zip C/C++ API]}}
| |
|
| |
|
| ==Common Problems and Solutions/Workarounds== | | ===Phidget Programming Basics=== |
| | {{PhidgetProgrammingBasicsLink}} |
|
| |
|
| Here you can put various frequent problems and our recommended solutions.
| | ==API== |
| | [{{SERVER}}/?view=api&lang=C Phidget22 API] |