|
|
| (28 intermediate revisions by 4 users not shown) |
| Line 1: |
Line 1: |
| | {{#seo:|description=Learn how to use Phidget USB devices with C and C++.}} |
| [[Category:Language]] | | [[Category:Language]] |
| __TOC__
| |
|
| |
|
| == Quick Downloads == | | == Get Started == |
| | With the Phidget22 library, it's easy to create C or C++ applications that work with Phidget devices. |
|
| |
|
| === Documentation === | | == C Libraries == |
| | If you've installed the Phidget drivers for [[OS - Windows|Windows]], [[OS - macOS|MacOS]], or [[OS - Linux|Linux]], then you already have the files you need for your C project. |
|
| |
|
| *{{Phidget22API}}
| | ==== Windows Considerations ==== |
| | | When adding directories for your project dependencies, add |
| === Example Code ===
| | <syntaxhighlight> |
| | | C:/Program Files/Phidgets/Phidget22 |
| *{{SampleCode|C|C/C++ Examples}}
| |
| | |
| ===Libraries===
| |
| | |
| {{AllQuickDownloads}}
| |
| | |
| == Getting started with C/C++ ==
| |
| Welcome to using Phidgets with C/C++! By using C/C++, you will have access to the complete Phidget22 API, including events. We also provide example code in C/C++ for all Phidget devices.
| |
| | |
| If you are developing for Windows, keep reading. Otherwise, select your operating system to jump ahead:
| |
| *[[#macOS | macOS]]
| |
| *[[#Linux | Linux]]
| |
| | |
| == Windows ==
| |
| ===Visual Studio=== | |
| ====Use our examples====
| |
| One of the best ways to start programming with Phidgets is to use our example code as a guide. In order to run the examples, you will need to download and install [https://www.visualstudio.com/ Microsoft Visual Studio].
| |
| | |
| | |
| Now that you have Microsoft Visual Studio installed, select an example that will work with your Phidget:
| |
| *{{SampleCode|C|C/C++ Examples}}
| |
| | |
| | |
| Open the example project and start the example by pressing the ''Local Windows Debugger'' button:
| |
| | |
| | |
| [[Image: c_vs_run.png|link=|center]]
| |
| | |
| | |
| The application will open the Phidget, list basic information about the Phidget, and demonstrate the Phidget's functionality. Here is an example of an Accelerometer channel on a Spatial Phidget:
| |
| | |
| | |
| [[Image: c_vs_output.PNG|link=|center]]
| |
| | |
| | |
| You should now have the example up and running for your device. Play around with the device and experiment with some of the functionality. When you are ready, the next step is configuring your project and writing your own code!
| |
| | |
| ====Configure your project====
| |
| When you are building a project from scratch, or adding Phidget functionality to an existing project, you'll need to configure your development environment to properly link the Phidget C/C++ library. To begin: | |
| | |
| | |
| Create a new Win32 Console application:
| |
| | |
| [[Image:C_vs_newproject.PNG|link=|center]]
| |
| | |
| | |
| After creating a project with the default settings, access the project's properties:
| |
| | |
| [[Image:C_vs_properties.png|link=|center]]
| |
| | |
| | |
| Next, navigate to Configuration Properties -> C/C++ -> General and add the following line to the additional include directories:
| |
| *C:\Program Files\Phidgets\Phidget22
| |
| | |
| | |
| [[Image:C_vs_additionalinclude.png|link=|center]]
| |
| | |
| | |
| Navigate to Configuration Properties -> Linker -> Input and add the following line to the additional dependencies:
| |
| *C:\Program Files\Phidgets\Phidget22\phidget22.lib
| |
| | |
| | |
| [[Image:C_vs_additionadepend.png|link=|center]]
| |
| | |
| Finally, include the Phidget library in your code:
| |
| | |
| <syntaxhighlight lang='C'>
| |
| #include <phidget22.h>
| |
| </syntaxhighlight> | | </syntaxhighlight> |
| | | And for the linker, you can add |
| Success! The project now has access to Phidgets. Next, view the [[#Write Code | write your own code]] section located below.
| | <syntaxhighlight> |
| ===GCC on Windows===
| | C:/Program Files/Phidgets/Phidget22/phidget22.lib}} #(for 64-bit systems) |
| | | C:/Program Files/Phidgets/Phidget22/x86/phidget22.lib}} #(for 32-bit systems) |
| ====Cygwin/MinGW====
| |
| | |
| =====Use our examples=====
| |
| | |
| Download the examples and unpack them into a folder. Afterwards, unpack the examples. The easiest way to confirm that your environment is set up properly will be to compile and run the HelloWorld C/C++ example. Locate the HelloWorld.c file and type the following to compile the file and link the Phidget C/C++ library in a command line prompt:
| |
| | |
| ======Cygwin======
| |
| | |
| <syntaxhighlight lang='bash'> | |
| gcc HelloWorld.c -o HelloWorld -I"/cygdrive/c/Program Files/Phidgets/Phidget22" -L"/cygdrive/c/Program Files/Phidgets/Phidget22/x86" -lphidget22
| |
| </syntaxhighlight> | | </syntaxhighlight> |
|
| |
|
| ======MinGW====== | | ==== MacOS Considerations ==== |
| | | The Phidget framework will be found in |
| <syntaxhighlight lang='bash'> | | <syntaxhighlight> |
| gcc HelloWorld.c -o HelloWorld -I"C:\Program Files\Phidgets\Phidget22" -L"C:\Program Files\Phidgets\Phidget22\x86" -lphidget22
| | /Library/Frameworks |
| </syntaxhighlight> | | </syntaxhighlight> |
| | | And the headers can be found in |
| After using gcc, you will have an executable named HelloWorld that you can run. It is assumed that phidget22.h is placed in C:\Program Files\Phidgets\Phidget22 and phidget22.lib is placed in C:\Program Files\Phidgets\Phidget22\x86. If the files are placed in another location, please adjust the paths to the file's location accordingly.
| | <syntaxhighlight> |
| | | /Library/Frameworks/Phidget22.framework/Headers |
| After using gcc, you will have an executable named HelloWorld that you can run.
| |
| | |
| This program will detect for devices that are attached/detached on the computer. Go ahead, and attach or detach your devices! Here is an example output:
| |
| | |
| [[Image: MinGW_example.png|link=|600px]]
| |
| | |
| After confirming that the HelloWorld example is working, you can proceed to run the example for your device. The source file will be named the same as the software object for your device. If you are not sure what the software object for your device is, find your Phidget on our [http://www.phidgets.com webpage], and then check the API documentation for it.
| |
| | |
| =====Write your own code=====
| |
| | |
| When writing your code from scratch, you start it as you would any C/C++ code with Cygwin/MinGW in your favourite text editor. In your .c source code file, you must include a reference to the library header:
| |
| | |
| <syntaxhighlight lang='C'> | |
| #include <phidget22.h>
| |
| </syntaxhighlight> | | </syntaxhighlight> |
|
| |
|
| Then, you would compile your completed C/C++ code the same way as shown in the [[#Use Our Examples|Use Our Examples]] section above.
| | ====Linux Considerations==== |
| To learn how to write your own code for your Phidget, and to learn more about our API, we have a [[#Edit the Examples|teaching section]] to help you follow the provided C/C++ examples and which has resources such as the API reference.
| | Linux restricts access to USB devices to the root user. |
| | |
| ===Code::Blocks=== | |
|
| |
|
| ====Use our examples====
| | To run your C application as a regular user, you'll need to [{{SERVER}}/docs/OS_-_Linux#Setting_udev_Rules set up udev rules] on your system. |
|
| |
|
| 1. Download the examples and unpack them into a folder. Here, you can find example programs for all the devices. The source file will be named the same as the software object for your device. If you are not sure what the software object for your device is, find your Phidget on our [http://www.phidgets.com webpage], and then check the API documentation for it. You will need this example source code to be copied into your Code::Blocks project later on. The easiest way to confirm that your environment is set up properly will be to compile and run the HelloWorld C/C++ example.
| | === Library Files === |
| | If you would like to manually manage the Phidget22 library files, you can download them [https://cdn.phidgets.com/downloads/phidget22/libraries/windows/Phidget22-windevel.zip here]. |
|
| |
|
| 2. Once that that has been done, open one of the example files that you would like to run, for example HelloWorld.c. Under the Settings menu, choose "Compiler..."
| | == Development Environment Configuration == |
|
| |
|
| [[Image: CodeBlocks Compiler.png|link=|600px]]
| | === GCC === |
| | {| style="margin:auto;" class="table-no-border mw-collapsible mw-collapsed" |
| | |+ '''Instructions''' |
| | | |
| | The most common tool for C development is GCC, whether used in the command line or through an IDE. GCC is packaged with many other IDEs and packages, so you may already have it installed. |
|
| |
|
| 3. Go to the "Search directories" tab, and within that select the "Compiler" tab. Add a new entry, and choose your Phidgets installation directory.
| | {{hiddenh4|Windows}} |
| | We recommend installing [https://www.cygwin.com/ Cygwin] or [https://sourceforge.net/projects/mingw/ MinGW], ensuring you select all gcc packages when prompted by the installer. |
|
| |
|
| [[Image: CodeBlocks SearchDirectories Compiler.png|link=|600px]]
| | To compile your code, go to the folder where your code is and open the command prompt by typing 'cmd' in the address bar. |
|
| |
|
| 4. Select the "Linker" tab. Add a new entry, and choose your Phidgets installation directory, but append "\x86".
| | The specific command you will use depends on your compiler of choice: |
| | <syntaxhighlight lang=bash> |
| | #Cygwin x86: |
| | gcc example.c -o example -I"/cygdrive/c/Program Files/Phidgets/Phidget22"-L"/cygdrive/c/Program Files/Phidgets/Phidget22/x86" -lphidget22 |
|
| |
|
| [[Image: CodeBlocks SearchDirectories Linker.png|link=|600px]]
| | #Cygwin x64: |
| | gcc example.c -o example -I"/cygdrive/c/Program Files/Phidgets/Phidget22" -L"/cygdrive/c/Program Files/Phidgets/Phidget22" -lphidget22 |
|
| |
|
| 5. Go to the "Linker Settings" tab and add an entry called "phidget22"
| | #MinGW: |
| | | gcc example.c -o example -I"C:/Program Files/Phidgets/Phidget22" -L"C:/Program Files/Phidgets/Phidget22/x86" -lphidget22 |
| [[Image: CodeBlocks LinkerSettings.png|link=|600px]]
| |
| | |
| You can now compile and run the example.
| |
| | |
| ====Write your own code====
| |
| | |
| When you are building a project from scratch, or adding Phidget function calls to an existing project, you'll need to configure your development environment to properly link the Phidget C/C++ library. Please see the [[#Use Our Examples|Use Our Examples]] section for instructions.
| |
| | |
| In your .c source code file, you must include a reference to the library header:
| |
| | |
| <syntaxhighlight lang='C'>
| |
| #include <phidget22.h>
| |
| </syntaxhighlight> | | </syntaxhighlight> |
|
| |
|
| Then, you would compile your completed C/C++ code the same way as the examples above.
| | After running the commands above for either Cygwin or MinGW, an executable file called example.exe will be created. Enter the following command to run the program: |
| | | <syntaxhighlight lang=bash> |
| To learn how to write your own code for your Phidget, and to learn more about our API, we have a [[#Edit the Examples|teaching section]] to help you follow the provided C/C++ examples and which has resources such as the API reference.
| | example.exe |
| | |
| ==macOS==
| |
| | |
| C/C++ has excellent support on OS X through the gcc compiler.
| |
| | |
| The first step in using C/C++ on Mac is to install the Phidget C/C++ library. Compile and install them as explained on the Getting Started guide for your device, which you can find in its user guide. Then, the OS - OS X page also describes the different Phidget files, their installed locations, and their roles.
| |
| | |
| ===Use our examples===
| |
| | |
| After installing the main Phidget library for OS X as above, you're ready to download the examples. Afterwards, unzip the file. To run the example code, you'll need to find the source code for your specific device. Then, compile the code under your platform and run it.
| |
| | |
| To compile, link the Phidget C/C++ library, and build an executable binary on OS X, do (for example, depending on the Headers location):
| |
| | |
| <syntaxhighlight lang='bash'> | |
| gcc example.c -o example -framework Phidget22 -I/Library/Frameworks/Phidget22.framework/Headers
| |
| </syntaxhighlight> | | </syntaxhighlight> |
| | {{hiddenh4|MacOS}} |
| | If you don't already have gcc installed, you can get it by installing [https://developer.apple.com/xcode/ Xcode]. |
|
| |
|
| After using gcc, you will have an executable named example that you can run.
| | To compile the program, enter the following command in the terminal, substituting "example" for the name of your C file: |
| | | <syntaxhighlight lang=bash> |
| ===Write your own code===
| | gcc example.c -o example -F /Library/Frameworks -framework Phidget22 -I /Library/Frameworks/Phidget22.framework/Headers |
| | |
| When writing your code from scratch, you must include a reference to the library header:
| |
| | |
| <syntaxhighlight lang='C'> | |
| #include <phidget22.h>
| |
| </syntaxhighlight> | | </syntaxhighlight> |
| | | Finally, run the program by entering the following command in the terminal: |
| Then, you would compile your completed C/C++ code the same way as shown in the [[#Use Our Examples|Use Our Examples]] section above.
| | <syntaxhighlight lang=bash> |
| | | ./example |
| To learn how to write your own code for your Phidget, and to learn more about our API, we have a [[#Edit the Examples|teaching section]] to help you follow the provided C/C++ examples. Even more help and references are provided from there.
| |
| | |
| ==Linux==
| |
| | |
| C/C++ has support on Linux through the gcc compiler.
| |
| | |
| The first step in using C/C++ on Linux is to install the Phidget libraries. Compile and install them as explained on the main Linux page. That Linux page also describes the different Phidget files, their installed locations, and their roles.
| |
| | |
| ===Use our examples===
| |
| | |
| After installing the Phidget libraries for Linux as above, you're ready to download and run the examples:
| |
| | |
| *Generic C/C++ Examples
| |
| | |
| To run the example code, you'll need to download and unpack the examples, and then find the source code for your device. The source file will be named the same as the software object for your device. If you are not sure what the software object for your device is, find your Phidget on our [http://www.phidgets.com webpage], and then check the API documentation for it. You can also use the HelloWorld program, which a basic program that can run with any Phidget. Then, compile the code under your platform and run it. When compiling, you need to link to the Phidget library.
| |
| | |
| To compile, link the Phidget libraries and build a binary executable on Linux, do the following in a terminal in the directory with example.c:
| |
| | |
| <syntaxhighlight lang='bash'> | |
| gcc example.c -o example -lphidget22
| |
| </syntaxhighlight> | | </syntaxhighlight> |
| | Success! The project is now running with Phidgets. |
|
| |
|
| In this case, example.c would be the .c file specific to your device. After using gcc, you will have an executable named example that you can run.
| | {{hiddenh4|Linux}} |
| | | On Linux, gcc is installed through the package manager: |
| On Linux, if you have not set up your udev rules for USB access, you will need to run the program as root: | | <syntaxhighlight lang=bash> |
| | | apt-get install gcc |
| <syntaxhighlight lang='bash'> | |
| sudo ./example
| |
| </syntaxhighlight> | | </syntaxhighlight> |
| | | To compile the program, enter the following command in the terminal, substituting "example" for the name of your C file: |
| ===Write your own code===
| | <syntaxhighlight lang=bash> |
| | | gcc example.c -o example -lphidget22 |
| When writing your code from scratch, you start it as you would any C/C++ code on Linux, such as within a text editor like Emacs, Vi, Gedit, or Kate. In your .c source code file, you must include a reference to the library header:
| |
| | |
| <syntaxhighlight lang='C'> | |
| #include <phidget22.h>
| |
| </syntaxhighlight> | | </syntaxhighlight> |
| | | After compiling, you can run the program by entering the following command in the terminal: |
| Then, you would compile your completed C/C++ code the same way as the examples above.
| | <syntaxhighlight lang=bash> |
| | | ./example |
| To learn how to write your own code for your Phidget, and to learn more about our API, we have a [[#Edit the Examples|teaching section]] to help you follow the provided C/C++ examples and which has resources such as the API reference.
| |
| | |
| ==Edit the examples==
| |
| | |
| By following the instructions for your operating system and compiler above, you probably now have a working example and want to understand it better so you can change it to do what you want. This [[#Edit the Examples|teaching section]] has resources for you to learn from the examples and write your own.
| |
| Your main reference for writing C/C++ code will be the {{Phidget22API}}.
| |
| | |
| === Code snippets ===
| |
| | |
| The following code snippets describe how to do various general tasks with Phidgets. You should be able to find places in the examples where these snippets exist, and modify them to suit your requirements.
| |
| | |
| ==== Step One: Initialize and open ====
| |
| | |
| Before using a Phidget, it must first be created and opened.
| |
| | |
| <syntaxhighlight lang=C> | |
| //Create | |
| PhidgetDigitalInputHandle device;
| |
| PhidgetDigitalInput_create(&device);
| |
|
| |
| //Open
| |
| PhidgetReturnCode ret;
| |
| ret = Phidget_open((PhidgetHandle)device);
| |
| if(ret != EPHIDGET_OK)
| |
| {
| |
| Phidget_getErrorDescription ( returnValue, &errorString );
| |
| printf("\n%s", errorString );
| |
| }
| |
| | |
| </syntaxhighlight> | | </syntaxhighlight> |
| | Success! The project is now running with Phidgets. |
| | |- |
| | |} |
|
| |
|
| The variable "device" is now a handle for the Phidget. This example is ''specific to the Digital Input''. For another device, use the correspondingly named calls in the C API.
| | === Visual Studio === |
| | | {| style="margin:auto;" class="table-no-border mw-collapsible mw-collapsed" |
| Note that Phidget_open() opens the software object, but not hardware. So, it is not a guarantee you can use the Phidget immediately.
| | |+ '''Instructions''' |
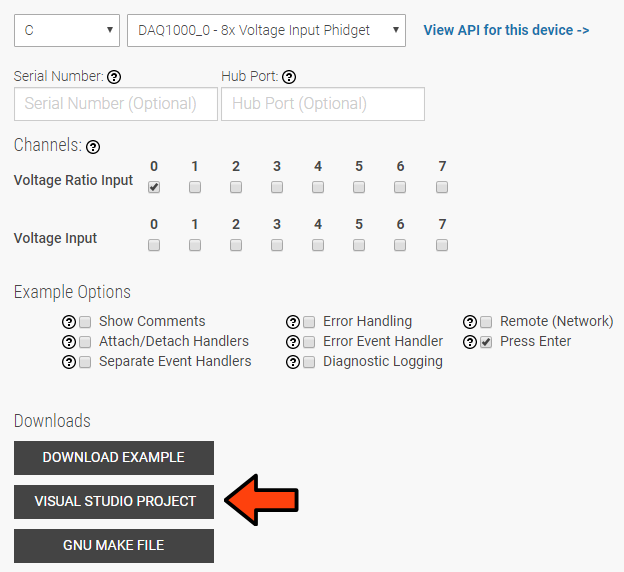
| | | | If you want to jump right into a pre-configured project, you can download one on our [https://www.phidgets.com/?view=code_samples&lang=C Code Sample Generator] page. || [[Image:Language_C_VSProject.jpg|center|link=https://cdn.phidgets.com/docs/images/f/f1/Language_C_VSProject.jpg|350px]] |
| Also note that you can catch error codes returned by the Phidget library as we did above when using the Phidget_open() call. In other words, this should probably be present around most of your Phidget calls, especially when you are learning how to use the Phidget and debugging your code:
| | |- |
| | | | To configure a new project, follow these steps. || |
| <syntaxhighlight lang=C>
| | |- |
| PhidgetReturnCode ret;
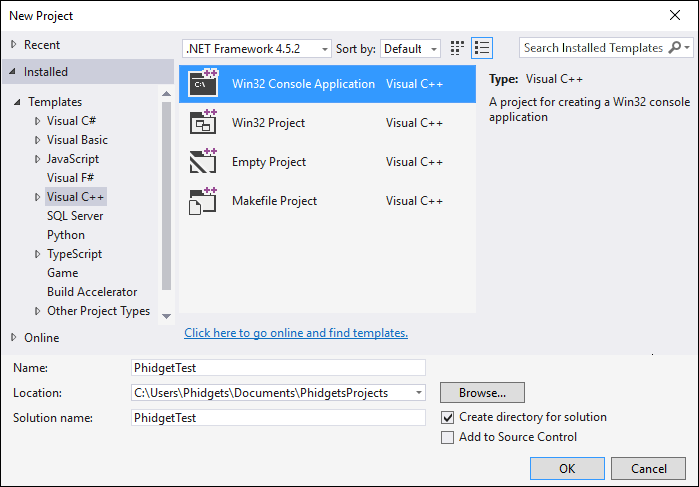
| | | First, create a new Win32 Console Application: || [[Image:Language_C_VS_step1.jpg|center|link=https://cdn.phidgets.com/docs/images/a/a1/Language_C_VS_step1.jpg|350px]] |
| const char* errorString;
| | |- |
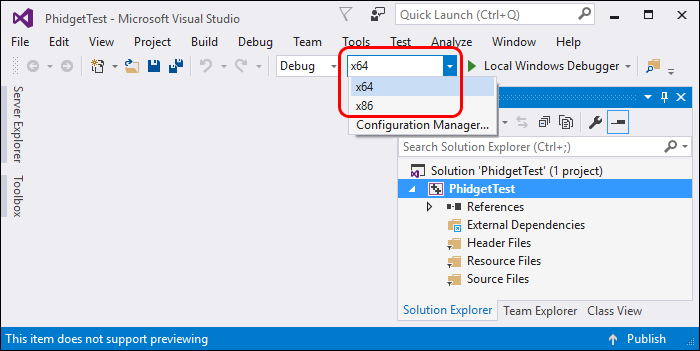
| ret = /*function call here*/;
| | | If you are using a 64-bit machine, select x64, otherwise, select x86: || [[Image:Language_C_VS_step2.jpg|center|link=https://cdn.phidgets.com/docs/images/6/6b/Language_C_VS_step2.jpg|350px]] |
| if(ret != EPHIDGET_OK)
| | |- |
| {
| | | Next, right click on the source folder and click New Item: || [[Image:Language_C_VS_step3.jpg|center|link=https://cdn.phidgets.com/docs/images/e/e1/Language_C_VS_step3.jpg|350px]] |
| Phidget_getErrorDescription ( returnValue, &errorString );
| | |- |
| printf("\n%s", errorString );
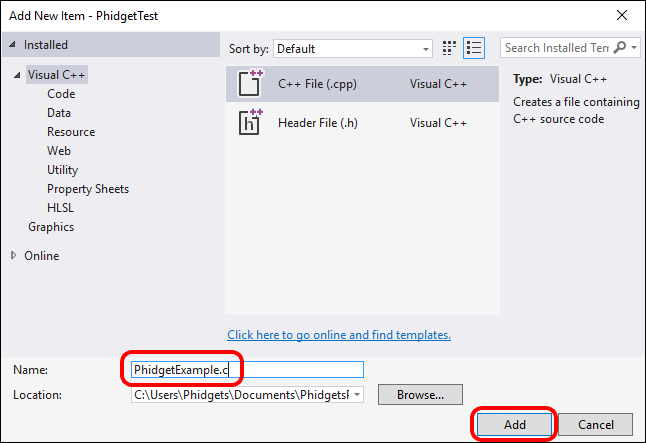
| | | Give the source file a name and click Add: || [[Image:Language_C_VS_step4.jpg|center|link=https://cdn.phidgets.com/docs/images/e/e5/Language_C_VS_step4.jpg|350px]] |
| }
| | |- |
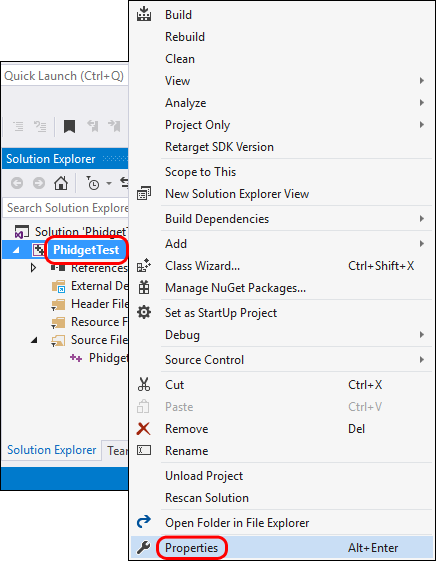
| | | Right click your project and access its properties: || [[Image:Language_C_VS_step5.jpg|center|link=https://cdn.phidgets.com/docs/images/1/1e/Language_C_VS_step5.jpg|350px]] |
| | |- |
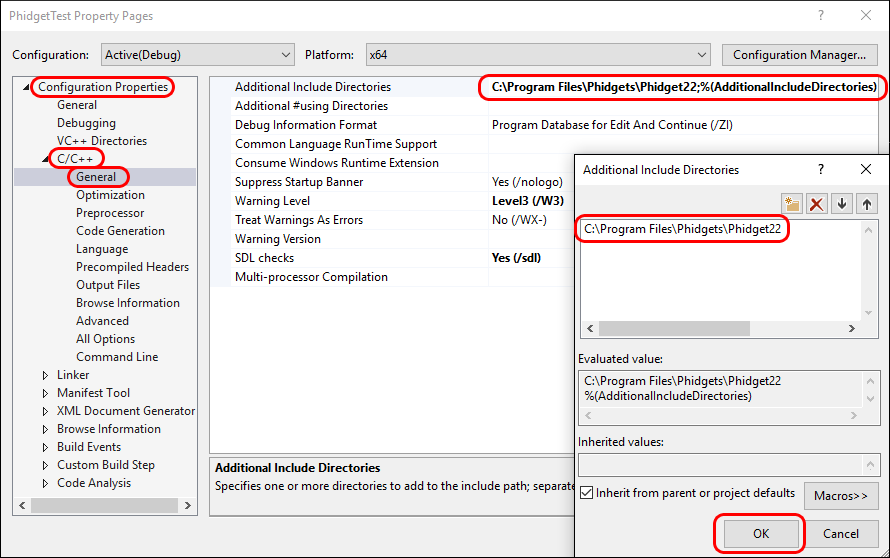
| | | Go to Configuration Properties -> C/C++ -> General and add this to the additional include directories: |
| | <syntaxhighlight> |
| | C:\Program Files\Phidgets\Phidget22 |
| </syntaxhighlight> | | </syntaxhighlight> |
| | | || [[Image:Language_C_VS_step6.jpg|center|link=https://cdn.phidgets.com/docs/images/d/d3/Language_C_VS_step6.jpg|350px]] |
| ==== Step Two: Wait for attachment (plugging in) of the Phidget ====
| | |- |
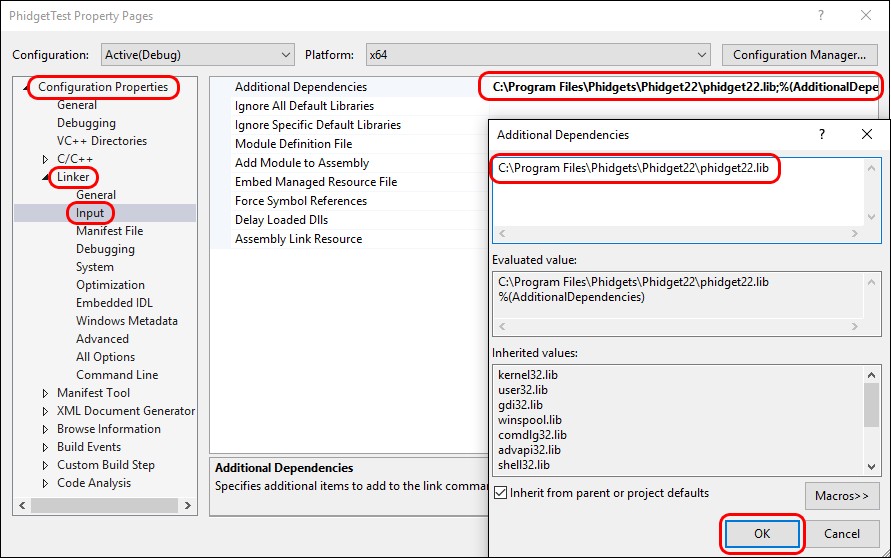
| | | | Go to Configuration Properties -> Linker -> Input and add the appropriate line to additional dependencies: |
| To use the Phidget, it must be plugged in (attached). We can handle this simply by calling openWaitForAttachment in place of the basic open. This function works for any Phidget. openWaitForAttachment will block until a connection is made to the Phidget, or the specified timeout is exceeded:
| | <syntaxhighlight> |
| | | C:\Program Files\Phidgets\Phidget22\phidget22.lib #(for 64-bit systems) |
| <syntaxhighlight lang=C> | | C:\Program Files\Phidgets\Phidget22\x86\phidget22.lib #(for 32-bit systems) |
| Phidget_openWaitForAttachment((PhidgetHandle)device, 5000);
| |
| </syntaxhighlight> | | </syntaxhighlight> |
| | | || [[Image:Language_C_VS_step7.jpg|center|link=https://cdn.phidgets.com/docs/images/0/09/Language_C_VS_step7.jpg|350px]] |
| Sometimes, it makes more sense to handle the attachment via an event. This would be in instances where the Phidget is being plugged and unplugged, and you want to handle these incidents. Or, when you want to use event-driven programming because you have a GUI-driven program. In these cases, an event-driven code snippet to handle the attachment might look something like this:
| | |- |
| | | | Lastly, include the Phidget library at the beginning of your program: |
| <syntaxhighlight lang=C> | | <syntaxhighlight lang=bash> |
| void CCONV OnAttachedEventHandler(PhidgetHandle Device, void *userPtr)
| | #include < phidget22.h > |
| {
| |
| int serial;
| |
| const char* deviceName;
| |
| Phidget_getDeviceSerialNumber(Device, &serial);
| |
| Phidget_getDeviceName(Device, &deviceName);
| |
| printf("\nHello to Device %s, Serial Number: %d", deviceName, serial);
| |
| }
| |
| </syntaxhighlight> | | </syntaxhighlight> |
| | || |
| | |- |
| | |} |
|
| |
|
| And the code to set up the event handler within the code opening your device might look like:
| | === PhidgetSBC Web Interface === |
| | | {| style="margin:auto;" class="table-no-border mw-collapsible mw-collapsed" |
| <syntaxhighlight lang=C>
| | |+'''Instructions''' |
| //Code for -creating- device here....
| | |<center>{{#ev:youtube|2hTlVexctqY|rel=0}}</center> |
| | | |} |
| Phidget_setOnAttachHandler((PhidgetHandle)device,OnAttachedEventHandler, NULL)
| |
| | |
| //Code for -opening- device here....
| |
| </syntaxhighlight>
| |
| | |
| ==== Step Three: Do things with the Phidget ==== | |
| | |
| You can read data and interact with your Phidget both by polling it for its current state (or to set a state), or by catching events that trigger when the data changes.
| |
| | |
| For a Phidget Digital Input or Output, the polling method of getting the input state or setting an output state looks something like this:
| |
| | |
| <syntaxhighlight lang=C>
| |
| //Get the state from a digital input
| |
| int state;
| |
| PhidgetDigitalInput_getState(digitalInputDevice, &state);
| |
| | |
| //Set the duty cycle for a digital output
| |
| PhidgetDigitalOutput_setDutyCycle(digitalOutputDevice, 0);
| |
| </syntaxhighlight>
| |
| | |
| To catch data changes via events, you would use something like this:
| |
| | |
| <syntaxhighlight lang=C>
| |
| void CCONV OnStateChangeHandler(PhidgetDigitalInputHandle digitalInput, void *userPtr, int state)
| |
| {
| |
| printf("State: %d", state);
| |
| }
| |
| | |
| //...
| |
| | |
| //Within the function that opens the device
| |
| | |
| // Insert code to create an Digital Input called 'device'
| |
|
| |
| // Hook our function above into the device object
| |
| PhidgetDigitalInput_setOnStateChangeHandler(digitalInput, OnStateChangeHandler, NULL);
| |
|
| |
| // Insert code to open 'device'
| |
| </syntaxhighlight> | |
| | |
| ==== Step Four: Close and delete ====
| |
| | |
| At the end of your program, don’t forget to close and delete the device to free any locks on the Phidget that opening the device put in place!
| |
| | |
| <syntaxhighlight lang=C>
| |
| Phidget_close((PhidgetHandle)device);
| |
| PhidgetDigitalInput_delete(&device);
| |
| </syntaxhighlight> | |
| | |
| ===C++ events===
| |
| | |
| If you want to use C++ style, object-oriented events you can do that as well. The following examples show you how to do this:
| |
| | |
| '''<span style="color:#FF0000">Figure out how to properly load these</span>'''
| |
| | |
| [[:File:Simple_22.cpp|Main]]
| |
| | |
| [[:File:Simple_22.h|Header]]
| |
| | |
| == Further Reading ==
| |
| | |
| [[Phidget Programming Basics]] - Here you can find the basic concepts to help you get started with making your own programs that use Phidgets.
| |
| | |
| [[Data Interval/Change Trigger]] - Learn about these two properties that control how much data comes in from your sensors.
| |
| | |
| [[Using Multiple Phidgets]] - It can be difficult to figure out how to use more than one Phidget in your program. This page will guide you through the steps.
| |
| | |
| [[Polling vs. Events]] - Your program can gather data in either a polling-driven or event-driven manner. Learn the difference to determine which is best for your application.
| |
| | |
| [[Logging, Exceptions, and Errors]] - Learn about all the tools you can use to debug your program.
| |
| | |
| [[Phidget Network Server]] - Phidgets can be controlled and communicated with over your network- either wirelessly or over ethernet.
| |
|
| |
|
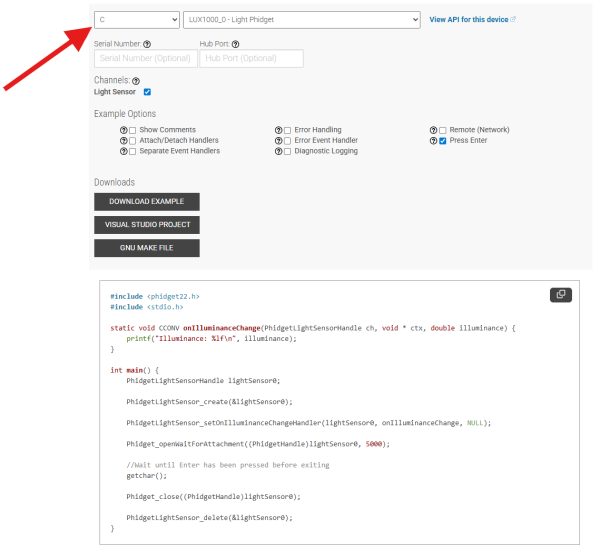
| == Common problems and solutions/workarounds == | | == Example Code == |
| | Navigate to our [https://www.phidgets.com/?view=code_samples&lang=C Code Sample Generator] to view and download code samples that are tailored to your specific device. |
|
| |
|
| ===Issue: I am using a non US-English version of Windows, and the Visual C/C++ examples run into a linker error===
| | [[Image:Language_c_codesample2.png|center|600px|link=]] |
|
| |
|
| Affected Operating Systems: '''Windows'''
| | ===Phidget Programming Basics=== |
| | {{PhidgetProgrammingBasicsLink}} |
|
| |
|
| The example projects, by default finds the phidget22.h and phidget22.lib in ${SystemDrive}\Program Files\Phidgets\Phidget22. If you are using a non US-English version of Windows, the Phidget drivers may be installed into a different location. To resolve, you will have to modify the paths to these two files. For instructions, please see your environment/compiler section.
| | ==API== |
| | [{{SERVER}}/?view=api&lang=C Phidget22 API] |