Language - Python: Difference between revisions

From Phidgets Support
No edit summary
No edit summary
 
(202 intermediate revisions by 9 users not shown)
Line 1: Line 1:
Preamble about the language and its general strengths and weaknesses.
[[Category:Language]]
__NOTOC__


==Assessment for use with Phidgets==
We provide support for Python in all major operating systems. We also provide instructions on how to get your project started in a number of common development environments. Select your operating system and preferred development environment below, and follow the instructions to get your project running with Phidgets.
Our honest opinion on how well this language is suited to controlling Phidgets. If it is a poor choice, suggest and link similar (better) languages.


==Support==
If you do not know which development environment you want to use, or your development environment of choice is not listed, we recommend starting with command line or terminal as the simplest path to getting your code running.
Python has a complete API and sample code for all Phidgets devices.


For a complete list of our supported languages and their support status, [[Levels of Support|click here]].
Once you have set up your development environment to run with Phidgets, we recommend you follow our guide on [[Phidget Programming Basics]]. The guide will showcase the fundamentals of programming with Phidgets, with examples in Python.


==Restrictions==
== Setup Guide ==
In this section, list any restrictions or limitations that this particular language may impose. For example, incompatibility with certain operating systems.


==Development Environments and Compilers==
<div class="phd-deck-sequence">
 
{{PT3_PYTHON_CHOOSE}}{{PT3_PYTHON_WIN_PYCHARM}}{{PT3_PYTHON_WIN_PYCHARM_1}}{{PT3_PYTHON_WIN_PYCHARM_2}}{{PT3_PYTHON_WIN_PYCHARM_3}}{{PT3_PYTHON_WIN_CMD}}{{PT3_PYTHON_MAC_TRM}}{{PT3_PYTHON_LNX_TRM}}{{PT3_PYTHON_SBC_TRM}}{{PT3_PYTHON_WIN_LIC}}{{PT3_PYTHON_WIN_VS}}{{PT3_PYTHON_WIN_VS_1}}{{PT3_PYTHON_WIN_VS_2}}{{PT3_PYTHON_WIN_IDLE}}
Describe each major compiler and notable differences or important information. (eg. framework versions) If there are known issues/workarounds mention them and link to the corresponding issue at the bottom of the page.
 
==Drivers, Libraries and Resources==
Before you can run your program, you need to set up the proper environment and get the necessary files off the Phidgets website.
Visit the drivers section at www.phidgets.com and get the latest:
* [http://www.phidgets.com/drivers.php Phidget Framework]
* [http://www.phidgets.com/downloads/libraries/PhidgetsPython_2.1.8.20110804.zip Phidgets Python Module]
You will need the Phidget Framework to use and to program with Phidgets. We also recommend that you download the following reference materials:
* [http://www.phidgets.com/documentation/PythonDoc.zip API Manual]
* [http://www.phidgets.com/documentation/web/PythonDoc/Phidgets.html API Reference]
* [http://www.phidgets.com/downloads/examples/Python_2.1.8.20110804.zip Python Sample Code]
* You can find a high level discussion about programming with Phidgets in general on the [[General API]] page.
* The [[Device Functionality]] page explains the general operational information for your device.
 
You may want to have these pages open while working through these instructions.
 
==Getting Started==
 
The Phidget examples were written in Python 3.0 and this tutorial assumes its use. 
However, they should still be compatible with Python 2.6. 
To run the examples using Python 2.5, you will need to modify the example code in the exception handling to read “except RuntimeError, e:”, instead of “except RuntimeError as e:”.
Please ensure you have extracted the “Phidgets” directory from the Python Module into your project directory or into the lib\site-packages\ directory in your python install.
 
===Coding For Your Phidget===
 
Before you can use the Phidget, you must include a reference in the code to the library. In Python:
 
<div style="background-color: #f3f3f3; border-color: #1c9edb; border-width:1px; border-style: dashed;">
<font size="3">
<source lang=python>
 
  from Phidgets.PhidgetException import *
  from Phidgets.Events.Events import *
  from Phidgets.Devices.InterfaceKit import *
 
</source>
</font>
</div>
 
Afterwards, the Phidget object will need to be declared and then initialized.
For example, we can declare a PhidgetInterfaceKit with:
 
<div style="background-color: #f3f3f3; border-color: #1c9edb; border-width:1px; border-style: dashed;">
<font size="3">
<source lang=python>
 
  try:
    interfaceKit = InterfaceKit()
  except RuntimeError as e:
    print("Runtime Error: %s" % e.message)
 
</source>
</font>
</div>
</div>


The initialization of the Phidget as well as calls using the Phidget object should be surrounded by a try catch block to handle any errors thrown by the library.
Calls to the Phidget object will throw a PhidgetException on an error.


<div style="background-color: #f3f3f3; border-color: #1c9edb; border-width:1px; border-style: dashed;">
== Quick Downloads ==
<font size="3">
<source lang=python>


  try:
If you already know what you're doing and just need the files, you can find them all below.
    #Your program Code here
  except PhidgetException as e:
    print (“Phidget Exception %i: %s” % (e.code, e.detail))
    exit(1)
 
</source>
</font>
</div>
 
The object name for any type of Phidget is listed in the API manual.
Every type of Phidget also inherits functionality from the Phidget base class.
 
===Connecting to the Phidget===
 
The program can try to connect to the Phidget through an open call.
Open will continuously try to connect to a Phidget, based on the parameters given, even trying to reconnect if it gets disconnected.
This means that simply calling open does not guarantee you can use the Phidget immediately.
We can handle this by using event driven programming and tracking the AttachEvents and DetachEvents, or checking isAttached().
 
<div style="background-color: #f3f3f3; border-color: #1c9edb; border-width:1px; border-style: dashed;">
<font size="3">
<source lang=python>
 
  interfaceKit.openPhidget()
  interfaceKit.waitForAttach(10000)
  print (“%d attached!” % (interfaceKit.getSerialNum()))
 
</source>
</font>
</div>
 
The parameters can be used to open the first Phidget of a type it can find, open based on its serial number, or even open across the network.
The API manual lists all of the available modes that open provides.
One important thing to remember is that when working with Phidgets, a local connection will reserve the device until closed.
This prevents any other instances from retrieving data from the Phidget, including other programs.  
The one connection per device limit does not apply when exclusively using the Phidget Webservice.
At the end of your program, don’t forget to call close to free any locks on the Phidget.
 
<div style="background-color: #f3f3f3; border-color: #1c9edb; border-width:1px; border-style: dashed;">
<font size="3">
<source lang=python>
 
  interfaceKit.closePhidget()
 
</source>
</font>
</div>
 
===Event Driven Programming===
 
We recommend the use of event driven programming when working with Phidgets.
In Python, we hook an event handler by defining the callback function and then calling a set handler function on it. 
 
<div style="background-color: #f3f3f3; border-color: #1c9edb; border-width:1px; border-style: dashed;">
<font size="3">
<source lang=python>
 
  def interfaceKitSensorChanged(e):
  print (“Sensor %i: %i” % (e.index, e.value))
  return 0
    interfaceKit.setOnSensorChangeHandler(interfaceKitSensorChanged)
 
</source>
</font>
</div>
 
With this, the code inside interfaceKitSensorChanged will get executed every time the PhidgetInterfaceKit reports a change on one of its analog inputs.
The values from the report can be accessed from the PhidgetDataEvent object properties.
 
Certain events such as Attach and Detach belong to the base Phidget object and thus are common to
all types of Phidgets. Please refer to the API manual for a full list of events and their usage.
 
===Working directly with the Phidget===
 
Some values can be directly read and set on the Phidget and used as an alternative to event driven programming.
Simply use the instance properties or call member functions such as getSensorValue(index) or setOutputState(index, state) for PhidgetInterfaceKits.
 
<div style="background-color: #f3f3f3; border-color: #1c9edb; border-width:1px; border-style: dashed;">
<font size="3">
<source lang=python>
 
  interfaceKit.setOutputState(0, 1)
 
</source>
</font>
</div>


===Working with multiple Phidgets===
=== Python Module ===
* [https://cdn.phidgets.com/downloads/phidget22/libraries/any/Phidget22Python.zip Phidget Python module]


Multiple Phidgets of the same type can easily be run inside the same program.
=== Documentation ===
In our case, it requires another instance of a PhidgetInterfaceKit to be defined and initialized.
The new instance can then be set up, opened and used in the same process as the previous one.
If the application needs to distinguish between the devices, open can be called with the serial number of a specific Phidget.


===Other Phidgets===
*{{Phidget22API}}  (select Python from the drop-down menu)


The design given in this document can also be followed for almost all Phidgets.
=== Example Code ===
For example, if you were using a PhidgetRFID instead of a PhidgetInterfacekit, you would declare an RFID instead of an InterfaceKit.
The functions and events available would change but they can be accessed in a similar manner.


==Building your Project==
*{{SampleCode|Python|Python Examples}}
Describe the different ways a project could be built using this language.


==Common Problems and Solutions/Workarounds==
===Libraries===
Here you can put various frequent problems and our recommended solutions.
{{AllQuickDownloads}}

Latest revision as of 22:06, 17 October 2023


We provide support for Python in all major operating systems. We also provide instructions on how to get your project started in a number of common development environments. Select your operating system and preferred development environment below, and follow the instructions to get your project running with Phidgets.

If you do not know which development environment you want to use, or your development environment of choice is not listed, we recommend starting with command line or terminal as the simplest path to getting your code running.

Once you have set up your development environment to run with Phidgets, we recommend you follow our guide on Phidget Programming Basics. The guide will showcase the fundamentals of programming with Phidgets, with examples in Python.

Setup Guide

Python - Select Development Environment

Select your Development Environment:

Windows

MacOS

Linux

PhidgetSBC

Language - Python

Windows with Pycharm

Welcome to using Phidgets with Python! By using Python, you will have access to the complete Phidget22 API, including events.

PyCharm is an integrated development environment for Python by JetBrains.

Requirements

First, make sure you have the following installed:

● Phidgets Drivers for Windows (see Part 1 of this user guide)

Python (2.7 and 3.6+ are both compatible with Phidgets)

Installing the Phidget Python Module

Select your preferred installation method below:

The recommended way to install the Phidget22 Python module is using the PIP package manager.

«
»

Language - Python

Installing the Phidget Python Module

You can install the Phidget22 libraries for your current PyCharm project with PIP by opening File > Settings

Installing the Phidget Python Module

Next, navigate to Project > Project Interpreter and click on the + symbol located on the right:

Installing the Phidget Python Module

Type Phidget22 into the search bar, select the package named Phidget22 and click Install Package:

Finding Code Samples

To find the code sample to use for your Phidget, navigate to the Code Samples page and select your device from the drop-down menu.

Once you select your device, the code sample generator will give you a working code sample, and a selection of options to customize it to your needs.

Using the Code Samples

Click the Download Example button to download the sample code:

Using the Code Samples

Add the example you just downloaded by dragging it into the project:

Using the Code Samples

Finally, run the project:

The project is now running with Phidgets!

What's Next?

Now that you've set up Phidgets in your programming environment, you should read our guide on Phidget Programming Basics to learn the fundamentals of programming with Phidgets.

Continue reading below for advanced information and troubleshooting for your device.

«
»

Language - Python

Installing the Phidget Python Module

Python versions 2.7.9+ and 3.4+ include PIP by default. To install the Phidget22 Python module with PIP, simply open the Command Prompt (press the Windows key and search for cmd), and enter the command:

python -m pip install Phidget22

To install the Phidget22 libraries to a specific Python version, you can use the Python Windows Launcher from the Command Prompt as follows (replace -X.X with your Python version, e.g. -2.7 or -3.6):

py -X.X -m pip install Phidget22

Installing the Phidget Python Module

To use the global Phidget22 library in your PyCharm project, select Inherit global site-packages when creating a new project.

Finding Code Samples

To find the code sample to use for your Phidget, navigate to the Code Samples page and select your device from the drop-down menu.

Once you select your device, the code sample generator will give you a working code sample, and a selection of options to customize it to your needs.

Using the Code Samples

Click the Download Example button to download the sample code:

Using the Code Samples

Add the example you just downloaded by dragging it into the project:

Using the Code Samples

Finally, run the project:

The project is now running with Phidgets!

What's Next?

Now that you've set up Phidgets in your programming environment, you should read our guide on Phidget Programming Basics to learn the fundamentals of programming with Phidgets.

Continue reading below for advanced information and troubleshooting for your device.

«
»

Language - Python

Installing the Phidget Python Module

To install the Phidget22 Python module without PIP, you need to download it here:

Phidget22 Python Module

Unpack the Phidget22 Python module and open the Command Prompt (press the Windows key and search for cmd). Find the folder where you downloaded the Python module and enter this command:

python setup.py install

This will build the module and install the Python module files into your site-packages directory.

Finding Code Samples

To find the code sample to use for your Phidget, navigate to the Code Samples page and select your device from the drop-down menu.

Once you select your device, the code sample generator will give you a working code sample, and a selection of options to customize it to your needs.

Using the Code Samples

Click the Download Example button to download the sample code:

Using the Code Samples

Add the example you just downloaded by dragging it into the project:

Using the Code Samples

Finally, run the project:

The project is now running with Phidgets!

What's Next?

Now that you've set up Phidgets in your programming environment, you should read our guide on Phidget Programming Basics to learn the fundamentals of programming with Phidgets.

Continue reading below for advanced information and troubleshooting for your device.

«
»

Language - Python

Windows with Command Line

Welcome to using Phidgets with Python! By using Python, you will have access to the complete Phidget22 API, including events.

The command line is the default environment to make Python programs in Windows, since it's available immediately after installing Python.

Requirements

First, make sure you have the following installed:

● Phidgets Drivers for Windows (see Part 1 of this user guide)

Python (2.7 and 3.6+ are both compatible with Phidgets)

Installing the Phidget Python Module

Python versions 2.7.9+ and 3.4+ include PIP by default. To install the Phidget22 Python module with PIP, simply open the Command Prompt (press the Windows key and search for cmd), and enter the command:

python -m pip install Phidget22

To install the Phidget22 libraries to a specific Python version, you can use the Python Windows Launcher from the Command Prompt as follows (replace -X.X with your Python version, e.g. -2.7 or -3.6):

py -X.X -m pip install Phidget22

If you don't use PIP, follow the manual installation instructions on the next slide.

Installing the Phidget Python Module

To install the Phidget22 Python module without PIP, you need to download it here:

Phidget22 Python Module

Unpack the Phidget22 Python module and open the Command Prompt (press the Windows key and search for cmd). Find the folder where you downloaded the Python module and enter this command:

python setup.py install

This will build the module and install the Python module files into your site-packages directory.

Finding Code Samples

To find the code sample to use for your Phidget, navigate to the Code Samples page and select your device from the drop-down menu.

Once you select your device, the code sample generator will give you a working code sample, and a selection of options to customize it to your needs.

Using the Code Samples

Click the Download Example button to download the sample code:

Using the Code Samples

To run the example, open the command prompt at the location of the example and enter the following command:

python example.py

The script is now running with Phidgets!

What's Next?

Now that you've set up Phidgets in your programming environment, you should read our guide on Phidget Programming Basics to learn the fundamentals of programming with Phidgets.

Continue reading below for advanced information and troubleshooting for your device.

«
»

Language - Python

MacOS with Terminal

Welcome to using Phidgets with Python! By using Python, you will have access to the complete Phidget22 API, including events.

The terminal is the default environment to make Python programs in macOS, since it's available immediately after installing Python.

Requirements

First, make sure you have the following installed:

● Phidgets Drivers for MacOS (see Part 1 of this user guide)

Python (2.7 and 3.6+ are both compatible with Phidgets)

Installing the Phidget Python Module

Python versions 2.7.9+ and 3.4+ include PIP by default. To install the Phidget22 Python module with PIP, simply open the Terminal and enter the command:

python pip install Phidget22

If you don't use PIP, follow the manual installation instructions on the next slide.

Installing the Phidget Python Module

To install the Phidget22 Python module without PIP, you need to download it here:

Phidget22 Python Module

After unpacking the Phidget Python module, open the terminal (Applications -> Utilities -> Terminal). Locate the folder containing the Python module and enter the following command:

python setup.py install

This will build the module and install the Python module files into your site-packages directory.

Finding Code Samples

To find the code sample to use for your Phidget, navigate to the Code Samples page and select your device from the drop-down menu.

Once you select your device, the code sample generator will give you a working code sample, and a selection of options to customize it to your needs.

Using the Code Samples

Click the Download Example button to download a Java file with the sample code:

Using the Code Samples

To run the example, open the command prompt at the location of the example and enter the following command:

python example.py

Success! Your program is now running with Phidgets!

What's Next?

Now that you've set up Phidgets in your programming environment, you should read our guide on Phidget Programming Basics to learn the fundamentals of programming with Phidgets.

Continue reading below for advanced information and troubleshooting for your device.

«
»

Language - Python

Linux with Terminal

Welcome to using Phidgets with Python! By using Python, you will have access to the complete Phidget22 API, including events.

The terminal is the default environment to make Python programs in Linux, since it's available immediately after installing Python.

Requirements

First, make sure you have the following installed:

● Phidgets Drivers for Linux (see Part 1 of this user guide)

Python (2.7 and 3.6+ are both compatible with Phidgets)

Installing the Phidget Python Module

Python versions 2.7.9+ and 3.4+ include PIP by default. To install the Phidget22 Python module with PIP, simply open the Terminal and enter the command:

Python 2.x :

pip install Phidget22

Python 3.x :

pip3 install Phidget22

If you don't use PIP, follow the manual installation instructions on the next slide.

Installing the Phidget Python Module

To install the Phidget22 Python module without PIP, you need to download it here:

Phidget22 Python Module

After unpacking the Phidget Python module, open the terminal at folder location and enter the following command:

python setup.py install

This will build the module and install the Python module files into your site-packages directory.

Finding Code Samples

To find the code sample to use for your Phidget, navigate to the Code Samples page and select your device from the drop-down menu.

Once you select your device, the code sample generator will give you a working code sample, and a selection of options to customize it to your needs.

Using the Code Samples

Click the Download Example button to download a Java file with the sample code:

Using the Code Samples

To run the example, open the command prompt at the location of the example and enter the following command:

Python 2.x :

python Python_Example.py

Python 3.x :

python3 Python_Example.py

Success! Your program is now running with Phidgets!

What's Next?

Now that you've set up Phidgets in your programming environment, you should read our guide on Phidget Programming Basics to learn the fundamentals of programming with Phidgets.

Continue reading below for advanced information and troubleshooting for your device.

«
»

Language - Python

PhidgetSBC with Python

Welcome to using Phidgets with Python! By using Python, you will have access to the complete Phidget22 API, including events.

Requirements

If you haven't already, check out the user guide in order to set up the following:

● Networking

● Administrator password


This guide will cover development using an external machine. For development using the SBC itself, go back and select Terminal - Linux as your environment.

Introduction

To begin, this video will help you get started:

Developing With An External Computer

There are two main ways in which you can access your SBC from an external computer:

● SBC Web Interface

● Secure Shell (SSH)


Since the SBC User Guide covers the web interface in detail, this guide will cover SSH.

SSH

If you are unfamiliar with SSH, it is a simple yet powerful tool that allows you to log into a remote machine in order to execute commands. You can also transfer files using the associated SCP tool.

In order to use SSH, you need the following:

● The SBC's IP address (e.g. 192.168.3.195) or the link local address (e.g. phidgetsbc.local)

● The administrator password

● SSH enabled on the SBC

SSH

You can enable SSH on the SBC Web Interface as shown below:

SSH on Windows

To use SSH on Windows, we recommend PuTTY. Use the images below as a guide for configuring PuTTY (use the IP address or the link local address interchangeably):

SSH on Windows

After clicking open, simply login as root and provide the administrator password:

To transfer files between your SBC and Windows machine, we recommend either of these programs:

WinSCP

PuTTY PSCP

You will follow a similar process to access the SBC as described for SSH.

SSH on Linux and macOS

SSH is available on Linux and macOS by default. To run SSH, open the terminal and type:

ssh root@phidgetsbc.local

Or, something like this (you will need to know the IP address of your SBC):

ssh root@192.168.3.195

You will then be prompted for the password in order to gain access to the SBC:

SSH on Linux and macOS

To copy a file from the SBC to your development machine using SCP, open the terminal and type:

scp root@phidgetsbc.local:/path/to/source /path/to/destination

You can reverse this if you want to transfer a file from your development machine to your SBC:

scp /path/to/source root@phidgetsbc.local:/path/to/destination

Installing Packages For Development

Installing support for Python has three steps:

  1. Ensure Include full Debian Package Repository is checked on the SBC Web Interface (System->Packages)
  2. Install Python
  3. Install Phidget Python module

You will need to run commands on the SBC to install support for Python. You can either use SSH to issue the commands, or you can connect directly to the SBC via a monitor and keyboard.

Installing Python

The base Python functionality can be downloaded and installed in one step:

apt-get install python

Installing the Phidgets Module

Next, you need to install the Phidget Python module. You have three options:

Using PIP

The recommended way to install the Phidget22 Python module is using the PIP package manager.

Python versions 2.7.9+ and 3.4+ include PIP by default.

To install the Phidget22 Python module with PIP, simply run the command:

python -m pip install Phidget22

Manual Install Using the Internet

First, install wget and unzip:

apt-get install wget
apt-get install unzip

Next, copy the web link address for the Python Libraries and use it in the following command (right click to copy into a terminal):

wget http://copied_link

The Phidget Python libraries should now be downloaded in the folder you ran the previous command in. The next step is to unzip the file:

unzip filename

Finally, change directories to the unzipped folder:

cd /path/to/unzipped/folder

and install the Phidget Python libraries:

python setup.py install

Using a USB Key

Copy the Python Libraries onto a USB key. Unpack the zip file into a folder on the USB key. Insert the key into the SBC.

You will have to figure out where the USB key (and the Phidget Python library folder) is now located. Next, run the following commands (be sure to modify the usb directory number if necessary):

cd /media/usb0/
python setup.py install

You're now ready to begin programming! Continue through this guide for code examples and directions on where to go next.

Finding Code Samples

To find the code sample to use for your Phidget, navigate to the Code Samples page and select your device from the drop-down menu.

Once you select your device, the code sample generator will give you a working code sample, and a selection of options to customize it to your needs.

Using the Code Samples

If it's unclear what any of the options do, click on the nearby '?' for more info.

Once you've made your selections, click the Download Example button under Downloads.

Setting up a New Project

When developing on an external computer, you will write, compile, and test your programs on that machine. When you are ready, you will then upload your programs to the SBC to compile and run them.

Setting up a New Project

Once your code is written, follow these steps to get your program running on the SBC:

1. Using the SBC Web Interface, create a new project:

Setting up a New Project

2. Transfer all the project files from the development machine to the SBC, either using the SBC Web Interface or a tool like WinSCP.

The project directory will be:

/usr/userapps/ProjectName

Setting up a New Project

3. Use SSH to access the SBC terminal and go to the project folder:

cd /usr/userapps/ProjectName

You can now run the program with the command:

python ExampleName.py

Success! The program is running on your SBC.

Running a Program Automatically

To run a Python script as a standalone application, you will need to add a line called a "shebang" to the top of the script, with the path to your Python executable. If you have followed the steps in this guide, the line will be:

#!/usr/bin/python

Click on the sections below for various automation options:

-----

Running a Program from the SBC Web Interface

To quickly test whether a program can be run automatically, you can try starting it from the SBC Web Interface.

1. To start the program, navigate to Projects->ProjectName->Startup Settings in the SBC Web Interface.

2. Select your program in the drop-down menu labeled Executable/Class Name.


3. Click the Start button on the SBC web interface.


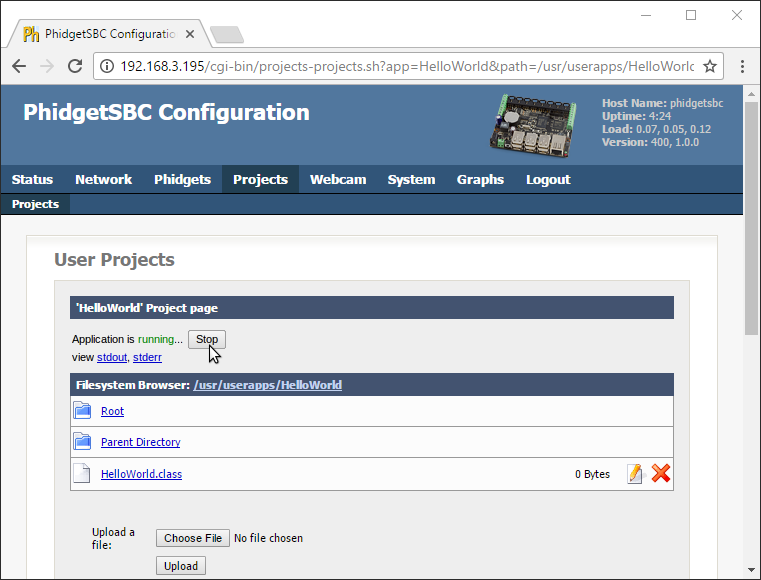
4. You'll note that as it runs, there are two links below the Stop button which can be used to view the program output:

  • stdout: view the program output like you would in a terminal or command prompt
  • stderr: view the program error output

Run on Boot

Running on boot ensures that your program will never miss an event. As long as the SBC is running, your code will be running. This section assumes you have written and compiled your program on an external computer, and have uploaded it to the SBC Web Interface.


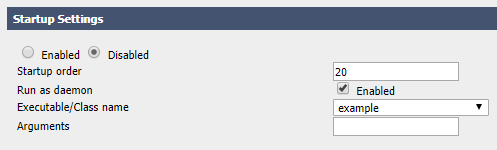
To have your program run on boot, navigate to Projects->ProjectName->Startup Settings in the SBC Web Interface. After selecting your project, copy the settings from the image below:


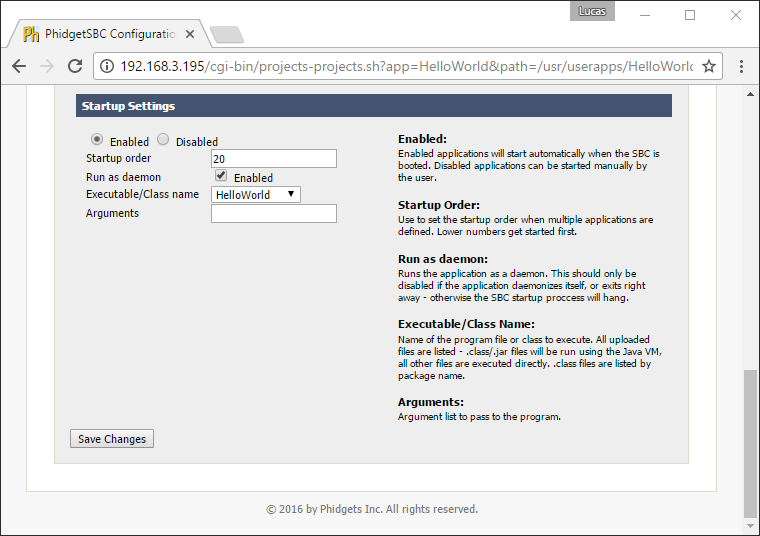
We will review some of the options that are shown in the image above:

  • Startup Order: lower numbers boot first. Booting later means more programs are available for use, booting earlier means other programs can use your program.
  • Run as a daemon: starts the program as a daemon. Unless you have explicitly written your program as a daemon, leave this checked, or else your SBC may hang on boot.
  • Executable/Class name: your main Java class or C file.
  • Arguments: any command line arguments the program needs.

After saving your changes, your program will run automatically whenever your SBC boots.


Run on a Schedule

Running your program on a schedule allows you to perform your task once a week, or once a minute without worrying about memory management issues or instability problems that may arise. It executes, and then gets cleaned up. To run your program on a schedule, we recommend using Cron. Cron can automatically schedule programs (known as jobs, or cron jobs). Cron simply reads a crontab file and runs whatever programs are listed, with whatever timing they are listed with. Cron runs continuously in the background, but the cron jobs only run as long as they naturally would, and then they exit.


Let's set up your first cron job. We will use nano to edit the crontab file, but feel free to use whatever editor you prefer.


First, set your editor to nano:

export EDITOR=nano

Next, edit your crontab file:

crontab -e

Finally, schedule your cron job:

#cron job that will run at 5AM every week:
0 5 * * 1 /root/code/myprogram argument1


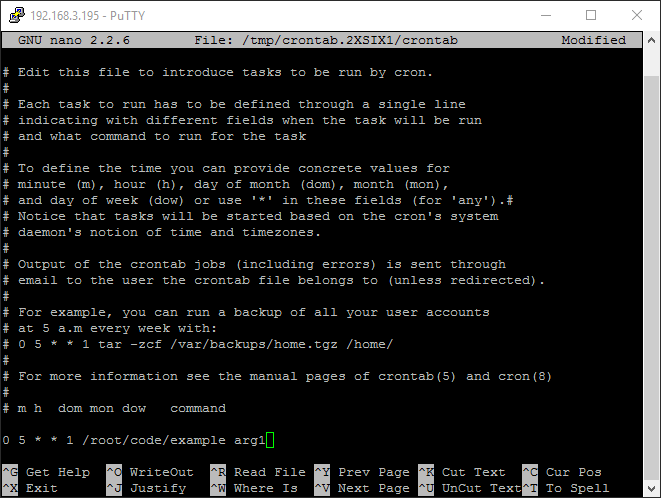
After entering your task, simply save and exit the file.


What's Next?

Now that you've set up Phidgets in your programming environment, you should read our guide on Phidget Programming Basics to learn the fundamentals of programming with Phidgets.

Continue reading below for advanced information and troubleshooting for your device.

«
»

Language - Python

Windows with LiClipse

Welcome to using Phidgets with Python! By using Python, you will have access to the complete Phidget22 API, including events.

LiClipse is a closed-source development environment based on Eclipse, with support for Python.

Requirements

First, make sure you have the following installed:

● Phidgets Drivers for Windows (see Part 1 of this user guide)

Python (2.7 and 3.6+ are both compatible with Phidgets)

Installing the Phidget Python Module

Python versions 2.7.9+ and 3.4+ include PIP by default. To install the Phidget22 Python module with PIP, simply open the Command Prompt (press the Windows key and search for cmd), and enter the command:

python -m pip install Phidget22

To install the Phidget22 libraries to a specific Python version, you can use the Python Windows Launcher from the Command Prompt as follows (replace -X.X with your Python version, e.g. -2.7 or -3.6):

py -X.X -m pip install Phidget22

If you don't use PIP, follow the manual installation instructions on the next slide.

Installing the Phidget Python Module

To install the Phidget22 Python module without PIP, you need to download it here:

Phidget22 Python Module

Unpack the Phidget22 Python module and open the Command Prompt (press the Windows key and search for cmd). Find the folder where you downloaded the Python module and enter this command:

python setup.py install

This will build the module and install the Python module files into your site-packages directory.

Setting Up a New Project

When you are building a project from scratch, or adding Phidget functionality to an existing project, you'll need to configure your development environment to properly link the Phidget Python library.

To start, create a new Python project:

Setting Up a New Project

Next, add a new file to the project:

Finding Code Samples

To find the code sample to use for your Phidget, navigate to the Code Samples page and select your device from the drop-down menu.

Once you select your device, the code sample generator will give you a working code sample, and a selection of options to customize it to your needs.

Using the Code Samples

If it's unclear what any of the options do, click on the nearby '?' for more info.

Once you've made your selections, click the copy button and paste the code into your new project.

What's Next?

Now that you've set up Phidgets in your programming environment, you should read our guide on Phidget Programming Basics to learn the fundamentals of programming with Phidgets.

Continue reading below for advanced information and troubleshooting for your device.

«
»

Language - Python

Windows with Visual Studio

Welcome to using Phidgets with Python! By using Python, you will have access to the complete Phidget22 API, including events.

Visual Studio is an IDE provided by Microsoft that can be used to develop code in a wide variety of programming languages, including Python.

Requirements

First, make sure you have the following installed:

● Phidgets Drivers for Windows (see Part 1 of this user guide)

Python (2.7 and 3.6+ are both compatible with Phidgets)

Installing the Phidget Python Module

Select your preferred installation method below:

The recommended way to install the Phidget22 Python module is using the PIP package manager.

«
»

Language - Python

Installing the Phidget Python Module

You can install the Phidget22 libraries for your current Visual Studio project with PIP by opening View > Other Windows > Python Environments

Installing the Phidget Python Module

Next, select Packages (PyPI) from the drop-down menu:

Installing the Phidget Python Module

Type Phidget22 into the search bar, then click Install Phidget22:

Success! Your project now has access to Phidget22.

Setting Up a New Project

When you are building a project from scratch, or adding Phidget functionality to an existing project, you'll need to configure your development environment to properly link the Phidget Python library.

To start, create a new Python project:

Setting Up a New Project

Then open the Python file that was generated with the project.

Finding Code Samples

To find the code sample to use for your Phidget, navigate to the Code Samples page and select your device from the drop-down menu.

Once you select your device, the code sample generator will give you a working code sample, and a selection of options to customize it to your needs.

Using the Code Samples

If it's unclear what any of the options do, click on the nearby '?' for more info.

Once you've made your selections, click the copy button and paste the code into your new project.

What's Next?

Now that you've set up Phidgets in your programming environment, you should read our guide on Phidget Programming Basics to learn the fundamentals of programming with Phidgets.

Continue reading below for advanced information and troubleshooting for your device.

«
»

Language - Python

Installing the Phidget Python Module

To install the Phidget22 Python module without PIP, you need to download it here:

Phidget22 Python Module

Unpack the Phidget22 Python module and open the Command Prompt (press the Windows key and search for cmd). Find the folder where you downloaded the Python module and enter this command:

python setup.py install

This will build the module and install the Python module files into your site-packages directory.

Setting Up a New Project

When you are building a project from scratch, or adding Phidget functionality to an existing project, you'll need to configure your development environment to properly link the Phidget Python library.

To start, create a new Python project:

Setting Up a New Project

Then open the Python file that was generated with the project.

Finding Code Samples

To find the code sample to use for your Phidget, navigate to the Code Samples page and select your device from the drop-down menu.

Once you select your device, the code sample generator will give you a working code sample, and a selection of options to customize it to your needs.

Using the Code Samples

If it's unclear what any of the options do, click on the nearby '?' for more info.

Once you've made your selections, click the copy button and paste the code into your new project.

What's Next?

Now that you've set up Phidgets in your programming environment, you should read our guide on Phidget Programming Basics to learn the fundamentals of programming with Phidgets.

Continue reading below for advanced information and troubleshooting for your device.

«
»

Language - Python

Windows with IDLE

Welcome to using Phidgets with Python! By using Python, you will have access to the complete Phidget22 API, including events.

IDLE is a cross-platform development environment for Python targeted at newcomers to the language.

WARNING: We do not recommend using Idle with Phidgets. It has known problems dealing with multiple threads, which is a required feature if your program uses events.

Requirements

First, make sure you have the following installed:

● Phidgets Drivers for Windows (see Part 1 of this user guide)

Python (2.7 and 3.6+ are both compatible with Phidgets)

Installing the Phidget Python Module

Python versions 2.7.9+ and 3.4+ include PIP by default. To install the Phidget22 Python module with PIP, simply open the Command Prompt (press the Windows key and search for cmd), and enter the command:

python -m pip install Phidget22

To install the Phidget22 libraries to a specific Python version, you can use the Python Windows Launcher from the Command Prompt as follows (replace -X.X with your Python version, e.g. -2.7 or -3.6):

py -X.X -m pip install Phidget22

If you don't use PIP, follow the manual installation instructions on the next slide.

Installing the Phidget Python Module

To install the Phidget22 Python module without PIP, you need to download it here:

Phidget22 Python Module

Unpack the Phidget22 Python module and open the Command Prompt (press the Windows key and search for cmd). Find the folder where you downloaded the Python module and enter this command:

python setup.py install

This will build the module and install the Python module files into your site-packages directory.

Finding Code Samples

To find the code sample to use for your Phidget, navigate to the Code Samples page and select your device from the drop-down menu.

Once you select your device, the code sample generator will give you a working code sample, and a selection of options to customize it to your needs.

Using the Code Samples

If it's unclear what any of the options do, click on the nearby '?' for more info.

Once you've made your selections, click the copy button.

Using the Code Samples

Paste the sample code into a new Python script file in IDLE:

Using the Code Samples

To run the example, simply click on Run and select Run Module:

What's Next?

Now that you've set up Phidgets in your programming environment, you should read our guide on Phidget Programming Basics to learn the fundamentals of programming with Phidgets.

Continue reading below for advanced information and troubleshooting for your device.

«
»


Quick Downloads

If you already know what you're doing and just need the files, you can find them all below.

Python Module

Documentation

Example Code

Libraries