|
|
| (37 intermediate revisions by 5 users not shown) |
| Line 1: |
Line 1: |
| [[Category:Language]] | | [[Category:Language]] |
| {{OSLang|[[File:icon-LabVIEW.png|64x64px|link=|alt=]]|LabVIEW, developed by [http://www.ni.com National Instruments] is dataflow programming language for data processing.}}
| |
| __TOC__
| |
|
| |
|
| ==Introduction==
| | We provide support for LabVIEW on the '''Windows''' operating system. By using LabVIEW, you will have access to the complete {{Phidget22API}}, including events. We also provide example code in LabVIEW for all Phidget devices. |
|
| |
|
| {{LanguageSupport|LabVIEW|the complete Phidget API, including events|all Phidget devices.| Windows. A minimum version of LabVIEW 7.1.1 is required to use the Phidget LabVIEW 32 bit library. For the Phidget LabVIEW 64 bit library, a minimum version of LabVIEW 2009 is required. OS X and Linux are unsupported as the Labview/Phidgets combination has not been tested on those systems.|}}
| | LabVIEW is a development environment for a graphical programming language created by National Instruments. |
|
| |
|
| Note that with LabVIEW you can install a 32-bit version on a 64-bit computer without any issues, but the 64-bit version cannot obviously be installed on a 32-bit computer. The reason this is relevant is that the respective versions cannot create executables that the other can run. I.E. 64-bit LabVIEW cannot generate a 32-bit executable. The upshot of this is that if you need your executable to be compatible with older machines (such as Windows XP machines) then you will need to use a 32-bit version of LabVIEW to create your program.
| | ==Setup Guide== |
| | | <div class="phd-deck-sequence"> |
| ==Quick Downloads== | | __NOTOC__ |
| {{QuickDownloads|LabVIEW|
| | {{PT3_LABVIEW_WIN}} |
| {{APIQuickDownloads|{{SERVER}}/documentation/LabVIEW_Manual.pdf PDF}}
| | </div> |
| {{ExtraAPIQuickDownloads|{{SERVER}}/documentation/web/LabVIEWDoc/index.html|HTML version of}}|
| |
| {{ExampleQuickDownloads|{{SERVER}}/downloads/examples/LabVIEWx866.zip| (32 bit Windows - same file as LabVIEW library)}}
| |
| {{ExampleQuickDownloads|{{SERVER}}/downloads/examples/LabVIEWx64.zip| (64 bit Windows - same file as LabVIEW library)}}|
| |
| {{ExtraLibraryQuickDownloads|{{SERVER}}/downloads/examples/LabVIEWx86.zip|LabVIEW|(32 bit Windows - same file as LabVIEW Examples)}}
| |
| {{ExtraLibraryQuickDownloads|{{SERVER}}/downloads/examples/LabVIEWx64.zip|LabVIEW|(64 bit Windows - same file as LabVIEW Examples)}}
| |
| {{WindowsQuickDownloads}}
| |
| }}
| |
| | |
| ==Getting started with LabVIEW==
| |
| | |
| If you are new to writing code for Phidgets, we recommend starting by running, then modifying existing examples. This will allow you to:
| |
| {{ExampleCodeReasons}}
| |
| | |
| ==Windows (2000/XP/Vista/7)==
| |
| | |
| ===Description of Library Files===
| |
| LabVIEW programs on Windows depend on the following two items, The installers in the [[#Libraries and Drivers|Quick Downloads]] section put only the {{Code|phidget21.dll}} into your system. You will need to manually put the Phidget LabVIEW library onto your system:
| |
| * <b>{{Code|phidget21.dll}}</b> contains the actual Phidget library, which is used at run-time. By default, it is placed in {{Code|C:\Windows\System32}}.
| |
| * <b>{{Code|Phidgets LabVIEW library}}</b> contains the Phidget library for LabVIEW. You need to place the library into your LabVIEW functions palette. Instructions are explained in the [[#Write Your Own Code | Write Your Own Code]] section.
| |
| | |
| If you do not want to use our installer, you can download the [{{SERVER}}/downloads/libraries/phidget21-x86.zip {{Code|phidget21.dll}}] and manually install it where you want; refer to our [[OS_-_Windows#Manual_File_Installation | Manual Installation Instructions]].
| |
| | |
| We include instructions for LabVIEW 2011 on [[#Use Our Examples | using our examples]] and [[#Write Your Own Code | writing your own code]].
| |
| | |
| ====Use Our Examples====
| |
| | |
| To run the examples, you first download the examples found in the [[#Example Code | Quick Downloads]] section and unpack them into a folder. Here, you will find the {{Code|examples}} folder, which contains {{Code|vi}} programs for all the devices. Each {{Code|vi}} example demonstrate the usage of a few of the device's properties. To get a broader understanding of the device, you should take a look at all the {{Code|vi}} examples inside the directory for your device. {{FindYourDevice}}
| |
| | |
| 1. Inside the {{Code|examples}} folder, navigate to the directory for your device.
| |
| | |
| 2. Open up any {{Code|.vi}} of your choice in LabVIEW. In this section, the {{Code|Sensor to Output Example.vi}} of the PhidgetInterfaceKit examples will be used.
| |
| | |
| [[File:LabVIEW Win Front Panel.PNG|link=|alt=Front Panel]]
| |
| | |
| You will see the front panel of the example. The front panel shows the user interface of the {{code|vi}} program.
| |
| | |
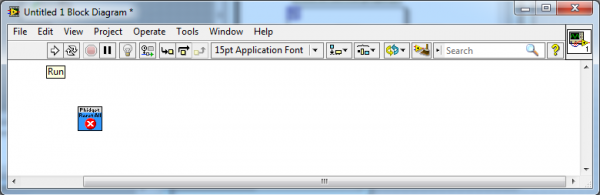
| 3. Next, let us take a look at the block diagram by navigating to {{Code|Window → Show Block Diagram}}.
| |
| | |
| [[File:LabVIEW Win Block Diagram 1.PNG|link=|alt=Block Diagram]]
| |
| | |
| The block diagram shows the logic of the application.
| |
| | |
| [[File:LabVIEW Win Block Diagram 2.PNG|link=|alt=Block Diagram]]
| |
| | |
| 4. The only thing left to do is to run the examples! Navigate to {{Code|Operate → Run}}.
| |
| | |
| [[File:LabVIEW Win Run 1.PNG|link=|alt=Run]]
| |
| | |
| 5. The application will run.
| |
| | |
| [[File:LabVIEW Win Run 2.PNG|link=|alt=Run]]
| |
| | |
| You can determine that your device is connected to your application if you see the indicator for {{Code|attached}} turn green and the correct serial number is displayed. These features are available in most of the example {{Code|vis}} we provide.
| |
|
| |
| 6. When you are ready to terminate the application, click on the [[File:LabVIEW Win Stop.PNG|link=|alt=Stop]] button to release the hold on the device. Please keep in mind that the application may not terminate properly if you stop it by clicking on {{Code|Operate → Stop}}.
| |
| | |
| Once you have the LabVIEW examples running, we have a [[#Follow the Examples|teaching]] section below to help you follow them.
| |
| | |
| ====Write Your Own Code====
| |
| | |
| When you are building a project from scratch, or adding Phidget function calls to an existing project, you'll need to add the Phidget LabVIEW library to your development environment. To begin:
| |
| | |
| 1. Navigate to {{Code|Tools → Advanced → Edit Palette Set}} to modify the functions palette.
| |
| | |
| [[File:LabVIEW Win Functions Palette 1.PNG|link=|alt=Edit Function Palette]]
| |
| | |
| 2. The functions palette will show up. Right click an empty area, and select {{Code|Insert → Subpalette}}.
| |
| | |
| [[File:LabVIEW Win Functions Palette 2.PNG|link=|alt=Insert Function Palette]]
| |
| | |
| 3. Next, select {{Code|Link to a directory}}.
| |
| | |
| [[File:LabVIEW Win Functions Palette 3.PNG|link=|alt=Link to a library]]
| |
| | |
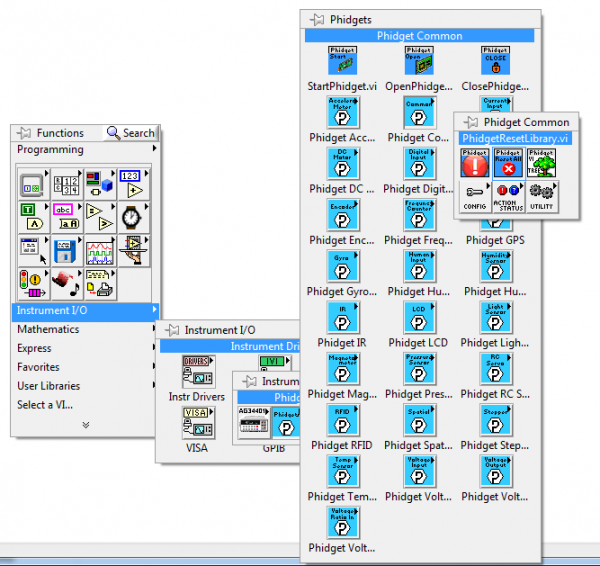
| 4. Make sure you have the Phidget LabVIEW library and examples in the [[#Libraries and Drivers| Quick Downloads]] section downloaded and extracted. After extracting, you will find the {{Code|Phidgets}} folder. In LabVIEW, browse to the {{Code|Phidgets}} folder, and select {{Code|Current Folder}}.
| |
| | |
| [[File:LabVIEW Win Functions Palette 4.PNG|link=|alt=Select Phidgets library]]
| |
| | |
| This will load the Phidget LabVIEW library into the functions palette. You can find all the functions that pertain to Phidgets inside the {{Code|Phidgets}} palette.
| |
| | |
| [[File:LabVIEW Win Functions Palette 5.PNG|link=|alt=Phidgets LabVIEW Library]]
| |
| | |
| 5. Click on {{Code|Save Changes}} in the {{Code|Edit Controls and Functions Palette Set}} window.
| |
| | |
| [[File:LabVIEW Win Functions Palette 6.PNG|link=|alt=Save Function Palette]]
| |
| | |
| The project now has access to the Phidget function calls and you are ready to begin coding.
| |
| | |
| The same [[#Follow the Examples|teaching]] section which describes the examples also has further resources for programming your Phidget.
| |
| | |
| ==Follow the Examples==
| |
| | |
| By following the instructions for your operating system and compiler above, you probably now have a working example and want to understand it better so you can change it to do what you want.
| |
| | |
| Since LabVIEW is a graphical language, the best way to get the 'code snippets' you need is to take them from our examples. The best way to find what blocks exist and how to use them is probably to switch between the block diagram view and the GUI view between examples that apply to you. This will allow you to use pieces from our examples to create your own LabVIEW application.
| |
| | |
| Your main reference for writing LabVIEW code will be our LabVIEW API information, with syntax for all of our functions:
| |
| | |
| {{UsingAPhidgetInCodeGeneral|both of which are available in LabVIEW|[{{SERVER}}/documentation/LabVIEW_Manual.pdf API Manual]}}
| |
| | |
| If you are really getting in to using Phidgets, you probably want our more general programming resources as well. Although these are focused on the text-based languages that we support (C++, Java, etc), the concepts remain the same on how Phidgets are used within code. Our [[General Phidget Programming]] page gives more information about:
| |
| * [[General Phidget Programming#Using Multiple Phidgets|Using Multiple Phidgets]] (or a Phidget [[General Phidget Programming#Creating a Software Object|other than the Interface Kit]])
| |
| * Catching [[General Phidget Programming#Exceptions and Errors|exceptions and errors]] and [[General Phidget Programming#Logging|using logging]]
| |
| * [[General Phidget Programming#Event Driven Code|Event catching]] versus [[General Phidget Programming#Logic Code|direct polling]]
| |
| * And more....
| |
| Of course, most of these concepts are covered using block flow within LabVIEW, but knowing the general order of operations can help you structure your code.
| |
| | |
| ==LabVIEW Error Codes==
| |
| LabVIEW uses a number of Phidget specific error codes which are not always well described when they pop up. If you are debugging your application and are running into one that you cannot figure out you can get more information from the [[General Phidget Programming#Error Codes|Phidget Error Codes list]] in the General Phidget Programming guide. The LabVIEW error codes are just the Phidget error codes + 7000.
| |
| | |
| ==Common Problems and Solutions/Workarounds==
| |
| | |
| ===Issue: Events can occasionally cause issues, especially when there are multiple of the same type of event===
| |
| In other words, if you open 2 Interface Kits and have a sensor change event for each one your system can behave unpredictably. To solve this issue you have to stop using events and simply poll the device. Events work similarly to polling in LabVIEW anyway and should not cause substantial performance changes to your application.
| |
| | |
| Note that Phidgets do not always work cleanly in Labview. Sometimes they do not appear, sometimes they work veeerrryyy slowly. No known fixes yet, hopefully soon.
| |
| | |
| ===Issue: I cannot attach to an object any more after running my program once===
| |
| What this means is you probably halted the VI instead of using the stop button. Halting operation will not release the Phidget device properly and will consequently make it unusable until LabVIEW has been exited and restarted. In order to prevent this from happening you should always use the stop button instead of simply halting operation. That way the close subVI gets called and the Phidget will be released.
| |