Phidget Programming Basics: Difference between revisions
No edit summary |
|||
| Line 1: | Line 1: | ||
[[Category:Programming]] | [[Category:Programming]] | ||
{| | |||
|style="vertical-align:middle; width: 60%;"| | |||
== Before You Start == | |||
Before trying to start programming Phidgets, you should have a basic understanding of what a Phidget is, and how they can be used. For an introduction to Phidgets, check out [[What is a Phidget?]]. | |||
This page will explain the concepts behind how Phidgets are used in any software application. | |||
|{{TOC limit|2}} | |||
|} | |||
== Channels == | |||
To program with Phidgets, it is important to understand how the physical input and output channels of Phidget devices correspond to the software controlling them. | |||
The | The Phidgets library is very modular, with each part of the device's behaviour split into individual parts called ''Channels''. Each channel represents a single part of a device, such as a single input on a digital input Phidget, the humidity sensor on a humidity Phidget, or one motor on a DC motor controller. | ||
Each channel has a ''Channel Class'', corresponding to the type of function the channel is to perform. For example, a TemperatureSensor channel will be used to measure temperature, and an RFID channel will deal with an RFID reader. Each channel class is designed make using channels of that class as similar as possible regardless of the Phidget they are a part of, while also supporting the unique features of each. You can find out what channel classes are available to your Phidget by looking at its [[User_Guides|User Guide]]. | |||
Each channel class has a set of functions tailored to the use of that type of device. For example, a {{Code|VoltageInput}} channel has functions you can use to control and read the Voltage Input, such as setting the data interval or reading the voltage: | |||
The set of all functions and other tools used to program with Phidgets is called the Phidgets Application Programming Interface ('''API'''). In addition to features unique to the class, every channel class also includes some functionality common to all channel classes, documented in the Phidgets API under {{Code|Phidget Common}}. For example, every channel has basic functions like {{Code|open()}} and {{Code|close()}}, which are the same no matter which Phidget you're using. | |||
==Outline of a Program with Phidgets== | |||
for | [[Image:General_Phidget_Program_Flowchart.png|right|200px]] | ||
Every Phidget channel you use in any program will follow the same life cycle: | |||
# '''[[#Creating a Channel|Create]] a channel:''' Make a variable to keep track of your Phidget | |||
# '''[[#Addressing Phidgets| Address]] the channel:''' Set some basic parameters to indicate which Phidget to connect to. | |||
#*You can specify as much, or as little as you deem necessary. You can even use a Phidget without specifying any parameters, if your system is simple enough. | |||
# '''[[#Opening a Channel|Open]] the channel:''' Opening the channel will begin trying to match a physical Phidget channel to your software channel. | |||
# '''[[#Attaching a Channel|Detect when the channel is attached]]:''' Your program must wait until a physical Phidget channel has been ''attached'' to your software channel. | |||
#* The attachment process is handled automatically, and will attach to the first available Phidget channel that matches all your specified addressing parameters. | |||
#* A channel is attached when the Phidget libraries link a physical Phidget channel to your software channel. | |||
#* Waiting for attachment can be handled automatically as part of ''opening'' the channel or separately, as best suits your program. | |||
# '''[[#Do Things with a Channel|Do things with the channel]]:''' Send commands to and receive data from your Phidget. | |||
#* This section will encompass the majority of your program. The Phidget API / libraries will make this process as straightforward as possible, and is similar across all types of Phidgets. | |||
# '''[[#Close a Channel|Close]] the channel:''' Once your program is done, you close the Phidget channel. | |||
#* This frees up the Phidget for the next program that might need it. | |||
==A Closer Look, with Examples== | |||
For | For a closer look at the parts of a Phidget program, this section will dissect the sections of a Phidget program in more detail. Small code snippets are provided for each step in the sections below to provide a representation of the code. | ||
For a look at how these steps are handled in your specific programming language, check out the | |||
'''Write Code''' section of the [[Programming Resources|Language Page]] for your programming language. | |||
The best reference to the features of each channel class is the {{Phidget22API}} for your specific device and language. This page is intended to be a high-level introduction. | |||
=== Creating a Channel === | |||
To control a Phidget channel, you must first create an instance of its channel class that will be used to keep track of the channel through your program. | |||
For example: | |||
<syntaxhighlight lang=java> | <tabber> | ||
Java=<syntaxhighlight lang=java> | |||
// Create a new Accelerometer channel | // Create a new Accelerometer channel | ||
Accelerometer accel = new Accelerometer(); | Accelerometer accel = new Accelerometer(); | ||
| Line 35: | Line 60: | ||
RFID rfid = new RFID(); | RFID rfid = new RFID(); | ||
</syntaxhighlight> | </syntaxhighlight> | ||
|-| | |||
Python=<syntaxhighlight lang=python> | |||
# Create a new Accelerometer channel | |||
<syntaxhighlight lang= | accel = Accelerometer() | ||
</syntaxhighlight> | |||
<syntaxhighlight lang=python> | |||
# Create a new RFID channel | |||
rfid = RFID() | |||
</syntaxhighlight> | |||
|-| | |||
C#=<syntaxhighlight lang=cSharp> | |||
// Create a new Accelerometer channel | // Create a new Accelerometer channel | ||
Accelerometer accel = new Accelerometer(); | |||
</syntaxhighlight> | </syntaxhighlight> | ||
<syntaxhighlight lang= | <syntaxhighlight lang=cSharp> | ||
// Create a new RFID channel | // Create a new RFID channel | ||
RFID rfid = new RFID(); | |||
</syntaxhighlight> | </syntaxhighlight> | ||
|-| | |||
C=<syntaxhighlight lang=c> | |||
// Create a new Accelerometer channel | |||
PhidgetAccelerometerHandle ch; | |||
PhidgetAccelerometer_create(&ch); | |||
<syntaxhighlight lang= | |||
ch | |||
ch | |||
</syntaxhighlight> | </syntaxhighlight> | ||
<syntaxhighlight lang=c> | <syntaxhighlight lang=c> | ||
// Create a new RFID channel | |||
PhidgetRFIDHandle ch; | |||
PhidgetRFID_create(&ch); | |||
</syntaxhighlight> | </syntaxhighlight> | ||
</tabber> | |||
===Addressing Phidgets=== | |||
In this step you set up the parameters the Phidget library will use to match your software channel to a physical channel on a Phidget. | |||
By default, the matching code in the Phidget library will attach the first available Phidget channel that is of the correct channel class. This works well for single Phidgets, but can be insufficient for systems with multiple Phidgets present. If not enough addressing parameters are specified, your software channel may attach to the wrong Phidget. | |||
Full descriptions of all the addressing parameters can be found on the [[Addressing Phidgets]] page. | |||
==== Addressing Example ==== | |||
In this example, we have a [{{SERVER}}/products.php?product_id=TMP1101 TMP1101 4x Thermocouple Phidget] and a [{{SERVER}}/products.php?product_id=HUB0000 HUB0000 VINT Hub]. | In this example, we have a [{{SERVER}}/products.php?product_id=TMP1101 TMP1101 4x Thermocouple Phidget] and a [{{SERVER}}/products.php?product_id=HUB0000 HUB0000 VINT Hub]. | ||
| Line 133: | Line 105: | ||
[[Image:channel-matching-3.jpg|link=|500px|center]] | [[Image:channel-matching-3.jpg|link=|500px|center]] | ||
If we wanted to open | If we wanted to open the thermocouple connected to channel 0, on hub port 2, the Java code would look like: | ||
<syntaxhighlight lang=java> | <tabber> | ||
TemperatureSensor tc = new TemperatureSensor(); // | Java=<syntaxhighlight lang=java> | ||
TemperatureSensor tc = new TemperatureSensor(); //Create | |||
tc.setDeviceSerialNumber(); | tc.setDeviceSerialNumber(370181); //Address | ||
tc.setHubPort(2); | tc.setHubPort(2); | ||
tc.setChannel(0); | tc.setChannel(0); | ||
Net.enableServerDiscovery(ServerType.DEVICE_REMOTE); | |||
tc.open(5000); //Open | |||
</syntaxhighlight> | </syntaxhighlight> | ||
|-| | |||
Python=<syntaxhighlight lang=python> | |||
tc = TemperatureSensor() #Create | |||
tc.setDeviceSerialNumber(370181) #Address | |||
tc.setHubPort(2) | |||
tc.setChannel(0) | |||
Net.enableServerDiscovery(PhidgetServerType.PHIDGETSERVER_DEVICEREMOTE) | |||
tc.openWaitForAttachment(5000); #Open | |||
</syntaxhighlight> | </syntaxhighlight> | ||
|-| | |||
C#=<syntaxhighlight lang=cSharp> | |||
TemperatureSensor tc = new TemperatureSensor(); //Create | |||
== | tc.DeviceSerialNumber = 370181; //Address | ||
tc.HubPort = 2; | |||
tc.Channel = 0; | |||
Net.EnableServerDiscovery(ServerType.DeviceRemote); | |||
tc.openWaitForAttachment(5000); //Open | |||
</syntaxhighlight> | </syntaxhighlight> | ||
|-| | |||
C=<syntaxhighlight lang=c> | |||
PhidgetTemperatureSensorHandle tc; //Create | |||
PhidgetTemperatureSensor_create(&tc); | |||
PhidgetTemperatureSensor_setDeviceSerialNumber(tc, 370181); //Address | |||
PhidgetTemperatureSensor_setHubPort(tc, 2); | |||
PhidgetTemperatureSensor_setChannel(tc, 0); | |||
PhidgetNet_enableServerDiscovery(PHIDGETSERVER_DEVICEREMOTE); | |||
Phidget_openWaitForAttachment((PhidgetHandle) | Phidget_openWaitForAttachment((PhidgetHandle)tc, 5000); //Open | ||
</syntaxhighlight> | </syntaxhighlight> | ||
</tabber> | |||
== Opening a Channel == | === Opening a Channel === | ||
After you have created a | After you have created and addressed a channel, you need to open it to begin the process of attaching the software channel to a physical channel. | ||
For example, | For example, in Java: | ||
<syntaxhighlight lang=java> | <tabber> | ||
Java=<syntaxhighlight lang=java> | |||
ch.open(5000); | |||
</syntaxhighlight> | |||
|-| | |||
Python=<syntaxhighlight lang=python> | |||
ch.openWaitForAttachment(5000); | |||
</syntaxhighlight> | |||
|-| | |||
C#=<syntaxhighlight lang=cSharp> | |||
ch.Open(5000); | |||
</syntaxhighlight> | |||
|-| | |||
C=<syntaxhighlight lang=c> | |||
Phdiget_openWaitForAttachment((PhidgetHandle)ch, 5000); | |||
</syntaxhighlight> | </syntaxhighlight> | ||
</tabber> | |||
''In Java and C# <code>open()</code> is overloaded. In other languages, you would use <code>openWaitForAttachment(5000)</code> to perform the same function.'' | |||
< | The <code>openWaitForAttachment()</code> function will hold the program until a Phidget channel matching the one you specified is attached, or the function times out. There is a similar function called <code>open()</code> that will do the attachment process in the background, and allow your program to continue before the channel has been attached. | ||
</ | |||
The <code>open()</code> and <code>openWaitForAttachment()</code> functions only begin the process of matching the channel handle you created to a channel of a Phidget device, and do not actually ''open'' the Phidget itself. An open channel that does not match any Phidget channels at first can still attach to a matching channel that is plugged in long after it was first opened. | |||
=== Attaching a Channel === | |||
When a channel is open (and not ''attached''), the system will continue to try to match it with a | |||
Phidget device channel until either a match is found, or the channel is closed. | |||
Any one physical channel can only be attached to one software channel at a time. For example, if you connected a single Phidget Accelerometer to a computer, and you created and opened two software <code>Accelerometer</code> channels, only one of the channels would attach while the other would remain ''open'' but not ''attached''. If the ''attached'' channel were to be closed, the other software channel would then attach to the Accelerometer. | |||
When the software channel is matched with a physical channel, the channel is ''attached'' and an <code>Attach</code> event is fired. | |||
An event handler can be registered to catch the <code>Attach</code> event. Each channel also has an <code>Attached</code> property that can be read to determine if the channel has been matched to a physical channel. | |||
The following examples show how to set an event handler to detect the <code>Attach</code> event: | |||
<tabber> | |||
Java=<syntaxhighlight lang=java> | |||
public static DigitalInputAttachListener onAttach = new DigitalInputAttachListener() { | |||
@Override | |||
public void onAttach(AttachEvent e) { | |||
//You can access the Phidget that fired the event by calling "getSource()" | |||
//on the event parameter. | |||
//Replace "DigitalInput" with the object for your Phidget. | |||
DigitalInput ph = (DigitalInput) e.getSource(); | |||
int deviceSerialNumber = ph.getDeviceSerialNumber(); | |||
} | |||
}; | |||
... | |||
//Declare your object. Replace "DigitalInput" with the object for your Phidget. | |||
DigitalInput ch; | |||
... | |||
//Assign the event listener that will be called when the event occurs | |||
ch.addAttachListener(onAttach); | |||
</syntaxhighlight> | |||
|-| | |||
Python=<syntaxhighlight lang=python> | |||
#Declare the event handler | |||
def onAttachHandler(self): | |||
#You can access the Phidget that fired the event using the "self" parameter | |||
ph = self | |||
deviceSerialNumber = ph.getDeviceSerialNumber() | |||
... | |||
#Declare your object. Replace "DigitalInput" with the object for your Phidgetch = DigitalInput() | |||
... | |||
#Assign the handler that will be called when the event occurs | |||
ch.setOnAttachHandler(onAttachHandler) | |||
</syntaxhighlight> | |||
|-| | |||
C#=<syntaxhighlight lang=cSharp> | |||
//Declare the event handler | |||
void attach(object sender, Phidget22.Events.AttachEventArgs e) { | |||
//You can access the Phidget that fired the event by typecasting "sender" | |||
//to the appropriate Phidget object type. | |||
//Replace "DigitalInput" with the object for your Phidget. | |||
DigitalInput ph = ((DigitalInput)sender); | |||
int deviceSerial = ph.DeviceSerialNumber; | |||
} | |||
... | |||
//Declare your object. Replace "DigitalInput" with the object for your Phidget. | |||
DigitalInput ch; | |||
... | |||
//Assign the handler that will be called when the event occurs | |||
ch.Attach += attach; | |||
</syntaxhighlight> | |||
|-| | |||
C=<syntaxhighlight lang=c> | |||
//Declare the event handler | |||
static void CCONV onAttachHandler(PhidgetHandle ph, void *ctx) { | |||
//You can access the Phidget that fired the event by using the first parameter | |||
//of the event handler | |||
int deviceSerialNumber; | |||
Phidget_getDeviceSerialNumber(ph, &deviceSerialNumber); | |||
} | |||
... | |||
//Declare your object. Replace "PhidgetDigitalInputHandle" with the handle for your Phidget object. | |||
PhidgetDigitalInputHandle ch; | |||
... | |||
//Assign the handler that will be called when the event occurs | |||
Phidget_setOnAttachHandler((PhidgetHandle)ch, onAttachHandler, NULL); | |||
</syntaxhighlight> | |||
</tabber> | |||
The attach event handler should be set '''before''' the channel is opened; otherwise, the attach event could occur before the handler is set to deal with it. | |||
'''Note:''' Once a physical channel is attached to a software channel, it will not be available to attach to another software channel until the first channel is closed. The one exception is if the Phidget device channel is ''attached'' over the network through the [[Phidget Network Server]]. In that case, multiple channels are allowed to match and attach to the Phidget device channel. Some Phidgets, such as motor controllers will never match more than one channel at a time, for safety reasons. | |||
=== Do Things with a Channel === | |||
After a channel has been ''opened'' and ''attached'', software can control the Phidget through the functions available to its channel class. | |||
This is the stage of your program where you can send commands to your channel, and handle the information it sends back. | |||
Generally, we recommend configuring any initial setup for your channel in its <code>Attach</code> handler, so it is set up before your program uses it, and so it can be re-initialized in case it is somehow detached and re-attached (such as if it is unplugged and plugged back in). | |||
Additionally, you can set up event handlers to handle events from the channel, such as when a state change occurs, or when sensor data is received. Event handlers should be set up before opening the channel to avoid missing events, but they will begin executing during this phase of the program. | |||
For example, with a Voltage Input channel, you could set up an event handler to process Voltage Change events. | |||
<tabber> | |||
Java=<syntaxhighlight lang=java> | |||
<syntaxhighlight lang=java> | //Declare the event listener | ||
public static VoltageInputVoltageChangeListener onVoltageChange = new VoltageInputVoltageChangeListener() { | |||
@Override | |||
public void onVoltageChange(VoltageInputVoltageChangeEvent e) { | |||
System.out.println("Voltage: " + e.getVoltage()); | |||
} | |||
}; | |||
... | |||
VoltageInput ch; | |||
... | |||
//Assign the event listener that will be called when the event occurs | |||
ch.addVoltageChangeListener(onVoltageChange); | |||
</syntaxhighlight> | |||
|-| | |||
Python=<syntaxhighlight lang=python> | |||
#Declare the event handler | |||
def onVoltageChangeHandler(self, voltage): | |||
print("Voltage: " + str(voltage)) | |||
... | |||
ch = VoltageInput() | |||
... | |||
#Assign the handler that will be called when the event occurs | |||
ch.setOnVoltageChangeHandler(onVoltageChangeHandler) | |||
</syntaxhighlight> | |||
|-| | |||
C#=<syntaxhighlight lang=cSharp> | |||
//Declare the event handler | |||
void voltageChange(object sender, Phidget22.Events.VoltageChangeEventArgs e) { | |||
Console.WriteLine("Voltage: " + e.Voltage.ToString()); | |||
} | |||
... | |||
VoltageInput ch; | |||
... | |||
//Assign the handler that will be called when the event occurs | |||
ch.VoltageChange += voltageChange; | |||
</syntaxhighlight> | </syntaxhighlight> | ||
|-| | |||
C=<syntaxhighlight lang=c> | |||
//Declare the event handler | |||
<syntaxhighlight lang=c> | static void CCONV onVoltageChangeHandler(PhidgetVoltageInputHandle ph, void *ctx, double voltage) { | ||
printf("Voltage: %lf\n", voltage); | |||
} | |||
... | |||
PhidgetVoltageInputHandle ch; | |||
... | |||
//Assign the handler that will be called when the event occurs | |||
Phidget_setOnVoltageChangeHandler(ch, onVoltageChangeHandler, NULL); | |||
</syntaxhighlight> | </syntaxhighlight> | ||
</tabber> | |||
Alternately, data from the device can be accessed from the main body of a program using the associated properties. Note that the values returned by getting the values of these properties will be the same as the value from the latest event associated with the property. | |||
<syntaxhighlight lang=java> | <tabber> | ||
Java=<syntaxhighlight lang=java> | |||
double val = ch.getVoltage(); | |||
</syntaxhighlight> | </syntaxhighlight> | ||
|-| | |||
Python=<syntaxhighlight lang=python> | |||
val = ch.getVoltage() | |||
<syntaxhighlight lang= | |||
</syntaxhighlight> | </syntaxhighlight> | ||
|-| | |||
C#=<syntaxhighlight lang=cSharp> | |||
double val = ch.Voltage; | |||
<syntaxhighlight lang= | |||
</syntaxhighlight> | </syntaxhighlight> | ||
|-| | |||
C=<syntaxhighlight lang=c> | |||
double voltage; | |||
<syntaxhighlight lang=c> | PhidgetVoltageInput_getVoltage(ch, &voltage); | ||
</syntaxhighlight> | </syntaxhighlight> | ||
</tabber> | |||
=== | === Close a Channel === | ||
When you are finished with a channel, you should close and (in some languages) delete it. Once closed, the physical Phidget channel the software channel was matched to will be released, and made available to attach to other software channels. | |||
When you are finished with a channel, you should close and (in some languages) delete it. Once closed, the Phidget | |||
For example, in Java: | For example, in Java: | ||
<syntaxhighlight lang=java> | <tabber> | ||
Java=<syntaxhighlight lang=java> | |||
ch.close(); | |||
</syntaxhighlight> | |||
|-| | |||
Python=<syntaxhighlight lang=python> | |||
ch.close() | |||
</syntaxhighlight> | |||
|-| | |||
C#=<syntaxhighlight lang=cSharp> | |||
ch.Close(); | |||
</syntaxhighlight> | |||
|-| | |||
C=<syntaxhighlight lang=c> | |||
Phidget_close((PhidgetHandle)ch); | |||
PhidgetDigitalInput_delete(&ch); //Replace DigitalInput with the channel class of your channel | |||
</syntaxhighlight> | </syntaxhighlight> | ||
</tabber> | |||
When you close a channel, it will reset all of the properties of that channel. For example, a digital output will revert back to FALSE when it is closed | When you close a channel, it will reset all of the properties of that channel. For example, a digital output will revert back to FALSE when it is closed. | ||
== Further Reading == | == Further Reading == | ||
[[ | [[Using Multiple Phidgets]] - Tips about using multiple Phidgets in your program. | ||
[[ | [[Polling vs. Events]] - Your program can gather data in either a polling-driven or event-driven manner. Learn the difference to determine which is best for your application. | ||
[[ | [[Data Interval/Change Trigger]] - Learn about these two properties that control how much data comes in from your sensors. | ||
[[Logging, Exceptions, and Errors]] - Learn about all the tools you can use to debug your program. | [[Logging, Exceptions, and Errors]] - Learn about all the tools you can use to debug your program. | ||
Revision as of 21:38, 31 October 2018
Before You StartBefore trying to start programming Phidgets, you should have a basic understanding of what a Phidget is, and how they can be used. For an introduction to Phidgets, check out What is a Phidget?. This page will explain the concepts behind how Phidgets are used in any software application. |
Channels
To program with Phidgets, it is important to understand how the physical input and output channels of Phidget devices correspond to the software controlling them.
The Phidgets library is very modular, with each part of the device's behaviour split into individual parts called Channels. Each channel represents a single part of a device, such as a single input on a digital input Phidget, the humidity sensor on a humidity Phidget, or one motor on a DC motor controller.
Each channel has a Channel Class, corresponding to the type of function the channel is to perform. For example, a TemperatureSensor channel will be used to measure temperature, and an RFID channel will deal with an RFID reader. Each channel class is designed make using channels of that class as similar as possible regardless of the Phidget they are a part of, while also supporting the unique features of each. You can find out what channel classes are available to your Phidget by looking at its User Guide.
Each channel class has a set of functions tailored to the use of that type of device. For example, a VoltageInput channel has functions you can use to control and read the Voltage Input, such as setting the data interval or reading the voltage:
The set of all functions and other tools used to program with Phidgets is called the Phidgets Application Programming Interface (API). In addition to features unique to the class, every channel class also includes some functionality common to all channel classes, documented in the Phidgets API under Phidget Common. For example, every channel has basic functions like open() and close(), which are the same no matter which Phidget you're using.
Outline of a Program with Phidgets

Every Phidget channel you use in any program will follow the same life cycle:
- Create a channel: Make a variable to keep track of your Phidget
- Address the channel: Set some basic parameters to indicate which Phidget to connect to.
- You can specify as much, or as little as you deem necessary. You can even use a Phidget without specifying any parameters, if your system is simple enough.
- Open the channel: Opening the channel will begin trying to match a physical Phidget channel to your software channel.
- Detect when the channel is attached: Your program must wait until a physical Phidget channel has been attached to your software channel.
- The attachment process is handled automatically, and will attach to the first available Phidget channel that matches all your specified addressing parameters.
- A channel is attached when the Phidget libraries link a physical Phidget channel to your software channel.
- Waiting for attachment can be handled automatically as part of opening the channel or separately, as best suits your program.
- Do things with the channel: Send commands to and receive data from your Phidget.
- This section will encompass the majority of your program. The Phidget API / libraries will make this process as straightforward as possible, and is similar across all types of Phidgets.
- Close the channel: Once your program is done, you close the Phidget channel.
- This frees up the Phidget for the next program that might need it.
A Closer Look, with Examples
For a closer look at the parts of a Phidget program, this section will dissect the sections of a Phidget program in more detail. Small code snippets are provided for each step in the sections below to provide a representation of the code.
For a look at how these steps are handled in your specific programming language, check out the Write Code section of the Language Page for your programming language.
The best reference to the features of each channel class is the Phidget22 API for your specific device and language. This page is intended to be a high-level introduction.
Creating a Channel
To control a Phidget channel, you must first create an instance of its channel class that will be used to keep track of the channel through your program.
For example:
 // Create a new Accelerometer channel
 Accelerometer accel = new Accelerometer();
 // Create a new RFID channel
 RFID rfid = new RFID();
 # Create a new Accelerometer channel
 accel = Accelerometer()
 # Create a new RFID channel
 rfid = RFID()
 // Create a new Accelerometer channel
 Accelerometer accel = new Accelerometer();
 // Create a new RFID channel
 RFID rfid = new RFID();
 // Create a new Accelerometer channel
 PhidgetAccelerometerHandle ch;
 PhidgetAccelerometer_create(&ch);
 // Create a new RFID channel
 PhidgetRFIDHandle ch;
 PhidgetRFID_create(&ch);
Addressing Phidgets
In this step you set up the parameters the Phidget library will use to match your software channel to a physical channel on a Phidget.
By default, the matching code in the Phidget library will attach the first available Phidget channel that is of the correct channel class. This works well for single Phidgets, but can be insufficient for systems with multiple Phidgets present. If not enough addressing parameters are specified, your software channel may attach to the wrong Phidget.
Full descriptions of all the addressing parameters can be found on the Addressing Phidgets page.
Addressing Example
In this example, we have a TMP1101 4x Thermocouple Phidget and a HUB0000 VINT Hub.
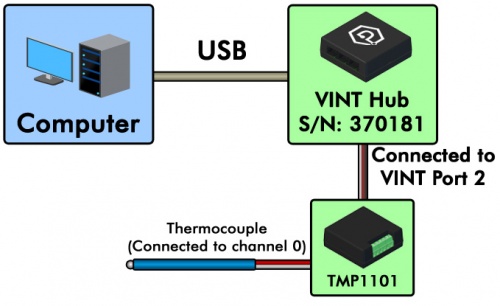
If we wanted to open the thermocouple connected to channel 0, on hub port 2, the Java code would look like:
TemperatureSensor tc = new TemperatureSensor(); //Create

tc.setDeviceSerialNumber(370181); //Address
tc.setHubPort(2);
tc.setChannel(0);

Net.enableServerDiscovery(ServerType.DEVICE_REMOTE);

tc.open(5000); //Open
tc = TemperatureSensor() #Create

tc.setDeviceSerialNumber(370181) #Address
tc.setHubPort(2)
tc.setChannel(0)

Net.enableServerDiscovery(PhidgetServerType.PHIDGETSERVER_DEVICEREMOTE)

tc.openWaitForAttachment(5000); #Open
TemperatureSensor tc = new TemperatureSensor(); //Create

tc.DeviceSerialNumber = 370181; //Address
tc.HubPort = 2;
tc.Channel = 0;

Net.EnableServerDiscovery(ServerType.DeviceRemote);

tc.openWaitForAttachment(5000); //Open
PhidgetTemperatureSensorHandle tc; //Create
PhidgetTemperatureSensor_create(&tc);

PhidgetTemperatureSensor_setDeviceSerialNumber(tc, 370181); //Address
PhidgetTemperatureSensor_setHubPort(tc, 2);
PhidgetTemperatureSensor_setChannel(tc, 0);

PhidgetNet_enableServerDiscovery(PHIDGETSERVER_DEVICEREMOTE);

Phidget_openWaitForAttachment((PhidgetHandle)tc, 5000); //Open
Opening a Channel
After you have created and addressed a channel, you need to open it to begin the process of attaching the software channel to a physical channel.
For example, in Java:
ch.open(5000);
ch.openWaitForAttachment(5000);
ch.Open(5000);
Phdiget_openWaitForAttachment((PhidgetHandle)ch, 5000);
In Java and C# open() is overloaded. In other languages, you would use openWaitForAttachment(5000) to perform the same function.
The openWaitForAttachment() function will hold the program until a Phidget channel matching the one you specified is attached, or the function times out. There is a similar function called open() that will do the attachment process in the background, and allow your program to continue before the channel has been attached.
The open() and openWaitForAttachment() functions only begin the process of matching the channel handle you created to a channel of a Phidget device, and do not actually open the Phidget itself. An open channel that does not match any Phidget channels at first can still attach to a matching channel that is plugged in long after it was first opened.
Attaching a Channel
When a channel is open (and not attached), the system will continue to try to match it with a Phidget device channel until either a match is found, or the channel is closed.
Any one physical channel can only be attached to one software channel at a time. For example, if you connected a single Phidget Accelerometer to a computer, and you created and opened two software Accelerometer channels, only one of the channels would attach while the other would remain open but not attached. If the attached channel were to be closed, the other software channel would then attach to the Accelerometer.
When the software channel is matched with a physical channel, the channel is attached and an Attach event is fired.
An event handler can be registered to catch the Attach event. Each channel also has an Attached property that can be read to determine if the channel has been matched to a physical channel.
The following examples show how to set an event handler to detect the Attach event:
public static DigitalInputAttachListener onAttach = new DigitalInputAttachListener() {
    @Override
    public void onAttach(AttachEvent e) {
        //You can access the Phidget that fired the event by calling "getSource()"
        //on the event parameter.
        //Replace "DigitalInput" with the object for your Phidget.
        DigitalInput ph = (DigitalInput) e.getSource();
        int deviceSerialNumber = ph.getDeviceSerialNumber();
    }
};
...
//Declare your object. Replace "DigitalInput" with the object for your Phidget.
DigitalInput ch;
...
//Assign the event listener that will be called when the event occurs
ch.addAttachListener(onAttach);
#Declare the event handler
def onAttachHandler(self):
    #You can access the Phidget that fired the event using the "self" parameter
    ph = self
    deviceSerialNumber = ph.getDeviceSerialNumber()
...
#Declare your object. Replace "DigitalInput" with the object for your Phidgetch = DigitalInput()
...
#Assign the handler that will be called when the event occurs
ch.setOnAttachHandler(onAttachHandler)
//Declare the event handler
void attach(object sender, Phidget22.Events.AttachEventArgs e) {
    //You can access the Phidget that fired the event by typecasting "sender"
    //to the appropriate Phidget object type.
    //Replace "DigitalInput" with the object for your Phidget.
    DigitalInput ph = ((DigitalInput)sender);
    int deviceSerial = ph.DeviceSerialNumber;
}
...
//Declare your object. Replace "DigitalInput" with the object for your Phidget.
DigitalInput ch;
...
//Assign the handler that will be called when the event occurs
ch.Attach += attach;
//Declare the event handler
static void CCONV onAttachHandler(PhidgetHandle ph, void *ctx) {
    //You can access the Phidget that fired the event by using the first parameter
    //of the event handler
    int deviceSerialNumber;
    Phidget_getDeviceSerialNumber(ph, &deviceSerialNumber);
}
...
//Declare your object. Replace "PhidgetDigitalInputHandle" with the handle for your Phidget object.
PhidgetDigitalInputHandle ch;
...
//Assign the handler that will be called when the event occurs
Phidget_setOnAttachHandler((PhidgetHandle)ch, onAttachHandler, NULL);
The attach event handler should be set before the channel is opened; otherwise, the attach event could occur before the handler is set to deal with it.
Note: Once a physical channel is attached to a software channel, it will not be available to attach to another software channel until the first channel is closed. The one exception is if the Phidget device channel is attached over the network through the Phidget Network Server. In that case, multiple channels are allowed to match and attach to the Phidget device channel. Some Phidgets, such as motor controllers will never match more than one channel at a time, for safety reasons.
Do Things with a Channel
After a channel has been opened and attached, software can control the Phidget through the functions available to its channel class.
This is the stage of your program where you can send commands to your channel, and handle the information it sends back.
Generally, we recommend configuring any initial setup for your channel in its Attach handler, so it is set up before your program uses it, and so it can be re-initialized in case it is somehow detached and re-attached (such as if it is unplugged and plugged back in).
Additionally, you can set up event handlers to handle events from the channel, such as when a state change occurs, or when sensor data is received. Event handlers should be set up before opening the channel to avoid missing events, but they will begin executing during this phase of the program.
For example, with a Voltage Input channel, you could set up an event handler to process Voltage Change events.
//Declare the event listener
public static VoltageInputVoltageChangeListener onVoltageChange = new VoltageInputVoltageChangeListener() {
    @Override
    public void onVoltageChange(VoltageInputVoltageChangeEvent e) {
        System.out.println("Voltage: " + e.getVoltage());
    }
};
...
VoltageInput ch;
...
//Assign the event listener that will be called when the event occurs
ch.addVoltageChangeListener(onVoltageChange);
#Declare the event handler
def onVoltageChangeHandler(self, voltage):
    print("Voltage: " + str(voltage))
...
ch = VoltageInput()
...
#Assign the handler that will be called when the event occurs
ch.setOnVoltageChangeHandler(onVoltageChangeHandler)
//Declare the event handler
void voltageChange(object sender, Phidget22.Events.VoltageChangeEventArgs e) {
    Console.WriteLine("Voltage: " + e.Voltage.ToString());
}
...
VoltageInput ch;
...
//Assign the handler that will be called when the event occurs
ch.VoltageChange += voltageChange;
//Declare the event handler
static void CCONV onVoltageChangeHandler(PhidgetVoltageInputHandle ph, void *ctx, double voltage) {
    printf("Voltage: %lf\n", voltage);
}
...
PhidgetVoltageInputHandle ch;
...
//Assign the handler that will be called when the event occurs
Phidget_setOnVoltageChangeHandler(ch, onVoltageChangeHandler, NULL);
Alternately, data from the device can be accessed from the main body of a program using the associated properties. Note that the values returned by getting the values of these properties will be the same as the value from the latest event associated with the property.
double val = ch.getVoltage();
val = ch.getVoltage()
double val = ch.Voltage;
double voltage;
PhidgetVoltageInput_getVoltage(ch, &voltage);
Close a Channel
When you are finished with a channel, you should close and (in some languages) delete it. Once closed, the physical Phidget channel the software channel was matched to will be released, and made available to attach to other software channels.
For example, in Java:
ch.close();
ch.close()
ch.Close();
Phidget_close((PhidgetHandle)ch);
PhidgetDigitalInput_delete(&ch); //Replace DigitalInput with the channel class of your channel
When you close a channel, it will reset all of the properties of that channel. For example, a digital output will revert back to FALSE when it is closed.
Further Reading
Using Multiple Phidgets - Tips about using multiple Phidgets in your program.
Polling vs. Events - Your program can gather data in either a polling-driven or event-driven manner. Learn the difference to determine which is best for your application.
Data Interval/Change Trigger - Learn about these two properties that control how much data comes in from your sensors.
Logging, Exceptions, and Errors - Learn about all the tools you can use to debug your program.
Phidget Network Server - Phidgets can be controlled and communicated with over your network- either wirelessly or over ethernet.
Best Phidgets Practices - Good programming habits that will save you from common problems when writing code for your Phidgets.