|
Notice: This page contains information for the legacy Phidget21 Library. Phidget21 is out of support. Bugfixes may be considered on a case by case basis. Phidget21 does not support VINT Phidgets, or new USB Phidgets released after 2020. We maintain a selection of legacy devices for sale that are supported in Phidget21. We recommend that new projects be developed against the Phidget22 Library.
|
Language - Visual Basic 6.0
| Visual Basic 6.0, developed by Microsoft is a high level programming language that uses the COM programming model. |
Introduction
If this is your first time working with a Phidget, we suggest starting with the Getting Started page for your specific device. This can be found in the user guide for your device. That page will walk you through installing drivers and libraries for your operating system, and will then bring you back here to use Visual Basic 6.0 specifically.
Visual Basic 6.0 is capable of using the complete Phidget API, including events. We also provide example code in Visual Basic 6.0 for all Phidget devices.
Visual Basic 6.0 can be developed with the Microsoft Visual Basic 6 IDE.
You can compare Visual Basic 6.0 with our other supported languages.
Quick Downloads
Just need the Visual Basic 6.0 documentation, drivers, libraries, and examples? Here they are:
Documentation
Example Code
Libraries and Drivers
- 32-bit Windows Drivers Installer
- 64-bit Windows Drivers Installer
- Windows Driver and Library Files (Zipped)
Getting started with Visual Basic 6.0
If you are new to writing code for Phidgets, we recommend starting by running, then modifying existing examples. This will allow you to:
- Make sure your libraries are properly linked
- Go from source code to a test application as quickly as possible
- Ensure your Phidget is hooked up properly
Windows (XP/Vista/7/8)
Description of Library Files
Visual Basic 6.0 programs on Windows depend on two files, which the installers in Quick Downloads put onto your system:
phidget21.dllcontains the actual Phidget library, which is used at run-time. By default, it is placed inC:\Windows\System32.Phidget21COM.dllis the Component Object Model(COM) library and provides your project access to the Phidget ActiveX objects. Your compiler has to know where this file is, by default our installer places this file intoC:\Program Files\Phidgets, so you can either point your compiler to that location, or copy and link to it in a directory for your project workspace. If you are manually installing this file, you must register it through command line by running:regsvr32 Phidget21COM.dll.
If you do not want to use our installer, you can download both files and manually install them where you want; refer to our Manual Installation Instructions.
We include instructions on using our examples and writing your own code for the Microsoft Visual Basic 6.0 IDE.
Visual Basic 6.0
Use Our Examples
To run the examples, you first download the examples and unpack them into a folder. Here, you can find a HelloWorld example program that is a simple test for any Phidget device. You will also find specific example programs for all the devices. The source file will be named the same as the software object for your device. If you are not sure what the software object for your device is, find your Phidget on our webpage, and then check the API documentation for it.
1. Open up the .vbp project into the Visual Basic IDE.
2. Next, navigate to Project → Components to ensure that your project has access to the Phidget ActiveX objects
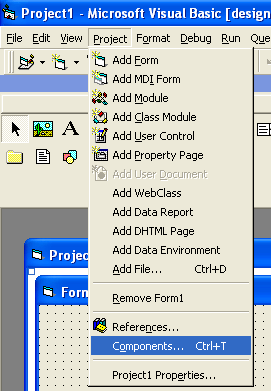
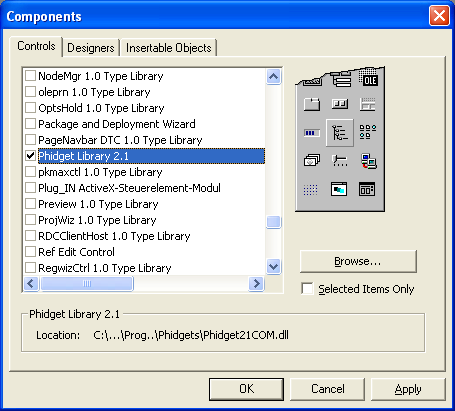
3. The Components menu will show up. Ensure that the Phidget COM library is selected. If it is not, then browse for Phidget21COM.dll and add it. By default, it is placed in C:\Program Files\Phidgets. Accept the changes.
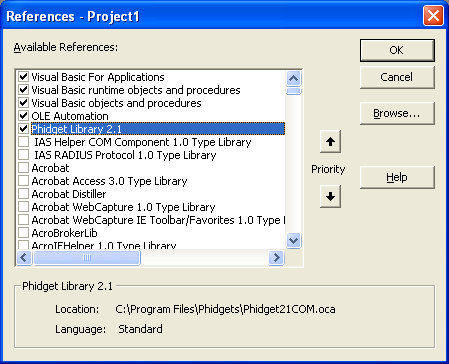
4. Navigate to Project → References and ensure that the Phidget COM library is selected.
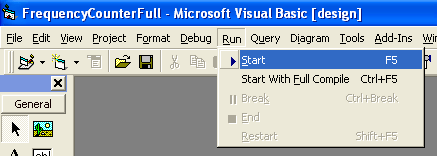
5. The only thing left to do is to run the examples! Click on Run → Start.
Once you have the Visual Basic 6.0 examples running, we have a teaching section below to help you follow them.
Write Your Own Code
When you are building a project from scratch, or adding Phidget function calls to an existing project, you'll need to configure your development environment to properly link the Phidget COM library. To begin:
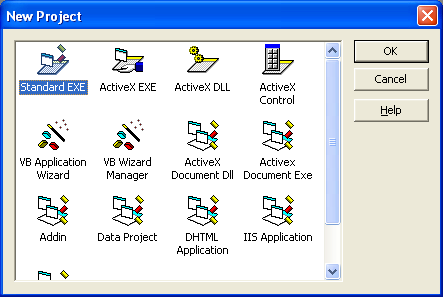
1. Generate a new Standard EXE project.
2. Next, navigate to Project → Components to add the Phidget ActiveX objects into your project.
3. The Components menu will show up. Browse for Phidget21COM.dll and add it. By default, it is placed in C:\Program Files\Phidgets. Accept the changes.
4. Navigate to Project → References and ensure that the Phidget COM library is selected.
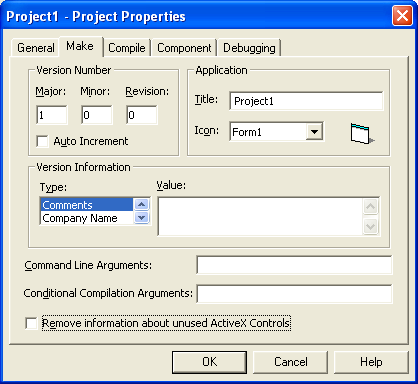
5. Navigate to Project → Project1 Properties, select the Make tab and ensure that the Remove information about unused ActiveX Controls checkbox is unchecked.
6. Then, you will need to declare and initialize the Phidget ActiveX object for your device.
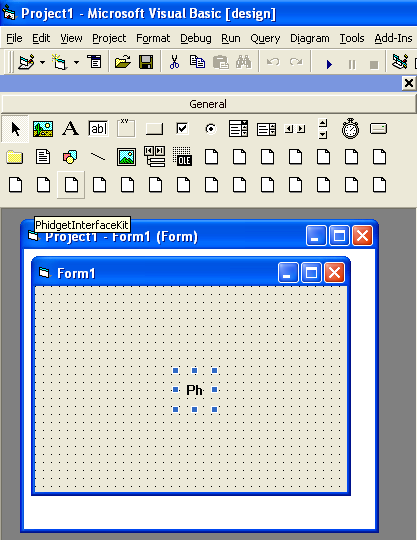
The simplest method is to place the Phidget ActiveX object from the toolbox directly onto your form. If the toolbox is not present on your screen, navigate to View → Toolbox to show the toolbar. Next, find the ActiveX object for your device in the toolbox, and double click it to add it to the form.
Alternatively, you can dynamically create the Phidget ActiveX object in code. For example, for an PhidgetInterfaceKit, you would type:
Dim WithEvents PhidgetInterfaceKit As PhidgetInterfaceKit

Private Sub Form_Load()
   ...
   Set PhidgetInterfaceKit = Controls.Add("Phidget21COM.PhidgetInterfaceKit", "PhidgetInterfaceKit")
   ...
End Sub
The object name for each type of Phidget is listed in the COM API Manual. Please see the examples on how to add a reference to your particular Phidget.
The project now has access to the Phidget function calls and you are ready to begin coding.
The same teaching section which describes the examples also has further resources for programming your Phidget.
Follow the Examples
By following the instructions for your operating system and compiler above, you probably now have a working example and want to understand it better so you can change it to do what you want. This teaching section has resources for you to learn from the examples and write your own.
Your main reference for writing Visual Basic 6.0 code will be our .COM API information, with syntax for all of our functions:
- COM API Manual (This is the complete set of functions you have available for all Phidgets)
- Device Specific APIs - The one for your Phidget can be found in its user guide.
To learn the details behind opening, configuring, using, and closing your Phidget, try the General Phidget Programming page. That page also describes using the Phidget in an event-driven manner and in a traditional manner, both of which are available in Visual Basic 6.0.
Example Flow
The Hello World example has this general structure so you can follow along. We also have an in-depth general introduction to writing Phidget code (like open, read data, etc), as well as the COM API Manual for specific syntax:
|
// ----- Event and Other Functions ----- Create any Language-Specific Functions (exception handling) Create General Attach, Detach, and Error Handling Functions:
|
In Visual Basic 6.0, you need to name these event functions by which events you want to catch. Using the underscore between your variable name and the event name from our .COM API (and then delegating each variable that gets passed with the event) will allow the function to be run when the event fires. | |
|
// ----- Main Code -----
Close Device Delete Device
|
Creating a Phidget software object in Visual Basic 6.0 is specific to the Phidget. For a Phidget Spatial, for example, this would involve creating a PhidgetSpatial object. The examples show how to do this and other API functions |
Code Snippets
Specific calls in Visual Basic 6 will differ in syntax from those on the General Phidget Programming page, but the concepts stay the same.
It may help to have the General Phidget Programming page and this section open at the same time, because they parallel each other and you can refer to the Visual Basic 6 syntax. However, many additional concepts are covered on the General Phidget Programming page on a high level, such as using multiple Phidgets, handling errors, and different styles of programming.
Step One: Initialize and Open
The open() function opens the software object, but not hardware. So, it is not a guarantee you can use the Phidget immediately.
The different types of open can be used with parameters to try and get the first device it can find, open based on its serial number, or even open across the network. The API manual lists and General Phidget Programming discusses all of the available modes that open provides.
For example, if we were using an Interface Kit Phidget board as our device, the create and open calls would look like this:
Public WithEvents PhidgetInterfaceKit1 As PhidgetInterfaceKit
Set PhidgetInterfaceKit1 = Controls.Add("Phidget21COM.PhidgetInterfaceKit", "PhidgetInterfaceKit1")
Then later, you would open the device as shown below along with the attachment of the Phidget.
Step Two: Wait for Attachment (plugging in) of the Phidget
To use the Phidget, it must be plugged in (attached). We can handle this by using event driven programming and tracking the AttachEvents and DetachEvents, or we can handle this by calling waitForAttachment. This function works for any Phidget. WaitForAttachment will block indefinitely until a connection is made to the Phidget, or an optional timeout is exceeded.
Again, if we were still using an Interface Kit Phidget board as our device (as opposed to a Spatial, or Temperature Sensor, or....), the wait for attachment would look like this:
Private Sub Form_Load()
    PhidgetInterfaceKit1.Open
    PhidgetInterfaceKit1.WaitforAttachment (3000)
End Sub
Step Three: Do Things with the Phidget
We recommend the use of event driven programming when working with Phidgets. In VB.NET we can hook an event handler into the event of a sensor changing on an Interface Kit board with the following code:
Private Sub PhidgetInterfaceKit1_OnSensorChange(ByVal Index As Long, ByVal SensorValue As Long)
    Text1.Text = Index & ":" & SensorValue
End Sub
With this function, the code inside ifKit_SensorChange will get executed every time the Phidget Interface Kit reports a change on one of its analog inputs. This is because it handles the OnSensorChange event after the underscore. Some events such as Attach and Detach belong to the base Phidget object and thus are common to all types of Phidgets. In the instance above, the sensor value read is then put into a text box (Text1) for display.
Some values can be read and sent directly to the Phidget, simply use the instance members and properties. This is also how you would set properties on the Phidget such as the output state or sensor sensitivity. For example, turning on the digital output 0 (for say, turning on an LED) on an Interface Kit board would be via:
phid.OutputState(4) = True
Step Four: Close and Delete
Make sure to close your Phidget (PhidgetInterfaceKit1.Close, for example) at the end of your program so that other programs can gain access to it.
More How-To's
The General Phidget Programming page gives more information about:
- Using Multiple Phidgets (or a Phidget other than the Interface Kit)
- Catching exceptions and errors and using logging
- Event catching versus direct polling
- And more....
The design given in this document can also be followed for almost all Phidgets. For example, if you were using a PhidgetRFID instead of an PhidgetInterfaceKit, you would place a PhidgetRFID ActiveX object instead of a PhidgetInterfaceKit. The methods and events available would change but they can be accessed in a similar manner.
The complete set of functions you have available for all Phidgets can be found in the .COM API. You can also find more description on any device-specific function in the Device API page for your specific Phidget, which can be found in its user guide.
Common Problems and Solutions/Workarounds
Windows: My application does not compile when a function contains more than one parameter.
In Visual Basic 6.0, the common way to handle multiple parameters is to not enclose the parameters with brackets. For example, instead of:
Object.getProperty(Parameter1, Parameter2)
You should write:
Object.getProperty Parameter1, Parameter2
If you wish, you can run the function with the parameters enclosed in brackets if you explicitly use the Call keyword when running the function. For example:
Call Object.getProperty(Parameter1, Parameter2)