Button Events
In this lesson, you’ll learn how to write a program that gets input from a button using events!
Write Code (Java)
Copy the code below into the project you created. If you don't have a project or forgot how to create one, revisit the Configure section.
Not your programming language? Set your preferences so we can display relevant code examples
package gettingstarted;

//Add Phidgets Library
import com.phidget22.*;

public class GettingStarted {
    //Handle Exceptions
    public static void main(String[] args) throws Exception {

        //Create
        DigitalInput redButton = new DigitalInput();

        //Address
        redButton.setIsHubPortDevice(true);
        redButton.setHubPort(0);

        //Event | Event code runs when data input from the sensor changes. The following event is a state change event. The code will listen to the button (Digital Input Object) and only run the contain code when the button is pressed or released (state changes).
        redButton.addStateChangeListener(new DigitalInputStateChangeListener() {
            public void onStateChange(DigitalInputStateChangeEvent e) {
                System.out.println("State: " + e.getState());
            }
        });

        //Open
        redButton.open(1000);

        //Keep program running
        while (true) {
            Thread.sleep(150);
        }
    }
}
//Add Phidgets Library
import com.phidget22.*;

//Define
DigitalInput redButton;

void setup(){
  try{

    //Create
     redButton = new DigitalInput();

    //Address
    redButton.setHubPort(0);
    redButton.setIsHubPortDevice(true);

    //Event | Event code runs when data input from the sensor changes. The following event is a state change event. The code will listen to the button (Digital Input Object) and only run the contain code when the button is pressed or released (state changes).
    redButton.addStateChangeListener(new DigitalInputStateChangeListener() {
      public void onStateChange(DigitalInputStateChangeEvent e) {
        System.out.println("State: " + e.getState());
      }
    });

    //Open
    redButton.open(1000);

  }catch(Exception e){
    e.printStackTrace();
  }
}

void draw(){
  delay(150);
}
Write Code (Python)
Copy the code below into the project you created. If you don't have a project or forgot how to create one, revisit the Configure section.
Not your programming language? Set your preferences so we can display relevant code examples
#Add Phidgets Library
from Phidget22.Phidget import *
from Phidget22.Devices.DigitalInput import *
import time

#Event | Event code runs when data from the sensor changes. The following event is a state change event. The code will listen to the button (Digital Input object) and only run the contain code when the button is pressed or released (state changes).
def onRedButton_StateChange(self, state):
    print("State: " + str(state))

#Create
redButton = DigitalInput()

#Address
redButton.setIsHubPortDevice(True)
redButton.setHubPort(0)

#Subscribe to Events | Subscribing to an Event tells your program to start listening to a Phidget. Here, the program will begin to listen to the state of the button (Digital Input Object).
redButton.setOnStateChangeHandler(onRedButton_StateChange)

#Open
redButton.openWaitForAttachment(1000)

#Keep program running
while(True):
    time.sleep(0.15)
Write Code (C#)
Copy the code below into the project you created. If you don't have a project or forgot how to create one, revisit the Configure section.
Not your programming language? Set your preferences so we can display relevant code examples
//Add Phidgets Library
using Phidget22;
using Phidget22.Events;

namespace GettingStarted
{
    class Program
    {
        //Event | Event code runs when data input from the sensor changes. The following event is a state change event. The code will listen to the button (Digital Input Object) and only run the contain code when the button is pressed or released (state changes).
        private static void RedButton_StateChange(object sender, Phidget22.Events.DigitalInputStateChangeEventArgs e)
        {
            System.Console.WriteLine("State: " + e.State);
        }

        static void Main(string[] args)
        {
            //Create
            DigitalInput redButton = new DigitalInput();

            //Address
            redButton.IsHubPortDevice = true;
            redButton.HubPort = 0;

            //Subscribe to Events | Subscribing to an Event tells your program to start listening to a Phidget. Here, the program will begin to listen to the state of the button (Digital Input Object).
            redButton.StateChange += RedButton_StateChange;

            //Open
            redButton.Open(1000);

            // Keep Program Running
            while (true)
            {
                System.Threading.Thread.Sleep(150);
            }
        }
    }
}
Write Code (Swift)
Oops, how did you end up here? There is no Button Events lesson for Swift. Go back to the main tutorial page.
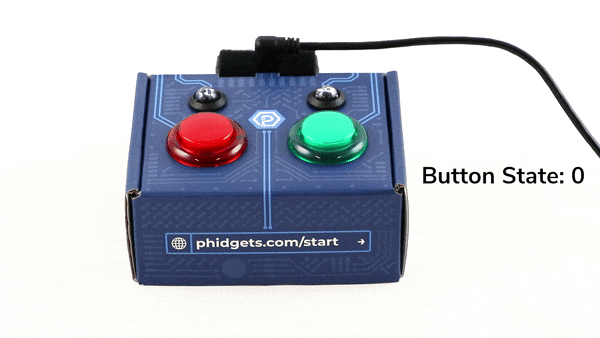
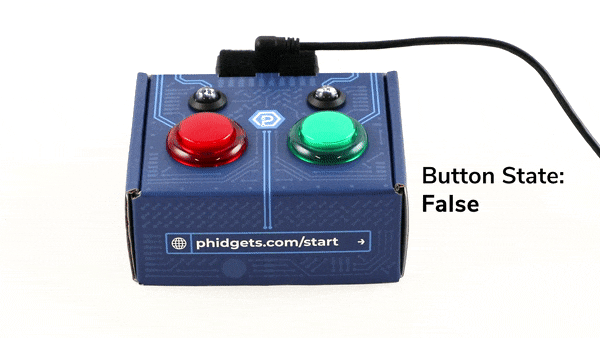
Run Your Program
When you press the red button, you will see the button state change.
What are Events?
In previous programs, you used a method called polling to access data from your button. This meant your program was continuously checking the state of the button (using a loop) to see if it had changed. Events allow you to sit back and wait for data to come to you! For example, in the program above, you simply subscribe to the State Change Event and wait for your function to be called when the button is pushed or released.
Practice
- Compare the code sample to the code sample in Lesson 2. Note the differences in the code and the program’s output.
- Modify the loop to repeat every 10ms, 1000ms, 5000ms. Note how the behavior of your program changes (or doesn’t) with the different times.
- Change the program output to print pressed and not pressed.
- Challenge: Add the green button and create an event for the green button.
Troubleshoot
I am getting a "Timed Out" exception.
- Make sure the USB cable from your VINT Hub to your computer is attached properly.
- Make the Phidget cable (the black, red and white one) is connected to your VINT Hub and to your Humidity Phidget properly).
- Make sure no other program is running that uses Phidgets. If a Phidget is already in use in another program, it will be busy and won't respond to this one.
Still having issues?
Visit the Advanced Troubleshooting Page or contact us (education@phidgets.com).