|
Notice: This page contains information for the legacy Phidget21 Library. Phidget21 is out of support. Bugfixes may be considered on a case by case basis. Phidget21 does not support VINT Phidgets, or new USB Phidgets released after 2020. We maintain a selection of legacy devices for sale that are supported in Phidget21. We recommend that new projects be developed against the Phidget22 Library.
|
Language - Adobe Director: Difference between revisions
No edit summary |
|||
| Line 1: | Line 1: | ||
[[Category:Language]] | [[Category:Language]] | ||
[[File:icon-Adobe_Director.png|64x64px]] | [[File:icon-Adobe_Director.png|64x64px|link=|alt=Adobe Director]] Adobe Director is a... | ||
__TOC__ | |||
==Introduction== | |||
{{LanguageSupport|Adobe Director|the complete Phidget API, including events|all Phidget devices.|Windows. We provide instructions on how to set up your environment for [[#Command line | command line]], [[#IDLE | IDLE]], and [[#Eclipse with PyDev | Eclipse with PyDev]]| | |||
}} | |||
==Quick Downloads== | |||
{{QuickDownloads|Python| | |||
{{APIQuickDownloads|http://www.phidgets.com/documentation/COM_API_Manual.pdf}}| | |||
{{ExampleQuickDownloads|http://www.phidgets.com/downloads/examples/AdobeDirector_2.1.8.20120216.zip|}}| | |||
{{ExtraLibraryQuickDownloads|http://www.phidgets.com/downloads/libraries/Phidget21-windevel_2.1.8.20120216.zip|COM|}} | |||
{{WindowsQuickDownloads}} | |||
{{MacQuickDownloads}} | |||
{{LinuxQuickDownloads}} | |||
}} | |||
==Getting started with Adobe Director== | |||
If you are new to writing code for Phidgets, we recommend starting by running, then modifying existing examples. This will allow you to: | |||
{{ExampleCodeReasons}} | |||
Instructions are divided up by operating system. Choose: | |||
*[[#Windows(2000/XP/Vista/7)|Windows 2000 / XP / Vista / 7]] | |||
*[[#OS X |OS X]] | |||
*[[#Linux | Linux]] (including PhidgetSBC) | |||
== | ==Windows(2000/XP/Vista/7)== | ||
===Description of Library=== | |||
Python programs on Windows depend on the following. The installers in the [[#Libraries and Drivers | Quick Downloads]] section put only the {{Code|phidget21.dll}} into your system. You will need to manually put the Phidget Python Module into your system. | |||
* <b>{{Code|phidget21.dll}}</b> contains the actual Phidget library, which is used at run-time. By default, it is placed in {{Code|C:\Windows\System32}}. | |||
* <b>{{Code|Phidget Python Module}}</b> is the Phidget library for Python. | |||
* <b>{{Code|setup.py}}</b> is used to install the Phidget module into the standard location for third party Python modules. On typical Python environments, this setup will install the Phidget Python module in the {{Code|site-packages}} directory. | |||
If you do not want to use our installer, you can download the [http://www.phidgets.com/downloads/libraries/Phidget21-windevel_2.1.8.20111220.zip {{Code|phidget21.dll}}]. | |||
The first thing you will have to do is to [[#Installing the Phidget Python Module |install the {{Code|Phidget Python Module}}]]. | |||
Afterwards, Running the examples and writing your own code can be fairly compiler-specific, so we include instructions for each environment below. | |||
===Installing the Phidget Python Module=== | |||
Please start by downloading [http://www.phidgets.com/downloads/libraries/PhidgetsPython_2.1.8.20120131.zip Phidget Python Module]. After extracting the file, open up a command line terminal, traverse to the directory containing {{Code|setup.py}} and enter the following to install the Phidget Python module into the Python environment. | |||
<div class="source"> | |||
<syntaxhighlight lang=bash> | |||
python setup.py install | |||
</syntaxhighlight> | |||
<div | |||
< | |||
</ | |||
</div> | </div> | ||
=== | ===Command Line=== | ||
====Use Our Examples==== | |||
Please ensure that the Phidget Python Module is [[#Installing the Phidget Python Module | installed]] onto your system. | |||
Next, download the [http://www.phidgets.com/downloads/examples/Python_2.1.8.20120131.zip examples] and unpack them into a folder. While these examples were written in Python 3.0, they are also compatible with Python 2.5(with a [[#All Operating Systems: The examples produces an error while running in a Python 2.5 environment. | minor modification]]). If you aren't sure what the software example for your device is called, check the software object listed in the [[Device List | Getting Started guide for your device]]. | |||
Now, open up a command line prompt and navigate to the directory of the example folder. | |||
< | Next, enter the following to run the example: | ||
</ | |||
<div class="source"> | |||
<syntaxhighlight lang=bash> | |||
python example.py | |||
</syntaxhighlight> | |||
</div> | </div> | ||
Once you have the Python examples running, we have a [[#Follow the Examples|teaching]] section below to help you follow them. | |||
Please | ====Write Your Own Code==== | ||
When you are building a project from scratch, or adding Phidget function calls to an existing project, you'll need to configure your environment to properly link the Phidgets Python libraries. Please see the [[#Use Our Examples| Use Our Examples ]] section for instructions. | |||
Then, in your code, you will need to reference to the Phidget Python library. | |||
<div class="source"> | |||
<syntaxhighlight lang=python> | |||
from Phidgets.PhidgetException import * | |||
from Phidgets.Events.Events import * | |||
</syntaxhighlight> | |||
</div> | |||
Then, you will also have to add a reference to your particular Phidget. For example, you would include the following line for a PhidgetInterfaceKit: | |||
<div class="source"> | |||
<syntaxhighlight lang=python> | |||
from Phidgets.Devices.InterfaceKit import * | |||
</syntaxhighlight> | |||
</div> | |||
Please see the [http://www.phidgets.com/downloads/examples/Python_2.1.8.20120131.zip examples] on how to add a reference to your particular Phidget. | |||
The project now has access to the Phidget function calls and you are ready to begin coding. | |||
The same [[#Follow the Examples|teaching ]] section which describes the examples also has further resources for programming your Phidget. | |||
===IDLE=== | |||
====Use Our Examples==== | |||
Please ensure that the Phidget Python Module is [[#Installing the Phidget Python Module | installed]] onto your system. | |||
Next, download the [http://www.phidgets.com/downloads/examples/Python_2.1.8.20120131.zip examples] and unpack them into a folder. While these examples were written in Python 3.0, they are also compatible with Python 2.5(with a [[#All Operating Systems: The examples produces an error while running in a Python 2.5 environment. | minor modification]]). If you aren't sure what the software example for your device is called, check the software object listed in the [[Device List | Getting Started guide for your device]]. Now, open the example in the IDLE editor. | |||
The only thing left to do is to run the examples! Click on Run → Run Module. | |||
== | [[File:Python IDLE Run.PNG|link=|alt=Run?]] | ||
Once you have the Python examples running, we have a [[#Follow the Examples|teaching]] section below to help you follow them. | |||
====Write Your Own Code==== | |||
When you are building a project from scratch, or adding Phidget function calls to an existing project, you'll need to configure your environment to properly link the Phidget Python library. Please see the [[#Use Our Examples 2| Use Our Examples ]] section for instructions. | |||
< | Then, in your code, you will need to reference to the Phidget Python library. | ||
</ | |||
<div class="source"> | |||
<syntaxhighlight lang=python> | |||
from Phidgets.PhidgetException import * | |||
from Phidgets.Events.Events import * | |||
</syntaxhighlight> | |||
</div> | </div> | ||
== | Then, you will also have to add a reference to your particular Phidget. For example, you would include the following line for a PhidgetInterfaceKit: | ||
<div class="source"> | |||
<syntaxhighlight lang=python> | |||
from Phidgets.Devices.InterfaceKit import * | |||
</syntaxhighlight> | |||
</div> | |||
Please see the [http://www.phidgets.com/downloads/examples/Python_2.1.8.20120131.zip examples] on how to add a reference to your particular Phidget. | |||
The project now has access to the Phidget function calls and you are ready to begin coding. | |||
The | The same [[#Follow the Examples|teaching ]] section which describes the examples also has further resources for programming your Phidget. | ||
== | ===Eclipse with PyDev=== | ||
====Use Our Examples==== | |||
1. Please ensure that the Phidget Python Module is [[#Installing the Phidget Python Module | installed]] onto your system. | |||
2. Next, download the [http://www.phidgets.com/downloads/examples/Python_2.1.8.20120131.zip examples] and unpack them into a folder. While these examples were written in Python 3.0, they are also compatible with Python 2.5(with a [[#All Operating Systems: The examples produces an error while running in a Python 2.5 environment. | minor modification]]). If you aren't sure what the software example for your device is called, check the software object listed in the [[Device List | Getting Started guide for your device]]. You will need this example source code to be imported into your project later on. | |||
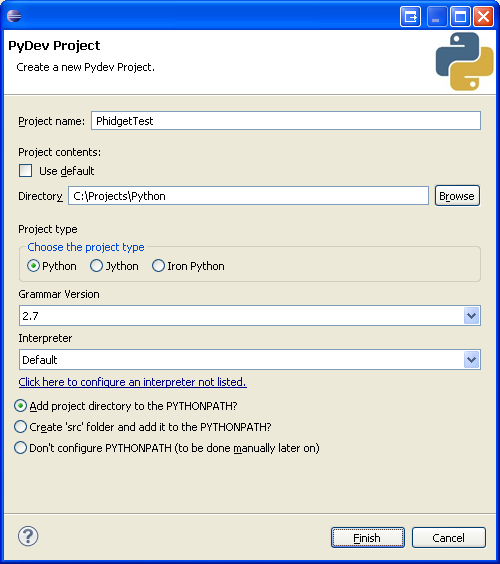
3. Next, a new project will need to be created. Generate a new PyDev project with a descriptive name such as PhidgetTest. | |||
[[File:Python PyDev New Project.PNG|link=|alt=New Project]] | |||
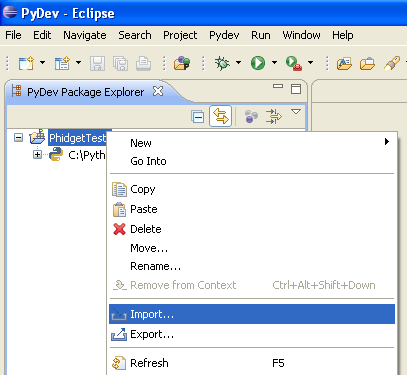
4. To import the example program into your project, right click the Project and select {{Code|Import}}. | |||
[[File:Python PyDev Import File 1.PNG|link=|alt=Import File]] | |||
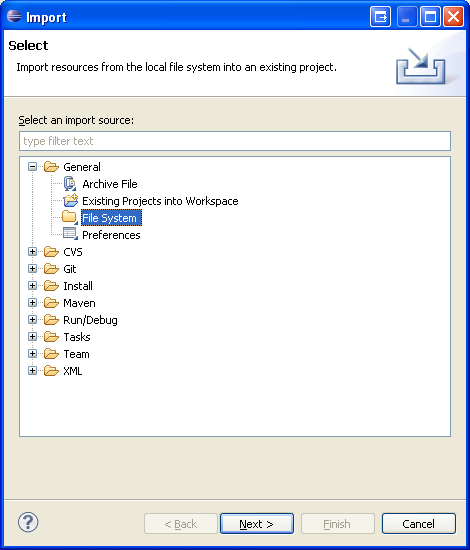
5. On the next screen, select {{Code|File System}} and proceed to the next screen. | |||
[[File:Python PyDev Import File 2.PNG|link=|alt=Import File]] | |||
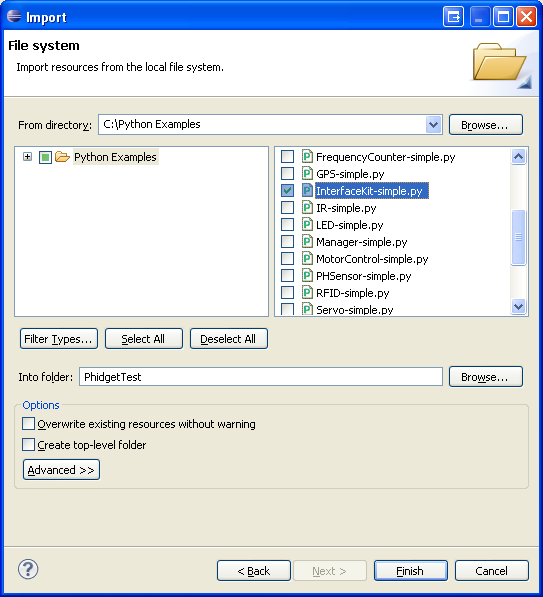
6. Browse to the directory where you extracted the examples into, and select the example you wish to open. | |||
[[File:Python PyDev Import File 3.PNG|link=|alt=Import File]] | |||
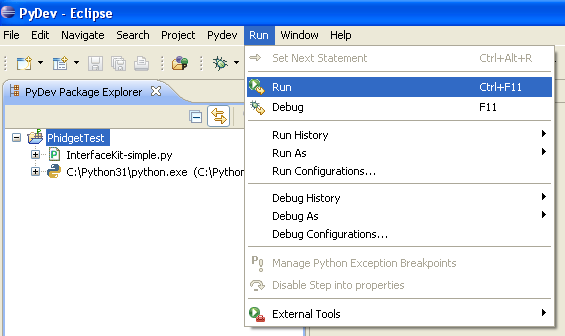
7. The only thing left to do is to run the examples! Click on Run → Run. | |||
[[File:Python PyDev Run.PNG|link=|alt=Run?]] | |||
Once you have the Python examples running, we have a [[#Follow the Examples|teaching]] section below to help you follow them. | |||
====Write Your Own Code==== | |||
When you are building a project from scratch, or adding Phidget function calls to an existing project, you'll need to configure your environment to properly link the Phidget Python library. Please see the [[#Use Our Examples 3 | Use Our Examples ]] section for instructions. | |||
Then, in your code, you will need to include a reference to the Phidget Python library. | |||
<div class="source"> | |||
<syntaxhighlight lang=python> | |||
from Phidgets.PhidgetException import * | |||
from Phidgets.Events.Events import * | |||
</syntaxhighlight> | |||
</div> | |||
You will also have to add a reference to your particular Phidget. For example, you would include the following line for a PhidgetInterfaceKit: | |||
<div class="source"> | |||
<syntaxhighlight lang=python> | |||
from Phidgets.Devices.InterfaceKit import * | |||
</syntaxhighlight> | |||
</div> | |||
Please see the [http://www.phidgets.com/downloads/examples/Python_2.1.8.20120131.zip examples] on how to add a reference to your particular Phidget. | |||
The project now has access to the Phidget function calls and you are ready to begin coding. | |||
The same [[#Follow the Examples|teaching ]] section which describes the examples also has further resources for programming your Phidget. | |||
==OS X== | |||
Python has excellent support on OS X. | |||
The first step in using Python on Mac is to install the Phidget libraries. Compile and install them as explained on the [[Device List|getting started guide for your device]]. Then, the [[OS - OS X]] page also describes the different Phidget files, their installed locations, and their roles.... | |||
==Linux== | |||
Python has support on Linux. | |||
The first step in using Python on Linux is to install the Phidget libraries. Compile and install them as explained on the main [[OS - Linux | Linux page]]. That Linux page also describes the different Phidget files, their installed locations, and their roles. | |||
==Follow the Examples== | |||
By following the instructions for your operating system and compiler above, you probably now have a working example and want to understand it better so you can change it to do what you want. This teaching section has resources for you to learn from the examples and write your own. | |||
Next, comes our API information. These resources outline the Python Phidget functions: | |||
{{UsingAPhidgetInCodeGeneral|both of which are available in Python|[http://www.phidgets.com/documentation/PythonDoc.zip Python API]}} | |||
===Example Flow=== | |||
{{ExamplePseudocode|In Python, you can name these '''event''' functions whatever you like. You will then pass them as function pointers to the Phidget library below in the Main Code section. This hooks them into the actual events when they occur. <br> | |||
In the example code, the event functions common to all Phidgets are called things like '''AttachHandler()''' and '''DetachHandler()''', etc.<br><br> | |||
Some event functions will be specific to each device, like when a tag is read on an RFID board, or when a sensor value changes on an Interface Kit. | |||
Other functions are given in the examples to show you more detail on using your Phidget. For example, '''DeviceInitialize()''' will show what needs to be set up for your Phidget before using it. | |||
|Creating a Phidget software object in Python is specific to the Phidget. For a Phidget Spatial, for example, this would involve creating a {{Code|Spatial}} object. The examples show how to do this and other API functions.<br><br> | |||
The object provides device specific methods and properties which are available from the API for your specific Phidget.| | |||
[http://www.phidgets.com/documentation/PythonDoc.zip Python API]}} | |||
==Code Snippets== | |||
==Common Problems and Solutions/Workarounds== | ==Common Problems and Solutions/Workarounds== | ||
==={{ProblemSolution|OS X|My application hangs when using multiple devices in a single Python application.}}=== | |||
A call to {{Code|open}} may hang indefinitely if multiple devices are being programmed in a single Python application. To circumvent this, allow the application to delay a short period between {{Code|open}} calls. For most environments, a 1.25 millisecond delay is enough. For example: | |||
<div class="source"> | |||
<syntaxhighlight lang=python> | |||
import time | |||
... | |||
interface_kit.openPhidget(94695) | |||
time.sleep(0.00125) | |||
rfid.openPhidget(33502) | |||
</syntaxhighlight> | |||
</div> | |||
==={{ProblemSolution|All Operating Systems|The examples produces an error while running in a Python 2.5 environment.}}=== | |||
Running the examples produces an error similar to the following: | |||
<div class="source"> | |||
<syntaxhighlight lang=python> | |||
InterfaceKit-simple.py:33: Warning: 'as' will become a reserved keyword in Python 2.6 | |||
File "InterfaceKit-simple.py", line 33 | |||
except RuntimeError as e: | |||
SyntaxError: invalid syntax | |||
</syntaxhighlight> | |||
</div> | |||
To run the example code in Python 2.5, all the lines containing: | |||
<div class="source"> | |||
<syntaxhighlight lang=python> | |||
except RuntimeError as e: | |||
</syntaxhighlight> | |||
</div> | |||
will need to be replaced with: | |||
<div class="source"> | |||
<syntaxhighlight lang=python> | |||
except Runtime, e: | |||
</syntaxhighlight> | |||
</div> | |||
Revision as of 23:16, 9 March 2012
![]() Adobe Director is a...
Adobe Director is a...
Introduction
If this is your first time working with a Phidget, we suggest starting with the Getting Started page for your specific device. This can be found in the user guide for your device. That page will walk you through installing drivers and libraries for your operating system, and will then bring you back here to use Adobe Director specifically.
Adobe Director is capable of using the complete Phidget API, including events. We also provide example code in Adobe Director for all Phidget devices.
Adobe Director can be developed with Windows. We provide instructions on how to set up your environment for command line, IDLE, and Eclipse with PyDev.
You can compare Adobe Director with our other supported languages.
Quick Downloads
Just need the Python documentation, drivers, libraries, and examples? Here they are:
Documentation
Example Code
Libraries and Drivers
- COM Libraries
- 32-bit Windows Drivers Installer
- 64-bit Windows Drivers Installer
- Windows Driver and Library Files (Zipped)
- OS X Drivers Installer
- Linux Libraries (Source Code)
Getting started with Adobe Director
If you are new to writing code for Phidgets, we recommend starting by running, then modifying existing examples. This will allow you to:
- Make sure your libraries are properly linked
- Go from source code to a test application as quickly as possible
- Ensure your Phidget is hooked up properly
Instructions are divided up by operating system. Choose:
- Windows 2000 / XP / Vista / 7
- OS X
- Linux (including PhidgetSBC)
Windows(2000/XP/Vista/7)
Description of Library
Python programs on Windows depend on the following. The installers in the Quick Downloads section put only the phidget21.dll into your system. You will need to manually put the Phidget Python Module into your system.
phidget21.dllcontains the actual Phidget library, which is used at run-time. By default, it is placed inC:\Windows\System32.Phidget Python Moduleis the Phidget library for Python.setup.pyis used to install the Phidget module into the standard location for third party Python modules. On typical Python environments, this setup will install the Phidget Python module in thesite-packagesdirectory.
If you do not want to use our installer, you can download the phidget21.dll.
The first thing you will have to do is to install the Phidget Python Module.
Afterwards, Running the examples and writing your own code can be fairly compiler-specific, so we include instructions for each environment below.
Installing the Phidget Python Module
Please start by downloading Phidget Python Module. After extracting the file, open up a command line terminal, traverse to the directory containing setup.py and enter the following to install the Phidget Python module into the Python environment.
python setup.py install
Command Line
Use Our Examples
Please ensure that the Phidget Python Module is installed onto your system.
Next, download the examples and unpack them into a folder. While these examples were written in Python 3.0, they are also compatible with Python 2.5(with a minor modification). If you aren't sure what the software example for your device is called, check the software object listed in the Getting Started guide for your device.
Now, open up a command line prompt and navigate to the directory of the example folder.
Next, enter the following to run the example:
python example.py
Once you have the Python examples running, we have a teaching section below to help you follow them.
Write Your Own Code
When you are building a project from scratch, or adding Phidget function calls to an existing project, you'll need to configure your environment to properly link the Phidgets Python libraries. Please see the Use Our Examples section for instructions.
Then, in your code, you will need to reference to the Phidget Python library.
from Phidgets.PhidgetException import *
from Phidgets.Events.Events import *
Then, you will also have to add a reference to your particular Phidget. For example, you would include the following line for a PhidgetInterfaceKit:
from Phidgets.Devices.InterfaceKit import *
Please see the examples on how to add a reference to your particular Phidget.
The project now has access to the Phidget function calls and you are ready to begin coding.
The same teaching section which describes the examples also has further resources for programming your Phidget.
IDLE
Use Our Examples
Please ensure that the Phidget Python Module is installed onto your system.
Next, download the examples and unpack them into a folder. While these examples were written in Python 3.0, they are also compatible with Python 2.5(with a minor modification). If you aren't sure what the software example for your device is called, check the software object listed in the Getting Started guide for your device. Now, open the example in the IDLE editor.
The only thing left to do is to run the examples! Click on Run → Run Module.

Once you have the Python examples running, we have a teaching section below to help you follow them.
Write Your Own Code
When you are building a project from scratch, or adding Phidget function calls to an existing project, you'll need to configure your environment to properly link the Phidget Python library. Please see the Use Our Examples section for instructions.
Then, in your code, you will need to reference to the Phidget Python library.
from Phidgets.PhidgetException import *
from Phidgets.Events.Events import *
Then, you will also have to add a reference to your particular Phidget. For example, you would include the following line for a PhidgetInterfaceKit:
from Phidgets.Devices.InterfaceKit import *
Please see the examples on how to add a reference to your particular Phidget.
The project now has access to the Phidget function calls and you are ready to begin coding.
The same teaching section which describes the examples also has further resources for programming your Phidget.
Eclipse with PyDev
Use Our Examples
1. Please ensure that the Phidget Python Module is installed onto your system.
2. Next, download the examples and unpack them into a folder. While these examples were written in Python 3.0, they are also compatible with Python 2.5(with a minor modification). If you aren't sure what the software example for your device is called, check the software object listed in the Getting Started guide for your device. You will need this example source code to be imported into your project later on.
3. Next, a new project will need to be created. Generate a new PyDev project with a descriptive name such as PhidgetTest.
4. To import the example program into your project, right click the Project and select Import.
5. On the next screen, select File System and proceed to the next screen.
6. Browse to the directory where you extracted the examples into, and select the example you wish to open.
7. The only thing left to do is to run the examples! Click on Run → Run.
Once you have the Python examples running, we have a teaching section below to help you follow them.
Write Your Own Code
When you are building a project from scratch, or adding Phidget function calls to an existing project, you'll need to configure your environment to properly link the Phidget Python library. Please see the Use Our Examples section for instructions.
Then, in your code, you will need to include a reference to the Phidget Python library.
from Phidgets.PhidgetException import *
from Phidgets.Events.Events import *
You will also have to add a reference to your particular Phidget. For example, you would include the following line for a PhidgetInterfaceKit:
from Phidgets.Devices.InterfaceKit import *
Please see the examples on how to add a reference to your particular Phidget.
The project now has access to the Phidget function calls and you are ready to begin coding.
The same teaching section which describes the examples also has further resources for programming your Phidget.
OS X
Python has excellent support on OS X.
The first step in using Python on Mac is to install the Phidget libraries. Compile and install them as explained on the getting started guide for your device. Then, the OS - OS X page also describes the different Phidget files, their installed locations, and their roles....
Linux
Python has support on Linux.
The first step in using Python on Linux is to install the Phidget libraries. Compile and install them as explained on the main Linux page. That Linux page also describes the different Phidget files, their installed locations, and their roles.
Follow the Examples
By following the instructions for your operating system and compiler above, you probably now have a working example and want to understand it better so you can change it to do what you want. This teaching section has resources for you to learn from the examples and write your own.
Next, comes our API information. These resources outline the Python Phidget functions:
- Python API (This is the complete set of functions you have available for all Phidgets)
- Device Specific APIs - The one for your Phidget can be found in its user guide.
To learn the details behind opening, configuring, using, and closing your Phidget, try the General Phidget Programming page. That page also describes using the Phidget in an event-driven manner and in a traditional manner, both of which are available in Python.
Example Flow
The Hello World example has this general structure so you can follow along. We also have an in-depth general introduction to writing Phidget code (like open, read data, etc), as well as the Python API for specific syntax:
|
// ----- Event and Other Functions ----- Create any Language-Specific Functions (exception handling) Create General Attach, Detach, and Error Handling Functions:
|
In Python, you can name these event functions whatever you like. You will then pass them as function pointers to the Phidget library below in the Main Code section. This hooks them into the actual events when they occur. | |
|
// ----- Main Code -----
Close Device Delete Device
|
Creating a Phidget software object in Python is specific to the Phidget. For a Phidget Spatial, for example, this would involve creating a |
Code Snippets
Common Problems and Solutions/Workarounds
OS X: My application hangs when using multiple devices in a single Python application.
A call to open may hang indefinitely if multiple devices are being programmed in a single Python application. To circumvent this, allow the application to delay a short period between open calls. For most environments, a 1.25 millisecond delay is enough. For example:
import time
...
interface_kit.openPhidget(94695)
time.sleep(0.00125)
rfid.openPhidget(33502)
All Operating Systems: The examples produces an error while running in a Python 2.5 environment.
Running the examples produces an error similar to the following:
InterfaceKit-simple.py:33: Warning: 'as' will become a reserved keyword in Python 2.6
  File "InterfaceKit-simple.py", line 33
    except RuntimeError as e:
SyntaxError: invalid syntax
To run the example code in Python 2.5, all the lines containing:
except RuntimeError as e:
will need to be replaced with:
except Runtime, e: