|
Notice: This page contains information for the legacy Phidget21 Library. Phidget21 is out of support. Bugfixes may be considered on a case by case basis. Phidget21 does not support VINT Phidgets, or new USB Phidgets released after 2020. We maintain a selection of legacy devices for sale that are supported in Phidget21. We recommend that new projects be developed against the Phidget22 Library.
|
OS - Phidget SBC: Difference between revisions
(Created page with "Category:OS 64x64px|link=OS - LinuxOn the Single Board Computer (SBC), Phidgets can be either plugged directly into one of the USB ports or run over a...") |
No edit summary |
||
| (350 intermediate revisions by 8 users not shown) | |||
| Line 1: | Line 1: | ||
[[Category:OS]] | [[Category:OS]] | ||
[[File:icon-Linux.png|64x64px|link=OS - Linux]]On the Single Board Computer (SBC), Phidgets can be either plugged directly into one of the USB ports or run over a network using the [[# | {{OSLang|[[File:icon-Linux.png|64x64px|link=OS - Linux]]|On the Single Board Computer (SBC), Phidgets can be either plugged directly into one of the USB ports or run over a network using the [[#WebService | WebService]].}} | ||
__TOC__ | __TOC__ | ||
== | ==Quick Downloads== | ||
Unlike our other supported operating systems, the SBC '''does not require downloads''' unless you are doing something advanced like loading the firmware or developing your own kernel. You will know if you need these downloads, otherwise, the SBC should work as described on the [[1073 User Guide#Getting Started|SBC3 Getting Started Guide]] right out of the box. | |||
*[[Software License]] | |||
*[ | |||
'''For PhidgetSBC (1070):''' | |||
*[{{SERVER}}/downloads/phidgetsbc/1070/changelog.txt changelog] | |||
*[{{SERVER}}/downloads/phidgetsbc/1070/phidgetsbc-minimal.bin Minimal Firmware] | |||
*[{{SERVER}}/downloads/phidgetsbc/1070/phidgetsbc-full.bin Full Firmware] | |||
*[{{SERVER}}/downloads/phidgetsbc/1070/buildroot-phidgetsbc.tar.gz Buildroot/Kernel Sources] | |||
'''For PhidgetSBC2 (1072):''' | |||
*[{{SERVER}}/downloads/phidgetsbc/1072/changelog.txt changelog] | |||
*[{{SERVER}}/downloads/phidgetsbc/1072/phidgetsbc2.bin SBC2 Firmware] | |||
*[{{SERVER}}/downloads/phidgetsbc/1072/phidgetsbc2-kerneldev.tar.gz SBC2 Kernel Development Package] (How-to and patch file) | |||
'''The PhidgetSBC3 has different firmware packages based on the kernel version. In order to determine the device version of your SBC3, see the [[1073_User_Guide#SBC_Web_Interface|web configuration page]].''' | |||
[[File:sbcver.jpg|thumb|562px|link=|The system information table is found on the Status -> System tab of the '''[[1073_User_Guide#SBC_Web_Interface|web configuration page]]''' of the SBC.]] | |||
'''For PhidgetSBC3 (1073) kernel version 3.6.3:''' | |||
*[{{SERVER}}/downloads/phidgetsbc/1073/changelog.txt changelog] | |||
*[{{SERVER}}/downloads/phidgetsbc/1073/linux-3.6.3/phidgetsbc3.bin SBC3 Firmware] | |||
*[{{SERVER}}/downloads/phidgetsbc/1073/linux-3.6.3/phidgetsbc3-kerneldev.tar.gz SBC3 Kernel Development Package] | |||
*[{{SERVER}}/downloads/phidgetsbc/1073/linux-3.6.3/phidgetsbc3-upgrade_3.6.3_3.14.27.tar.gz SBC3 Kernel upgrade package (3.6.3 -> 3.14.27)] | |||
'''For PhidgetSBC3 (1073) kernel version 3.14.27:''' | |||
*[{{SERVER}}/downloads/phidgetsbc/1073/changelog.txt changelog] | |||
*[{{SERVER}}/downloads/phidgetsbc/1073/linux-3.14.27/phidgetsbc3.bin SBC3 Firmware] | |||
*[{{SERVER}}/downloads/phidgetsbc/1073/linux-3.14.27/phidgetsbc3-update_3.14.27.tar.gz SBC3 Kernel update package (3.14.27)] | |||
*[{{SERVER}}/downloads/phidgetsbc/1073/linux-3.14.27/phidgetsbc3-kerneldev.tar.gz SBC3 Kernel Development Package] | |||
Note that, instead of using the firmware to update your SBC, updates should normally be done via the System -> Packages page on your SBC3 web interface. It is rarely necessary to completely re-flash your device.. | |||
<br clear = all> | |||
==Getting Started with the Phidget SBC Debian Linux== | |||
The Single Board Computer (SBC) is a unique Phidget. It is a computer with a Linux operating system. It can compile code, save files, manage background jobs, host information over the web, and more. | |||
'''If this is your first time''' using the Phidget SBC, you will want to start with the [[1073 User Guide#Getting Started | Getting Started Guide for the SBC]]. After that, here we will get you started on topics beyond those in the getting started guide, including how to write Phidget code to run on the SBC. You '''do not need this page''' if you are simply using the SBC to broadcast data from Phidgets over the network - it does that automatically. We describe how to verify and use this in the [[1073 User Guide#Getting Started | Getting Started Guide]]. | |||
This page will show you how to: | |||
* Install the ability to write and develop code on the SBC itself | |||
* Use the command line for basic coding tasks | |||
* Troubleshoot the SBC's network | |||
It will also give additional specifications, which are useful for doing more advanced things with the SBC hardware and software. | |||
Before reading this page, you should have done the following via the Getting Started Guide: | |||
* Set up networking on your SBC, via either Ethernet or wireless | |||
* Set up an admin password | |||
* Learned the IP address or link local address of the SBC | |||
We will use this information in setting up the libraries and drivers to use the SBC for writing and running code. | |||
Conceivably, you could simply use the SBC like any Linux computer, and do all of your development and compiling of Phidget code on the SBC itself. In practice this gets complicated as the SBC does not have a keyboard or screen. So usually, you will want to develop your code an external computer and copy files and settings over to the SBC via a network. This makes this Getting Started section unique, in that we show you how to set up both computers: | |||
* Your [[#Getting Started - External Computer | External Development Computer]], usually your main desktop or laptop which will transfer files and settings to and from the SBC | |||
* The [[#Getting Started - The SBC (Debian Linux) | SBC]] itself, which needs programming language libraries to use Phidgets. | |||
===Getting Started - External Computer=== | |||
You have two ways to connect to the SBC from an external computer: via the [[#SBC Web Interface|SBC Web Interface]] and over the more powerful but complex [[#SSH | Secure Shell (SSH)]]. | |||
====SBC Web Interface==== | |||
You have already worked extensively with the web interface in the [[1073 User Guide#Getting Started | Getting Started Guide for the SBC]]. This was the tool within a web browser which was opened either via the [[Phidget Control Panel]] on Windows, or by simply entering the IP or link local address into an internet browser. It allowed you to set the password, set up internet connectivity, and so on. | |||
This section doesn't have more information on the interface; rather, it simply serves as a reminder that you have the web interface as an available tool. Examples, including screenshots, are placed where appropriate in this document. The web interface will probably stay your initial go-to way to connect to the SBC, especially for tasks that benefit from graphical interaction, like setting up wireless or using the webcam. | |||
====SSH==== | |||
The most flexible way to transfer files and commands to and from the SBC is via a program called '''ssh'''. The ssh program provides command line text access over a network into the SBC. Using it, you can run programs and give the SBC commands. The ssh program has a companion program called '''scp''' which can copy files back and forth. If you are unfamiliar with ssh, you can think of it like the command line or a Mac terminal, but with a remote connection to a different computer. It is a minimal yet effective way to interact with a remote computer. | |||
Before connecting over ssh, you will need: | |||
* The '''IP address''' (such as 168.254.3.0) or '''link local address''' (such as phidgetsbc.local) of the SBC | |||
* The '''admin password''' for the SBC | |||
Both of these items can be found by following the steps in the [[1073 User Guide#Getting Started | Getting Started Guide for the SBC]]. | |||
You will also need to enable SSH on the SBC side. This can be done through the [[#SBC Web Interface| Web Interface]], under {{Code|Network → Settings}}, by changing the ''SSH Server'' radio button to ''Enabled'' and saving your changes: | |||
[[File:sbc_turn_on_ssh.png|link=|alt=]] | |||
=====SSH on Windows===== | |||
The ssh program is not installed on Windows by default. But, there are a variety of SSH programs available for free. One simple and commonly used program is [http://www.chiark.greenend.org.uk/~sgtatham/putty/download.html PuTTY], and it has the advantage that the executable doesn't need to install, it just runs. | |||
With PuTTY, when you first run the program it will ask you what to connect to. Enter the IP address or link local address of the SBC, and then click the SSH radio button right below the address, which will change the port to 22. Then click open, and you'll have an ssh connection to the SBC open in a terminal. It will prompt you for a user name ({{Code|root}}) and password (the admin password). | |||
To copy files back and forth, there is an SCP component to PuTTY, called PSCP, which is available from the same [http://www.chiark.greenend.org.uk/~sgtatham/putty/download.html PuTTY download page]. Use of PSCP will be similar with the address, username, and password, except that you will be transferring files instead of sending commands. | |||
=====SSH on Linux and Mac OS===== | |||
Linux and Mac OS already have ssh installed by default. To run ssh simply open a terminal... | |||
* {{Code|Ctrl-Alt-T}} on Linux | |||
* {{Code|Applications → Utilities → Terminal}} on Mac OS | |||
...and type: | |||
<div class="source"> | <div class="source"> | ||
<syntaxhighlight lang=bash> | <syntaxhighlight lang=bash> | ||
ssh root@phidgetsbc.local | |||
</syntaxhighlight> | |||
</div> | |||
If you have re-named your SBC, include that name instead of the {{Code|phidgetsbc.local}} link address. Or, you can use the SBC's IP address, e.g. something like {{Code|ssh root@168.254.3.0}} | |||
To copy files back and forth, the command follows the form of: {{Code|scp from to}} | |||
So, to copy a file {{Code|/root/data.txt}} from the SBC to your local machine, type: | |||
<div class="source"> | |||
<syntaxhighlight lang=bash> | |||
scp root@phidgetsbc.local:/root/data.txt . | |||
</syntaxhighlight> | </syntaxhighlight> | ||
</div> | </div> | ||
Note the use of the dot '''.''' to indicate that scp should put the file in the current local directory. If you're not sure what folder the terminal is operating in type {{Code|pwd}} to print the working directory. Terminals usually start by default in your home folder. | |||
===Getting Started - The SBC (Debian Linux)=== | |||
The SBC runs Linux, which is a full operating system. It is stripped down compared to a full desktop release of Linux, but you can compile code on it, run programs, schedule tasks, create and manage files, run a web server, and much, much more. | |||
At this point you have connected to the SBC via the [[#SBC Web Interface|web interface]], and probably also through [[#SSH|SSH]]. This section will help you install libraries and drivers that you probably want - i.e. support for C, Java, and Python. After this section, you'll be well into the depths of using the SBC as a computer, and so you'll probably want to keep the [[#Using SBC Linux|Using SBC Linux section]] open for reference while you work if you are not already familiar with Linux. | |||
The SBC comes with the following Phidget functionality installed: | |||
* The Phidget C libraries {{Code|libphidget21.so}} | |||
* The Phidget [[#WebService | WebService]] | |||
(If you are simply curious what these are and how they get installed, we describe the process on the [[OS - Linux | general Linux page]].) | |||
But to compile C programs, or run Java programs, or use Python, you will need to install these languages onto the SBC. | |||
Before installing anything on the SBC, however, (even via a button on the web interface) make sure that the ''Include full Debian Package Repository'' option is checked in the web interface under {{Code|System → Packages}}. | |||
====Installing C/C++ and Java==== | |||
The simplest way to install C/C++ and Java on the SBC is via the web interface. There is a button under {{Code|System → Packages}} to install C support (including {{Code|gcc}}) and another button to install Java support: | |||
[[File:sbc_packages_web.png|link=|alt=]] | |||
You have to check that you are running the same version of Java on your development machine (where you plan on compiling the java programs) as the SBC is running. To do this type the following into the terminal on your computer and from ssh on the SBC: | |||
<div class="source"> | |||
<syntaxhighlight lang=bash> | |||
Java -version | |||
</syntaxhighlight> | |||
</div> | |||
If you need to update the version of Java on your SBC, use the following commands: | |||
<div class="source"> | |||
<syntaxhighlight lang=bash> | |||
apt-get install openjdk-7-jre-headless | |||
su | |||
update-alternatives --config java | |||
</syntaxhighlight> | |||
</div> | |||
Now you're ready to begin programming. We have programming pages for both [[Language - C/C++|C/C++]] and for [[Language - Java|Java]]. Remember that if you're unfamiliar with Linux, we have help on using files and running programs automatically in the [[#Using SBC Linux|Using SBC Linux section]]. | |||
If you want to avoid using the [[#SSH|SSH]] interface on the SBC entirely, and you want to write your program in Java and run it continuously from boot (which is the only option if you want to avoid [[#SSH|SSH]]), we have a [[#Program in Java with the Web Interface|very in-depth section]] on that topic. | |||
====Installing Python==== | |||
Installing Python has two steps. First, you'll need to install the basic ability to run python, and then you'll need to install the Phidget Python module. Both steps (and both options) require that you issue the relevant commands through an [[#SSH|SSH terminal]]. | |||
=====Basic Python===== | |||
The base Python functionality can be downloaded and installed in one step with [[#apt|apt]] (i.e. in a terminal, type): | |||
<div class="source"> | |||
<syntaxhighlight lang=bash> | |||
apt-get install python | |||
</syntaxhighlight> | |||
</div> | |||
This will give you Python, and now you just have to install the Phidget Python module to gain Phidget functionality. If the installation fails because it can't find python, you need to enable the full repository as described in [[#Getting Started_-_The_SBC_(Debian_Linux)|this section]], and then perform an apt-get update. | |||
=====Install Phidget Python Method 1: Use a USB Key===== | |||
Copy the [{{SERVER}}/downloads/phidget21/libraries/any/PhidgetsPython.zip Python Libraries] onto a USB key. Unpack the zip file into a folder on the USB key. Insert the key into the SBC. | |||
You will have to figure out where the USB key (and the Phidget Python library folder) is now located. We describe how in the general [[#Using USB Data Keys | Using USB Data Keys]] section. | |||
After you know the place where the USB key is mounted, in a terminal go to that directory (e.g. type {{Code|cd /media/usb0/}}), enter the unpacked Phidget Python Library folder, and run: | |||
<div class="source"> | <div class="source"> | ||
<syntaxhighlight lang=bash> | <syntaxhighlight lang=bash> | ||
python setup.py install | |||
</syntaxhighlight> | |||
</div> | |||
Now, you're ready to begin writing Python code for the SBC. For more help on writing and using Python with Phidgets, we have an whole [[Language - Python | page on that topic]]. Remember that if you're unfamiliar with Linux, we have help on using files and running programs automatically in the [[#Using SBC Linux|Using SBC Linux section]]. | |||
=====Install Phidget Python Method 2: Use the Internet===== | |||
Rather than using a USB key to transfer the file, the SBC can download it directly from the internet. You will need {{Code|wget}} and {{Code|unzip}} installed, both of which are small: | |||
<div class="source"> | |||
<syntaxhighlight lang=bash> | |||
apt-get install wget | |||
apt-get install unzip | |||
</syntaxhighlight> | </syntaxhighlight> | ||
</div> | </div> | ||
Copy the web link address for the [{{SERVER}}/downloads/phidget21/libraries/any/PhidgetsPython.zip Python Libraries]. | |||
In an SSH terminal to the SBC, type: {{Code|<nowiki>wget http://www.python_library_link</nowiki>}} where instead of <nowiki>http://www.python_library_link</nowiki> you insert the link you just copied. Copying into a terminal can usually be done via the right-click menu. | |||
This will download the Phidget python libraries to the folder you ran the {{Code|wget}} command in. Unzip the downloaded file using the command {{Code|unzip file}}, where file is the filename from {{Code|wget}}. Or try typing {{Code|ls}} to list the names of a file in the directory, which should include the unzipped folder. Enter the unzipped folder (e.g. use {{Code|cd}} to change directory), and install the Phidget Python libraries: | |||
<div class="source"> | <div class="source"> | ||
<syntaxhighlight lang=bash> | <syntaxhighlight lang=bash> | ||
python setup.py install | |||
</syntaxhighlight> | |||
</div> | |||
Now, you're ready to begin writing Python code for the SBC. For more help on writing and using Python with Phidgets, we have a whole [[Language - Python | page on that topic]]. Remember that if you're unfamiliar with Linux, we have help on using files and running programs automatically in the [[#Using SBC Linux|Using SBC Linux section]]. | |||
====Installing Other Languages==== | |||
You may also be able to program on the SBC using [[Language - Ruby|Ruby]] and [[Language - C Sharp|C# under Mono]], though we do not offer in-depth support for these languages on the SBC. The installation procedures should more or less follow that of [[#Installing Python|installing python]] on the SBC, except you will be installing Ruby or Mono. Performing package searches using [[#apt|apt cache search]] can help you find the relevant software. | |||
For C#, as of 2012 the {{Code|mono-complete}} package is broken on the Debian Squeeze repository. Rather, you have to install the Mono runtime and Mono compiler separately. | |||
To install the runtime package (and its dependencies), use [[#apt|apt]]: | |||
<div class="source"> | |||
<syntaxhighlight lang=bash> | |||
apt-get install mono-runtime | |||
</syntaxhighlight> | </syntaxhighlight> | ||
</div> | </div> | ||
== | Then, to install the C# compiler: | ||
<div class="source"> | |||
<syntaxhighlight lang=bash> | |||
apt-get install mono-gmcs | |||
</syntaxhighlight> | |||
</div> | |||
Or the Visual Basic compiler: | |||
<div class="source"> | <div class="source"> | ||
<syntaxhighlight lang=bash> | <syntaxhighlight lang=bash> | ||
apt-get install mono-vbnc | |||
</syntaxhighlight> | |||
</div> | |||
Then, the system and library packages do not link correctly for the version 2.0 of Mono. If this is the case, your code will compile fine, but when you try to run it, you will get an error like: | |||
:{{Code|The assembly mscorlib.dll was not found or could not be loaded.}} | |||
:{{Code|It should have been installed in the `/usr/lib/mono/1.0/mscorlib.dll' directory.}} | |||
In this case, you need to install these two packages: | |||
<div class="source"> | |||
<syntaxhighlight lang=bash> | |||
apt-get install libmono-corlib1.0-cil | |||
apt-get install libmono-system1.0-cil | |||
</syntaxhighlight> | </syntaxhighlight> | ||
</div> | </div> | ||
Here we found these packages to work by working through the tree structure. As a general rule, you can find these dependencies by using install (here, {{Code|apt-get install mono-complete}}) to get a sense of the package tree structure. This will possibly tell you that the packages are broken, but at the same time this will list the dependencies of the packages. Trying to install individual dependencies will show you that although a root-package fails, the sub-packages will sometimes succeed, and install what you need. | |||
If you want to use a specific dll or library that is not available in this reduced version of mono, you can install mono complete by switching from Emdebian+Debian to just Debian. To do this: | |||
In {{Code|/etc/apt/preferences}} make the following changes: | |||
:{{Code|Package: *}} | |||
:{{Code|<nowiki>Pin: release a=stable</nowiki>}} | |||
:{{Code|Pin-Priority: 1010}} | |||
In {{Code|/etc/apt/sources.list/mutistrap-debian.list}} remove the emdebian line. | |||
Apply the changes: | |||
<div class="source"> | <div class="source"> | ||
<syntaxhighlight lang=bash> | <syntaxhighlight lang=bash> | ||
apt-get update | |||
apt-get dist-upgrade | |||
</syntaxhighlight> | |||
</div> | |||
Many packages will be 'downgraded' from the emdebian to debian versions. Delete the {{Code|<nowiki>/etc/apt/preferences</nowiki>}} file and install mono-complete: | |||
<div class="source"> | |||
<syntaxhighlight lang=bash> | |||
apt-get install monodoc-http mono-complete | |||
</syntaxhighlight> | </syntaxhighlight> | ||
</div> | </div> | ||
Choose monodoc-http explicitly, because otherwise the install fails on monodoc-browser. | |||
After this process, you can compile your C# Code.cs Phidget source file the same way as on a generic [[Language - C Sharp#Linux|Linux with Mono]] system. Please refer to that page on how to obtain the *.dll Phidget resource file and compile your code. On the SBC, however, because you are already running as root (the Super User), you do not need 'sudo' and indeed the SBC will give you an error if you use it. Instead, compiling and running will look like: | |||
<div class="source"> | |||
<syntaxhighlight lang=bash> | |||
gmcs Code.cs -r:Phidget21.NET.dll | |||
mono Code.exe | |||
</syntaxhighlight> | |||
</div> | |||
==Using SBC Linux== | |||
== | Now that you've set up communication with the SBC, and installed whichever programming language support you need, you're probably ready for a short tour of useful tools on the SBC's version of Linux. | ||
First, you will by default be running on the SBC as '''root''', which is the super-user. For Linux users, this probably makes you nervous because you know you can overwrite important system files without the system asking for additional permission. As a Windows or Mac OS user - although you may usually run your computer as an administrator - your familiar system usually prompts you to confirm before you do anything really dangerous, and this will '''not''' happen on the SBC as the root user. | |||
Next, there is no installed help on the SBC. Help on Linux is usually called 'man pages' which is short for 'the manual pages'. On a full Linux system, usually if you need help with any command you can type, for example, {{Code|man ls}} and it will give you help with the program [[#ls|ls]]. But these help pages take up significant space, and they are widely available online. So, if you need more help with a certain command, you can always type {{Code|man command}} into your favourite search engine. | |||
Finally, the SBC has no windowing system. For Linux users, this means no X-windows (Gnome, KDE, etc). And as a Windows or Mac user, you can think of it as running all of your programs and commands through the terminal or DOS prompt command line. The SBC provides all of the functionality of an operating system (e.g. process scheduling, file management, etc) but without any graphical interface. The only exception is the [[#SBC Web Interface|web interface]], which gives graphical access to a limited part of what the SBC can do. | |||
===Some Useful Commands=== | |||
If you are doing more with the SBC than simply running pre-written programs [[#Writing a Phidget Program|in Java to run continuously from boot]], you will be interacting with the SBC's Linux operating system over the command line by using [[#SSH|SSH]]. This section discusses useful programs already installed on the SBC, and how to run them on the command line. | |||
====ls==== | |||
The '''ls''' program lists the contents of a directory. | |||
It will show both files and folders, but not files that start with a "." (these are hidden files on Linux). | |||
*If you also want to show hidden files, use {{Code|ls -a}} | |||
*If you want more information, such as size and date modified, use {{Code|ls -l}} | |||
*Commands can be combined, like {{Code|ls -al}} | |||
====cd==== | |||
The '''cd''' program changes to a new directory. | |||
For example, {{Code|cd /root}} changes into the directory at the base of the file tree called ''root''. | |||
Note: | |||
* Linux uses forward slashes | |||
* The base of all directories is "/" (not "C:\") | |||
* The tilde symbol (~) is short for your home directory (i.e. when you are root, this is short for "/root") | |||
* The double dot ".." means move one directory higher (for example from {{Code|/root/data/}} to {{Code|/root/}}) | |||
====pwd==== | |||
The '''pwd''' program prints the current directory you are working in. ('P'rint 'W'orking 'D'irectory) | |||
For example: | |||
:{{Code|root@phidgetsbc:~# pwd}} | |||
:{{Code|/root}} | |||
====cp, mv, and rm==== | |||
These programs are copy ('''cp'''), move ('''mv'''), and remove ('''rm'''). | |||
Copy copies a file from one location and pastes it to another. | |||
For example, if you have a file {{Code|data.txt}}, typing {{Code|cp data.txt data_backup.txt}} will put a copy of the file {{Code|data.txt}} into {{Code|data_backup.txt}} | |||
Move moves a file (this is also useful for renaming files) to a new destination. | |||
For example, if you have a file {{Code|data.txt}}, typing {{Code|mv data.txt data_backup.txt}} will put the contents of {{Code|data.txt}} into {{Code|data_backup.txt}}, and then will remove {{Code|data.txt}}. | |||
Remove deletes a file. | |||
For example, typing {{Code|rm data.txt}} will delete {{Code|data.txt}}. | |||
Note that '''rm''' is final. Once you remove a file using {{Code|rm}}, it is gone forever. There is no recycle bin, no temporary trash, nothing other than backups you may have personally created in the past! | |||
Directories can only be removed with {{Code|rmdir}}, and then only if they are empty. If you want to remove a directory and all the files in it, use {{Code|rm -rf directory}} but be '''very, very careful''' with this command. Trying to remove everything within a directory (e.g. {{Code|rm -rf *}}) is one of the most dangerous commands you can run on a Linux system, as running it from the wrong directory will result in Linux happily removing everything under that directory -- which could be your entire filesystem. | |||
====find==== | |||
The '''find''' program does what it says - it finds things. | |||
Unfortunately for the casual user, the find program is very flexible and powerful, and thus not especially intuitive to use. But, here are some examples: | |||
{| style="border:1px solid darkgray;" cellpadding="15px;" | |||
|- | |||
! SSH Command | |||
! What it Does | |||
! Example | |||
|- | |||
| {{Code|find folder -name file.txt}} | |||
| Looks for all files in a folder (/ for root - or all - folders) with a certain name (* for wildcard) | |||
| {{Code|find / -name *.jpg}} | |||
|- | |||
| {{Code|find folder -mtime +X}} | |||
| Looks for all files in a folder modified less than X days ago | |||
| {{Code|find /root -mtime +30}} | |||
|} | |||
====grep==== | |||
The '''grep''' program takes text input and searches for a term. | |||
For example, if you type {{Code|mount}} to view what devices are mounted (e.g. loaded) on your SBC, you will see: | |||
<div class="source"> | |||
<syntaxhighlight lang=text> | |||
root@phidgetsbc:~# mount | |||
tmpfs on /lib/init/rw type tmpfs (rw,nosuid,mode=0755) | |||
proc on /proc type proc (rw,noexec,nosuid,nodev) | |||
sysfs on /sys type sysfs (rw,noexec,nosuid,nodev) | |||
udev on /dev type tmpfs (rw,mode=0755) | |||
tmpfs on /dev/shm type tmpfs (rw,nosuid,nodev) | |||
devpts on /dev/pts type devpts (rw,noexec,nosuid,gid=5,mode=620) | |||
rootfs on / type rootfs (rw) | |||
procbususb on /proc/bus/usb type usbfs (rw) | |||
/dev/sda1 on /media/usb0 type vfat (rw,noexec,nodev,sync,noatime,nodiratime) | |||
</syntaxhighlight> | |||
</div> | |||
This may be a lot of information you don't need. If you are only interested in a USB key attachment (as described in the [[#Using USB Data Keys|Using USB Data Keys]] section), you can use grep to filter that one response: | |||
<div class="source"> | |||
<syntaxhighlight lang=text> | |||
root@phidgetsbc:~# mount | grep sda1 | |||
/dev/sda1 on /media/usb0 type vfat (rw,noexec,nodev,sync,noatime,nodiratime) | |||
</syntaxhighlight> | |||
</div> | |||
====nano==== | |||
The '''nano''' program is a small text editor that you can use within an SSH terminal. | |||
Nano can be surprisingly useful for writing short lengths of code right on the SBC, so there is no need to transfer files and keep track of different file versions on different computers. | |||
Nano has all keyboard commands which are listed at the bottom of the screen at all times as a reminder (Ctrl-O to save, Ctrl-X to exit, these expand with a larger terminal window). And, nano provides what is called 'syntax highlighting', which colours reserved keywords, comments, strings, and so on as appropriate to the programming language you are using. Nano detects the programming language via the extension of the file ({{Code|.java}} for Java, {{Code|.c}} for C/C++, and {{Code|.py}} for Python). | |||
Typing {{Code|nano test.py}} on an SSH command line and then entering a few lines of Python into the new empty file results in: | |||
[[File:sbc_nano_python.png|link=|alt=]] | |||
====apt==== | |||
The '''apt''' program allows you to install, uninstall, upgrade, and search software available for the SBC. | |||
For a non-Linux user, the apt framework may be daunting at first, but it actually allows you to keep your system up to date and install and manage software quickly, easily, and for free. | |||
'''Note:''' Before installing anything on the SBC, make sure that the ''Include full Debian Package Repository'' option is checked in the web interface under {{Code|System → Packages}}. | |||
{| style="border:1px solid darkgray;" cellpadding="15px;" | |||
|- | |||
! SSH Command | |||
! What it Does | |||
! Example | |||
|- | |||
| {{Code|apt-cache search term}} | |||
| Looks for all programs (packages) that have {{Code|term}} in the title or description | |||
| {{Code|apt-cache search opencv}} | |||
|- | |||
| {{Code|apt-cache show package}} | |||
| Shows a lot of data about {{Code|package}} including size, version, etc | |||
| {{Code|apt-cache show unzip}} | |||
|- | |||
| {{Code|apt-get update}} | |||
| Gets the most recent listing of available software | |||
| {{Code|apt-get update}} (No options) | |||
|- | |||
| {{Code|apt-get install program}} | |||
| Installs {{Code|program}} from the internet | |||
| {{Code|apt-get install python}} | |||
|- | |||
|} | |||
====mount==== | |||
The program {{Code|mount}} shows you all of the mounted devices on your SBC. | |||
For example: | |||
<div class="source"> | |||
<syntaxhighlight lang="text"> | |||
root@phidgetsbc:~# mount | |||
tmpfs on /lib/init/rw type tmpfs (rw,nosuid,mode=0755) | |||
proc on /proc type proc (rw,noexec,nosuid,nodev) | |||
sysfs on /sys type sysfs (rw,noexec,nosuid,nodev) | |||
udev on /dev type tmpfs (rw,mode=0755) | |||
tmpfs on /dev/shm type tmpfs (rw,nosuid,nodev) | |||
devpts on /dev/pts type devpts (rw,noexec,nosuid,gid=5,mode=620) | |||
rootfs on / type rootfs (rw) | |||
procbususb on /proc/bus/usb type usbfs (rw) | |||
/dev/sda1 on /media/usb0 type vfat (rw,noexec,nodev,sync,noatime,nodiratime) | |||
</syntaxhighlight> | |||
</div> | |||
For the non-Linux user, the concept of a device may be quite strange. To give a short summary, everything on Linux that you can read or write is a file. Webcams are files (i.e. you can 'read' photos from them), USB keys are files, and each filesystem (tmp storage, the kernel portion, the main filesystem) are also themselves files. These files specify what and how something can be written. These are not necessarily linear, for example, you can see above that the USB key ({{Code|/media/usb0}} is mounted ''within'' the root file system {{Code|rootfs}} which is /. | |||
So mount gives you an idea of what devices have been 'mounted' for reading or writing, and how you can read and write to them. More information on mount (and its various forms, like {{Code|umount}}) is available widely around the Internet. | |||
====which==== | |||
The program {{Code|which}} tells you if and where a program is installed. | |||
For example, on a default SBC, typing {{Code|which python}} will return no results. But after successfully [[#Installing Python | installing python]], it will return {{Code|/usr/bin/python}} as the location of the python program/binary/executable. | |||
===Some Useful Commands to Install=== | |||
These are other programs you may find useful on the command line. Although they are not on the SBC by default, these and other programs can usually be installed simply by using [[#apt|apt-get install]], with the exception of gcc. For example, {{Code|apt-get install wget}} will download and install [[#wget|wget]]. | |||
'''Note:''' This section and the section on [[#Some Useful Commands|pre-installed commands]] can hardly cover all of the complexities and power of the Linux operating system. There are many excellent tutorials online, and between them and using [[#apt|apt]] to find and install programs you should be able to learn a lot and perform any number of complex useful tasks. | |||
====gcc==== | |||
The '''gcc''' program is the C compiler for Linux. | |||
If you are an experienced C/C++ user on Mac or Linux, or if you've already read our [[Language - C/C++ | C Language page]], you might think you need to install gcc via {{Code|apt-get}} to compile C code. However, gcc is not in the package repository for the SBC, so {{Code|apt-get install gcc}} will fail. Rather, to install gcc, you can do it via the web interface, as described in the [[#Installing C/C++ and Java|Installing C/C++ and Java]] section. | |||
After installing it via the SBC web interface, you can use {{Code|gcc}} normally. | |||
== | ====less==== | ||
The | The '''less''' program displays the contents of a text or source code file. When displaying the file, {{Code|less}} allows you to scroll up and down to read it. | ||
This is useful if you are writing your sensor readings to a data file, and you want to read the data file while it is being written by your main code. If your data file is called {{Code|data.txt}}, you can type {{Code|less data.txt}} and see the lines in the file, and what they are. | |||
The {{Code|less}} program output can also be piped into another program. For example, you can use {{Code|less}} and the word search program {{Code|grep}} to find lines within a file with a search term. For instance, if you have a C source code file {{Code|Program.c}} on the SBC, and you want to see all the lines in {{Code|Program.c}} that contain a variable name {{Code|var}}, you can type: | |||
:<code>less Program.c | grep var</code> | |||
====wget==== | |||
The '''wget''' program allows you to get an online file (over http) and download it to the SBC. | |||
For | For example, to get the source file (HTML) from the Phidgets home page, you can type: | ||
<div class="source"> | <div class="source"> | ||
<syntaxhighlight lang=bash> | <syntaxhighlight lang=bash> | ||
wget http://www.phidgets.com | |||
</syntaxhighlight> | </syntaxhighlight> | ||
</div> | </div> | ||
This is most useful for downloading libraries, drivers, or anything (zip, tar, etc) you need from the web which is not available by [[#apt|using apt]]. | |||
===Writing a Phidget Program=== | |||
We provide two ways to write and upload a Phidget Program: | |||
# The [[#SBC Web Interface|web interface]]: | |||
#* This is useful for simple projects written in Java that you want to start only at boot | |||
#* You can also use C projects, but they must be compiled off the SBC for an ARM processor | |||
# Over [[#SSH|SSH]], which will allow you to write or transfer source code directly to and from the SBC | |||
#* This is useful for all other projects, such as: | |||
#** Projects that run at scheduled times (e.g. once per minute) | |||
#** Projects that use languages other than Java or ARM-compiled C | |||
Note that you can still run an [[#SSH|SSH]] project at boot, you just have to write and install a startup script. This is a bit complex, but we do have an example that starts the program {{Code|phidgetwebservice21}} [[OS - Linux#As A Service|at boot using a script]]. | |||
Once you know which method you'd like to use, you can continue on to learn how to [[#Program in Java with the Web Interface|Program in Java with the Web Interface]], or how to [[#Program with SSH|Program with SSH]] using Java, C, or Python. If you are actually typing in source code on the SBC, you'll find our [[#Developing Code on the SBC|developing code on the SBC section]] useful. | |||
====Program in Java with the Web Interface==== | |||
To show how to write, compile, and install Java programs on the SBC, we'll use the [[Language - Java|Java Hello World]] example code. You can download the HelloWorld example by downloading the whole [{{SERVER}}/downloads/phidget21/examples/java/JavaJNI.zip Java example package]. Make sure you have the same version of [[#Installing C/C++ and Java|Java installed on the SBC]] as you have on your external development machine. Instruction for checking and updating are found on the [[#Installing C/C++ and Java|installation page]]. | |||
Here's how to get the HelloWorld code running on the SBC. On your external computer: | |||
1. Download the SBC version of the Phidget Java libraries ({{Code|phidget21.jar}}). You can download this from the [[#SBC Web Interface|web interface]], on the page under {{Code|Projects → Projects}}, under the '''Notes''' section. | |||
2. Place the SBC version of {{Code|phidget21.jar}} into a directory on your external computer. This will be your working directory that you will use to compile the Java files. | |||
3. Also copy the {{Code|HelloWorld.java}} file into that working directory. | |||
4. Compile the {{Code|HelloWorld.java}} file from within that working directory. From the command line prompt on Windows, this will be: | |||
<div class="source"> | <div class="source"> | ||
<syntaxhighlight lang=bash> | <syntaxhighlight lang=bash> | ||
javac -classpath .;phidget21.jar HelloWorld.java | |||
</syntaxhighlight> | </syntaxhighlight> | ||
</div> | </div> | ||
In a terminal on Linux or Mac OS, this will be: | |||
<div class="source"> | |||
<syntaxhighlight lang=bash> | |||
javac -classpath .:phidget21.jar HelloWorld.java | |||
</syntaxhighlight> | |||
</div> | |||
5. You should now have three compiled class files: {{Code|HelloWorld.class}}, {{Code|HelloWorld$1.class}}, and {{Code|HelloWorld$2.class}}. You don't need to try and run them, and if you do you may encounter an error because the SBC {{Code|phidget21.jar}} may be slightly different than the Phidget support you have installed on your external computer. | |||
Now we move onto the SBC: | |||
6. Create a new project on the SBC, in the web interface under {{Code|Projects → Projects}}. Call it HelloWorld: | |||
[[File:sbc_create_project.png|link=|alt=]] | |||
7. On the next screen, you will be prompted to upload your files. We will upload the three Java class files, and then click the {{Code|Start}} button: | |||
[[File:sbc_web_run_project.png|link=|alt=]] | |||
8. You'll note that as it runs, there are two links below the {{Code|Stop}} button: One called {{Code|stdout}}, which is ''Standard Output'', and one called {{Code|stderr}}, which is ''Standard Error''. Usually, when you run a program on the command line, you see both standard out and standard error at the same time - i.e. you get all program output right there in your terminal or command prompt. But when running a program in the background, Linux splits the output up into normal output and error output as this is very useful for debugging (i.e. you can check if standard error is empty). | |||
Here, however, if you're not sure whether the program will run correctly, you should first check {{Code|stderr}} to see if any errors were generated, and then check {{Code|stdout}} to see if the output looks as expected. | |||
To write your own Java program, follow the same process but use your own source code instead of the {{Code|HelloWorld.java}} example. | |||
Now that you have a running program, we offer additional help on [[#Via the Web Interface|running a program automatically using the web interface]]. | |||
====Program with SSH==== | |||
Similarly to starting a program via the [[#Program in Java with the Web Interface|web interface]], we use the Phidget Java {{Code|HelloWorld}} example here. | |||
Make sure you have [[#Installing C/C++ and Java|Java installed on the SBC]]. To compile and run the {{Code|HelloWorld}} example: | |||
1. Open an [[#SSH|SSH terminal]] to the SBC | |||
2. Download the [{{SERVER}}/downloads/phidget21/examples/java/JavaJNI.zip Phidget Java Examples] to the SBC, using [[#wget|wget]] (you may need to install {{Code|wget}} using [[#apt|apt]].) | |||
( | 3. Unpack the examples using [[#unzip|unzip]] (you may need to install {{Code|unzip}} using [[#apt|apt]].) | ||
4. The location of {{Code|phidget21.jar}} on the SBC is {{Code|/usr/share/java/phidget21.jar}}. Within the unzipped example directory, compile the {{Code|HelloWorld.java}} example: | |||
<div class="source"> | |||
<syntaxhighlight lang=bash> | |||
javac -classpath .:/usr/share/java/phidget21.jar HelloWorld.java | |||
</syntaxhighlight> | |||
</div> | |||
5. To run the {{Code|HelloWorld}} program, use: | |||
<div class="source"> | <div class="source"> | ||
<syntaxhighlight lang=bash> | <syntaxhighlight lang=bash> | ||
java -classpath .:/usr/share/java/phidget21.jar HelloWorld | |||
</syntaxhighlight> | </syntaxhighlight> | ||
</div> | |||
Now that you have a running program, you'll probably want to learn to [[#Running a Program Automatically|run this Java program automatically]]. | |||
'''Permissions Note:''' If you're used to using Linux with Phidgets already, you'll probably notice that you don't need to switch into root using {{Code|sudo}} on the SBC in order to run programs. This is because you already are running as root, not because the [[OS - Linux#Setting udev Rules|udev rules are set up]]. So if you set up another user, or [[#Via Cron|run a cron job]] as anything other than root or system, you'll need to add permission for the Phidget program to run in your [[OS - Linux#Setting udev Rules|udev rules]]. | |||
====Developing Code on the SBC==== | |||
When you're not just using pre-written source code, and you're writing code actually on the SBC itself, you'll probably want to use [[#nano|nano]]. Other terminal editors on the SBC include {{Code|vi}} which is already installed, and {{Code|emacs}}, which you can install using [[#apt|apt]]. Both {{Code|vi}} and {{Code|emacs}} are much more efficient for the experienced user, but they contain modes and keyboard shortcuts that can seem strange or almost hindering to the casual user. | |||
Regardless of which editor you choose to use, some of your keyboard habits may not transfer well. For example, in the Linux command line, the command {{Code|Ctrl-C}} means ''stop the currently running program'', (i.e. your open editor) not copy. Within most SSH terminals, you can copy and paste using the right-mouse button, and on some terminals (and all native Linux terminals) you can copy by simply highlighting text, and you can paste it using the middle (scroll) mouse button. On the other hand, if you write a program that hangs on the command line, {{Code|Ctrl-C}} can actually be useful to terminate it. | |||
Also {{Code|Ctrl-Z}} does not mean ''undo'', rather it means ''run the current program in the background''. This is useful because running a program in an SSH terminal simply hangs your SSH input until the program is done. So typing {{Code|Ctrl-Z}} while the program is running frees up the command line for more input. But if you accidentally hit {{Code|Ctrl-Z}} while running an editor like [[#nano|nano]], the editor will immediately exit to the command line. Don't worry though, it will not stop or lose your work. You can bring it back up by using the {{Code|fg}} (e.g. 'foreground') command, like {{Code|fg nano}}, and this will automatically bring your nano process back to the front. | |||
===Running a Program Automatically=== | |||
For testing your program, you will certainly want to run it via [[#SSH|SSH]] or via the {{Code|Start}} button on the project page on the web interface until you are quite sure it runs well. However, eventually you will probably want the program to run without your input, either [[#Via the Web Interface|continuously, and starting at boot]], or via a task scheduled to [[#Via Cron|run to completion at certain times]]. | |||
Both have their advantages and disadvantages. Usually, you would want to use the continuous, from-boot methods for event driven code that has to handle a wide variety of user input that could occur at any time. You would want to use the scheduled method when the SBC needs to perform a repeated task (e.g. reading sensor data) again and again. The main difference is: | |||
* With the continuous (boot) method you can have any Phidgets (including sensors, LEDs, input switches, etc) attached and giving events to your code all the time, and | |||
* With the scheduled (cron) method you have much less of a chance to run into long-term memory management and instability problems with any code you write, because your program runs for only a short time before exiting and getting cleaned up. | |||
====Via the Web Interface==== | |||
To use this method, you must have created the program you want to run as [[#Program in Java with the Web Interface | a Java or ARM-compiled C project in the web interface]]. If you would like to use another language, or another way of uploading your project, but you still want to start at boot and run continuously, you will need to use a [[#Via a Boot Script|boot script]]. | |||
In the web interface, go to the {{Code|Projects}} tab, and click on the project you would like to run. Near the bottom of the project page (the one with the {{Code|Start}} and {{Code|Stop}} buttons at the top), there will be a section called {{Code|Startup Settings}}. You can see a screenshot of the whole project page, including these settings, in the [[#Program in Java with the Web Interface | web interface project section]]. | |||
Select the {{Code|Enabled}} radio button. The other defaults should be fine, unless you specifically know otherwise: | |||
* For ''Boot Order'', lower numbers boot first. Booting later means more programs are available for use, booting earlier means other programs can use your program. | |||
* ''Run as a daemon'' starts the program as a daemon, which is a program that runs in the background. Unless you have ''explicitly'' written your program as a daemon, leave this checked. (If you don't know what a daemon is, don't worry, you haven't written one, so leave it checked.) ''Un''checking this when your program is a normal program will cause the SBC to hang while booting. | |||
* The ''Executable or Class'' name should be automatically sensed to be your main Java class | |||
* ''Arguments'' are any command line arguments you need, just as you would type them into the command line | |||
'''Note:''' Your program must be very, very stable to run properly via the web interface. Imagine your program running continuously for days, or months on end. Any memory leaks, over time, will render your program (and the SBC) unusable until a reboot. Counts or other variables that increase within your program and never reset may create a segmentation fault eventually. | |||
If, for stability purposes, you want your program to start, run for a little while, and then exit so that the SBC operating system can clean up the memory each time, you'll probably want to use [[#Via Cron|Cron]] to run your program instead. | |||
====Via Cron==== | |||
Cron can automatically schedule programs - known as 'jobs', or 'cron jobs' - at most once per minute. Less often than that, it is very flexible, allowing you to run it on certain months, weekdays, hours, etc. Cron simply reads a special file (your {{Code|crontab}}) and runs whatever programs are listed, with whatever timing they are listed with. The cron program runs all the time in the background, making it what is known as a Linux ''daemon'', but the programs it starts as jobs run only as long as they naturally would, and then they exit. | |||
If you need your program to run more often than once per minute, have the program schedule itself while still running. For example, to run every five seconds, run a fast loop, and sleep for five seconds. Do this twenty times and exit. Then schedule this once per minute using cron, and your program will in essence run every five seconds. | |||
Setting up a cron job simply entails editing your {{Code|crontab}} file. | |||
First, you'll probably want to specify your default editor to be [[#nano|nano]]. Otherwise it will default to {{Code|vi}} and you'll have to figure out {{Code|vi}} in order to add lines to your crontab: | |||
<div class="source"> | |||
<syntaxhighlight lang=bash> | |||
export EDITOR=nano | |||
</syntaxhighlight> | |||
</div> | |||
Then, to edit your crontab file, simply type: | |||
<div class="source"> | |||
<syntaxhighlight lang=bash> | |||
crontab -e | |||
</syntaxhighlight> | |||
</div> | |||
Each line of the crontab file is one scheduled job. Lines that start with a hash "#" are comments and are ignored. There is an example line in the crontab, and a reminder line at the very end. Essentially, each line should contain: | |||
<div class="source"> | |||
<syntaxhighlight lang=text> | <syntaxhighlight lang=text> | ||
' | minute hour dayOfMonth month dayOfWeek command | ||
</syntaxhighlight> | |||
</div> | |||
Where: | |||
*{{Code|command}} is the program you want to run (with absolute path, and arguments) | |||
** For example, {{Code|./myprogram argument1}} won't work, but {{Code|/root/code/myprogram argument1}} will | |||
* Each time argument is either a number, a list of numbers separated by commas, or an asterisk | |||
** For example, * * * * * means every minute for all days and months, 0,30 * * * * means every thirty minutes (i.e. at the top of the hour and at 30 minutes in) for all days and months | |||
If you already have jobs scheduled, you'll see them in the file that comes up. You can edit, add, or delete. | |||
After you save, you'll see a little message back in the terminal that says the new crontab file was installed, and it is now scheduled! Cron always starts every boot, and so if you have edited and installed your crontab as above, the scheduling of your program will start properly even after a reboot of the SBC. However, if you are having strange scheduling problems, you may want to familiarize yourself with the [[#Software Details|software details]] of how the SBC as a whole determines the current date and time. | |||
=====My Cron Job Doesn't Work!===== | |||
It is actually very common for a script or program to work on the command line but then ''not'' work as a cron job. The most common reason for this, by far, is that you specify ''relative'' paths in your program to access files rather than ''absolute'' paths. For example: | |||
* {{Code|code/project.c}} is a relative path (bad for cron) | |||
* {{Code|/root/code/project.c}} is an absolute path (good for cron) | |||
The cron jobs are ''not'' executed from your home directory, or your code directory, so they will not be using the same location you may be using to test your code. So always use absolute paths. | |||
Another common reason is you may be using environment variables or other settings that are true in a terminal but are ''not'' true by default in the raw system. You can end up taking many things for granted in a shell, for example the shortcut "~" means home directory in a shell, but not by default in the raw system. The things that get loaded for a shell (but which are not present in the raw system) are: | |||
* The settings loaded by {{Code|/etc/profile}} | |||
* Any settings in {{Code|~/.bashrc}}, which is nothing by default on the SBC | |||
On a full Linux operating system, you would use the logs written to by cron to find the error output and debug it. On the SBC, however, cron does not write logs (otherwise, these logs would eat up the SBC memory very quickly even for routine jobs). For short-term debugging, you can write output from your program to a file, and read that file afterwards to figure out what your program is doing. | |||
====Via a Boot Script==== | |||
If you want to run your program constantly and for it to start at boot like the [[#Via the Web Interface|web interface would do]], you can install your program into the boot order using a script. This is a somewhat involved process, and you should be familiar with shell programming in Linux. For this process, we only offer a [[OS - Linux#As A Service|similar example]] which installs and runs the program {{Code|phidgetwebservice21}} within the boot sequence. | |||
===Using USB Data Keys=== | |||
After plugging the USB key in, it won't just appear on your desktop, so to speak, so you'll need to figure out where you can read and write to it within the SSH directory structure. | |||
The web interface program can help with this. After you plug a USB key in, it will show up under {{Code|Status → System}}. Or, the USB key and all other attached devices can be seen at {{Code|Status → USB}}: | |||
[[File:sbc_mounted_devices.png|link=|alt=]] | |||
In the screenshot above, you can see that the USB key is located in {{Code|/media/usb0}}. | |||
Alternately, you can use the SSH command {{Code|mount}}, and the searching program {{Code|grep}} which will filter the response of {{Code|mount}} and only return the lines with your search term ({{Code|usb}}): | |||
<div class="source"> | |||
<syntaxhighlight lang=bash> | |||
root@phidgetsbc:~# mount | grep usb | |||
/dev/sda1 on /media/usb0 type vfat (rw,noexec,nodev,sync,noatime,nodiratime) | |||
</syntaxhighlight> | </syntaxhighlight> | ||
</div> | </div> | ||
In this case, the USB key can be written to and read from using the {{Code|/media/usb0}} directory. Copying a file to {{Code|/media/usb0}} will copy a file to the USB key. The same goes for removing, renaming, opening files within your program, etc. | |||
'''Note:''' Mount points like {{Code|/media/usb0}} should not be hard-coded into any of your programs. (See the [[#Common Problems and Solutions | Common Problems and Solutions]] section for more information.) If you need to obtain the mount point for a freshly mounted USB key within your code, have your code obtain the mount tables and search on the ''device'' (e.g. {{Code|/dev/sda1}} or {{Code|/dev/sdb1}}) and obtain the corresponding mounted {{Code|/media/usbN}} location, where N is a number 0-9. | |||
===Saving and Retrieving Data=== | |||
This section covers getting data on and off of the SBC. There are two main methods of simply moving data on and off the SBC - via a [[#Via a USB Key|USB key]], and via [[#Over the Network (SCP)|copy over the network]] - and a third method for moving and installing data when it concerns [[#Backing Up Your Data|backing up lower level system data]]. | |||
====Via a USB Key==== | |||
After plugging in a USB data key, first you need to [[#Using USB Data Keys | find out the location]] where that data key was mounted. | |||
Let's say the location of the USB key is {{Code|/media/usb0/}}, and we want to copy the file {{Code|data.txt}} to the USB key. Your SSH session might look something like this, using [[#ls|ls]] and [[#mount|mount]]: | |||
<div class="source"> | <div class="source"> | ||
<syntaxhighlight lang=bash> | <syntaxhighlight lang=bash> | ||
root@phidgetsbc:~# ls | |||
data.txt | |||
root@phidgetsbc:~# mount | |||
tmpfs on /lib/init/rw type tmpfs (rw,nosuid,mode=0755) | |||
proc on /proc type proc (rw,noexec,nosuid,nodev) | |||
sysfs on /sys type sysfs (rw,noexec,nosuid,nodev) | |||
udev on /dev type tmpfs (rw,mode=0755) | |||
tmpfs on /dev/shm type tmpfs (rw,nosuid,nodev) | |||
devpts on /dev/pts type devpts (rw,noexec,nosuid,gid=5,mode=620) | |||
rootfs on / type rootfs (rw) | |||
procbususb on /proc/bus/usb type usbfs (rw) | |||
/dev/sda1 on /media/usb0 type vfat (rw,noexec,nodev,sync,noatime,nodiratime) | |||
root@phidgetsbc:~# cp data.txt /media/usb0/ | |||
</syntaxhighlight> | </syntaxhighlight> | ||
</div> | </div> | ||
The '''cp''' program copies data from a source to a destination. The syntax is {{Code|cp from to}}, where here we are copying from {{Code|data.txt}} to {{Code|/media/usb0/}}. | |||
'''Caution:''' Even if there is no USB key mounted at {{Code|/media/usb0/}}, this use of {{Code|cp}} will still work ''with no errors''! This is because there is still a file called {{Code|/media/usb0/}}, there is just no USB key file system ''mounted'' to that point. So be sure to run [[#mount|mount]] or use some other method of determining that there is, in fact, a USB data key attached and where it is mounted to. | |||
====Over the Network (SCP)==== | |||
SCP is a command line program already installed on Linux and Mac OS, and downloadable for free on Windows. We discuss it and give examples in the [[#SSH|SSH]] section, but remember it here when you're trying to get data on and off of the SBC. With SSH or a terminal already open, you'll probably find it to be much faster and easier than dealing with a USB key. | |||
====Backing Up Your Data==== | |||
For the web interface, you can save and restore all web interface settings under the {{Code|System → Backup & Restore}} tab. | |||
To | To save the settings of what packages are installed for later re-installation, you can type: | ||
<div class="source"> | |||
<syntaxhighlight lang=bash> | |||
dpkg --get-selections > installedPrograms.txt | |||
</syntaxhighlight> | |||
</div> | |||
and | Then save the file {{Code|installedPrograms.txt}} externally. If you have to completely wipe the SBC, you can just reinstall the whole list by moving the {{Code|installedPrograms.txt}} file back onto the SBC, and then typing: | ||
<div class="source"> | <div class="source"> | ||
<syntaxhighlight lang=bash> | <syntaxhighlight lang=bash> | ||
dpkg –set-selections < installedPrograms.txt | |||
apt-get dselect-upgrade | |||
</syntaxhighlight> | </syntaxhighlight> | ||
</div> | </div> | ||
Also remember to externally save: | |||
* Your {{Code|~/.bashrc}} settings file if you've changed it | |||
* Your {{Code|crontab}} file if [[#Via Cron|you've edited it]] | |||
* Any data files or code you've created | |||
It is important to save these settings often, and at points where you know the system is running well. It may be tempting to create a backup right before you [[#Recovery System|wipe the SBC and start from scratch]], but often the reason you are having problems then is some setting or change, and backing these up and reinstalling them will only reinstall the problem. | |||
To truly back the files up, you must copy them to an external computer or location using either a [[#Via a USB Key|USB Key]] or [[#Over the Network (SCP) | over the network]]. Then they can be copied back if needed later. | |||
If you are looking to restore data on an SBC that will not boot properly, you'll want to be in the [[#Partial Recovery|partial recovery]] portion of our Troubleshooting section. | |||
==Troubleshooting== | |||
The SBC can be quite tricky to debug, because it is a complex and flexible computer. Common problems and solutions include: | |||
* You can't find the SBC on the network at all - refer to the [[#Initial Internet Setup|Initial Internet Setup]] section | |||
* You have changed some setting or file such that the SBC doesn't run anymore, or doesn't run as expected - refer to the [[#Recovery|Recovery]] section | |||
If you are having trouble using Phidgets on the SBC, you should go through the [[OS - Linux#Troubleshooting | Troubleshooting section on the general Linux page]]. Some of the problems on the Linux page (such as library problems) are easier to fix by simply working through the [[#Recovery|Recovery]] section when they occur on the SBC. | |||
Namely, it often helps to simply perform a [[#Factory Reset|factory reset]] on the SBC (save your files and installed program list first, as [[#Backing Up Your Data|described here]]). Sometimes you change a file or setting within the operating system when you are trying to get something up and running, and this unintentionally affects other programs too. Performing a factory reset starts you with a clean slate. | |||
If your problem doesn't seem to be fixed by these steps, or the information within this guide, please [[Contact Us|ask us]]! | |||
===Initial Internet Setup=== | |||
To set up the SBC, you almost always need a ''wired'' Ethernet connection with DHCP (Dynamic Host Configuration Protocol), and without a firewall. This connection should be to a ''router'', not directly plugged in to your computer. | |||
Even if you do not have this type of a connection at home, these types of connections are very common at both offices and universities. On a Windows or Mac OS computer, you can bring up the [[Phidget Control Panel]] as described in the SBC's [[1072 User Guide#Getting Started|Getting Started Page]]. Failing this, or on a Linux computer, we discuss some alternate setup methods in this section. Keep in mind that without a wired, open DHCP connection these setup methods can be difficult and fickle. | |||
====No Wired-Only Connection==== | |||
Sometimes it can work to plug the SBC, using Ethernet, directly into an Ethernet port on your home wireless router. Do not plug it directly into your computer! (Although in some instances, a direct connection can be made to work on Linux, see the [[#No DHCP|No DHCP]] section below) | |||
This direct-router method is a very picky process, however, and can fail because: | |||
* Some home and office routers place a firewall between wireless connections (clients) and wired connections (the local area network) | |||
* Some home and office routers do not by default allow both Ethernet DHCP and wireless DHCP. | |||
* Some routers and DHCP hubs only provide access to an internet connection, and do not provide local area network inter-connections (this is common on mobile device tethering hubs) | |||
Routers are quite complex, and even with admin privileges it can be a painstaking process to find all the right firewall settings to turn off in order to allow two computers on the network to talk to one another, rather than just connect to the internet. This is why university or office networks are often ideal for the purpose of setting up the SBC, because these institutions depend on computers on a local network being able to talk together. University libraries in particular can be a good source of wired DHCP connection ports. | |||
Covering all of the different router configuration possibilities here, and how to change them to make the SBC work, is essentially impossible. If you try using the SBC at home or at work, the SBC does not work on the first try when plugged directly into the router via Ethernet, and you want to make that connection work rather than seeking out an alternate for the initial setup, you should find documentation specific to your router (usually available online) and properly configure it. | |||
The good news is that if you can find an Ethernet DHCP connection ''just once'' for a short time, you can use that connection to configure the SBC to work on your home wireless network. During that initial connection, you can enable wireless and set up as many wireless DHCP connections (with passwords) that you need. Once wireless is enabled and set up, you can take the SBC home to your wireless router and the SBC will automatically seek out and connect to its remembered networks as they appear. At that point, you can also use wireless like a normal internet, web interface, and SSH connection. | |||
====No Link Local Addressing==== | |||
If you have a wired DHCP connection, no firewall, and no link local addressing (e.g. bonjour or avahi is not installed) then you will need access to the DHCP router logs. From the router logs, you should see the connection (or attempted connection) by the SBC within the logs. From that log entry, you should either be able to determine the IP address for the SBC, or see what happens when the router blocks access. The IP address can be used in place of the link local address for both the web interface and for SSH. | |||
====No DHCP==== | |||
The SBC will first try to use DHCP, but then it will revert to responding to a link local address under bonjour and avahi. If you are depending on this, please wait '''at least three minutes''' after the SBC boots for the SBC to fail in obtaining a DHCP connection and properly revert to link local addressing. | |||
If you have a static IP setup, and want to use link local addressing rather than accessing the router logs, this should usually work by default on Windows and Mac OS (e.g. type the address such as {{Code|phidgetsbc.local}} into a web browser). If it doesn't work automatically, there is not much you can do and you should seek out a wired DHCP connection elsewhere. | |||
On Linux, it also should work by default, but you have the additional option of explicitly adding routes that look within the default network settings for the SBC. From a terminal (as root), type: | |||
* {{Code|route add -net 169.254.0.0 netmask 255.255.0.0 dev eth0 metric 99}} | |||
* {{Code|route add default dev eth0 metric 99}} | |||
You can also compile and use the {{Code|phidgetsbclist.c}} example (use the provided Makefile, don't use gcc) in the [{{SERVER}}/downloads/phidget21/libraries/linux/libphidget.tar.gz Phidget Linux Libraries] package, under the {{Code|examples}} folder. This will allow you to see if the SBC is detected on the network at all. Note that to use this option you must have the Phidget Libraries and the Phidget WebService installed on your Linux computer - in-depth instructions to do this are on the [[OS - Linux|main Linux page]]. | |||
===Recovery System=== | |||
You can either boot the SBC into recovery mode and attempt to recover files and settings, or you can completely wipe the SBC by performing a factory reset. If the LEDs do not turn on normally (red on constantly, green on at first start, then off, then on when fully booted) then you'll want to read the [[#Hardware Issues|hardware issues]] section. | |||
====Partial Recovery==== | |||
The recovery system can be entered in two ways: | |||
# From the {{Code|System → Backup & Restore}} web interface page. | |||
# By holding down the reset button for 20+ seconds - until the green light has switched from flashing slowly to flashing quickly. | |||
The recovery system runs an [[#SSH|SSH]] server where the username and password both are {{Code|root}}. | |||
If the main filesystem has been damaged/misconfigured in such a way that it won’t boot, you may be able to fix the issue or recover important files before running a full factory reset. From an SSH connection to the recovery system, you can mount the main root filesystem with the following commands (assuming it’s not damaged): | |||
<div class="source"> | |||
<syntaxhighlight lang=bash> | |||
# For 1072 - PhidgetSBC2: | |||
ubiattach /dev/ubi_ctrl -m 6 | |||
# For 1073 - PhidgetSBC3: | |||
ubiattach /dev/ubi_ctrl -m 7 | |||
mount -t ubifs /dev/ubi0_0 /mnt | |||
</syntaxhighlight> | |||
</div> | |||
====Factory Reset==== | |||
This restores the kernel and root filesystem from backup, overwriting any changes that may have been made and ''completely wiping the system'' to the state that it got shipped in. (You can save your files and installed program list first, as [[#Backing Up Your Data|described here]].) This can be enacted one of two ways. | |||
# Use the reset button: | |||
##Enter the recovery mode by holding down the reset button for 20+ seconds as above (until fast flashing) | |||
##Wait for a full boot (i.e. you can see it on the [[Phidget Control Panel]], or can SSH with username and password as {{Code|root}}) | |||
##Hold down the reset button again, but this time for only 10 seconds (until slow flashing) | |||
##Wait for the SBC to fully reset and reboot (at least three minutes) - the LED will turn off and on again when this occurs | |||
##*Note that after a factory reboot the SSH server will be disabled | |||
##*Also note that after a factory reboot the SBC creates new SSH keys, and reverts to the {{Code|phidgetsbc.local}} address | |||
# Via the web interface, under {{Code|System → Backup & Restore → Go button}}, where you can follow the instructions | |||
====Hardware Issues==== | |||
The LEDs are an indicator of the hardware working properly. The normal boot process is: | |||
* Red LED: Turns on from moment of power being applied. | |||
* Green LED: Turns on momentarily when power applied, then turns off momentarily, then turns on and stays on when booted. | |||
If the green status LED never turns on (or fails to turn on the second time), the boot process is failing somewhere. This could be due to: | |||
* A damaged OS - Try performing a [[#Factory Reset|Factory Reset]] | |||
* If this fails, it is likely hardware damage (very difficult to diagnose, please [[Contact Us|contact us]]) | |||
If neither LED turns on, hardware damage is even more likely. Unless the path to the red LED is the one thing that has been damaged, the device is likely not receiving and using power. | |||
* Try performing a [[#Factory Reset|Factory Reset]], and if that does not work please [[Contact Us|contact us]] | |||
=====USB Issues===== | |||
On the Phidget SBC2, there is a hardware issue that is unrelated to the LEDs. It is a USB problem, and manifests in many ways: | |||
* Strange behaviour when some devices but not others are plugged in to the SBC | |||
* Strange behaviour with combinations of devices | |||
* Failure (or intermittent failure) to see Phidgets on the USB hub, or USB keys on the hub | |||
This problem is fixable, either on your own or by sending your SBC back to Phidgets. For an in-depth solution, see the [[SBC2_USB_Hub_Fix | SBC2 Hub Fix Page]]. | |||
===Updating Your SBC=== | |||
If you've owned your SBC for a while and want to update your packages, you can run: | |||
<div class="source"> | <div class="source"> | ||
<syntaxhighlight lang=bash> | <syntaxhighlight lang=bash> | ||
apt-get update | |||
apt-get upgrade | |||
</syntaxhighlight> | </syntaxhighlight> | ||
</div> | </div> | ||
...to ''update'' your software source list and then ''upgrade'' to the latest version of all installed software. If you are used to Mac OS or Windows, note that this does not just update the non-kernel parts of the operating system, it updates every additional piece of software you have installed. | |||
To update the SBC software itself (e.g. the kernel), it is easiest to use the web interface, under {{Code|System → Backup & Restore → Go button}}, to enter a page that will give you the option to update. You will need to have an update file on a USB key inserted into the SBC, of type: | |||
* UBI Image (system_ubi.img), or | |||
* Kernel image (uImage), or | |||
* Phidget Upgrade package containing both UBI and Kernel images (phidgetsbc*.bin) | |||
These are either obtained from the Phidgets website, or are a custom kernel / filesystem that you can create yourself, if you are experienced. | |||
The reason why this information is in troubleshooting is that you should certainly [[#Backing Up Your Data|back up your system]] before trying this. And, it is quite rare to need to upgrade the kernel or filesystem on the SBC, so something serious should be going on before you attempt it. Try using the [[#Recovery System|recovery system]] first. | |||
==Programming Languages== | |||
Now that you have the basic libraries installed, you can pick your language and begin programming! | |||
If you are not using the [[#WebService | webservice]] to control a Phidget over a network, your next step will be to delve into the use of your specific language. Each page has its own set of specific libraries, code examples, and setup instructions. | |||
On SBC Linux, we recommend the following languages: | |||
[[ | *[[Language - C/C++|C/C++]] | ||
*[[Language - Java | Java]] | |||
*[[Language - Python | Python]] | |||
These languages may also run on the SBC, but we do not yet directly offer SBC support for them: | |||
* [[Language - Ruby|Ruby]] | |||
* [[Language - C Sharp|C#]] (using Mono) | |||
[[ | You can probably figure out how to install and use them by a combination of the language pages linked above, and the section on [[#Installing Other Languages|installing other languages on the SBC]]. | ||
==WebService== | |||
[[ | The SBC comes with the [[Phidget WebService]] installed, and the SBC automatically starts the WebService at boot. | ||
=== | To practice using the WebService, and to learn more about it, we have hands-on examples on the [[OS - Linux|general Linux page]], starting in the [[OS - Linux#Using the WebService|using the WebService section]]. | ||
==Advanced Uses== | |||
===Shutting off USB ports to save power=== | |||
The SBC3 has an on-board USB hub that can control power to the ports. To do this unbind and rebind the USB drivers. | |||
To turn off the ports {{code|echo "1-1" >/sys/bus/usb/drivers/usb/unbind}} | |||
To turn on the ports {{code|echo "1-1" >/sys/bus/usb/drivers/usb/bind}} | |||
These will also cause detach and attach events for the Phidget devices, respectively. While the drivers are unbound, you will not get any hot plug events for any devices on USB. | |||
===Using a Touchscreen=== | |||
Please note that this will ONLY work with an SBC3 since it has a USB 2.0 hub: | |||
Using a touchscreen with the SBC is a great way to get user input and visual feedback from an SBC otherwise devoid of visual output. The SBC does not have any conventional display ports such as VGA, DVI, or HDMI but it does have a number of USB ports and USB displays do exist. With the upgrade to a USB 2.0 hub on the SBC3 from the earlier models which had USB 1 hubs the SBC now has enough capability to operate a screen over USB. We don't recommend running a standard desktop environment since the processor is too slow to really keep up with a typical desktop it does make for an excellent interface for a kiosk, instrumentation control panel or other, similar use case. This document is going to go through the process of enabling support for a typical USB display as well as installing a fairly compact desktop environment called xfce on the SBC. | |||
The screen I will be using is from a company called [http://lilliputweb.net/ Lilliput]. Specifically a UM-70 model. Before you begin, please make sure that you have the screen plugged into the SBC, it will also be useful to have a spare USB keyboard and mouse handy as you will need them once you are no longer using an SSH terminal to communicate with the SBC. | |||
[[File:lilliputoff.jpg|center|400px|link=]] | |||
====Getting the display to function==== | |||
Begin by logging into the web configuration page for your SBC and upgrading all of the packages on the SBC. Be sure to include the full Debian package repository. For more information on how to do this refer to the [[OS - Phidget SBC#Getting Started - External Computer|getting started]] section of the Phidget SBC documentation. Once you are fully up to date open an SSH session with the SBC and navigate to the "/etc" folder. Open inittab with a terminal-based text editor such as nano and add the following to the bottom of the file, just above the {{code|T0:23:respawn:/sbin/getty -L ttyAMA0 115200 vt100}} line: | |||
<div class="source"> | <div class="source"> | ||
<syntaxhighlight lang=bash> | <syntaxhighlight lang=bash> | ||
1:2345:respawn:/sbin/getty 38400 tty1 | |||
2:23:respawn:/sbin/getty 38400 tty2 | |||
3:23:respawn:/sbin/getty 38400 tty3 | |||
4:23:respawn:/sbin/getty 38400 tty4 | |||
5:23:respawn:/sbin/getty 38400 tty5 | |||
6:23:respawn:/sbin/getty 38400 tty6 | |||
</syntaxhighlight> | |||
</div> | |||
. | Now reboot your system. After a few minutes you should see the LCD screen come up with a standard Linux terminal interface and a login prompt. This is all well and good but this isn't really appreciably better than simply using an SSH session to communicate with the SBC. | ||
[[File:lilliputlogin.jpg|center|400px|link=]] | |||
====Setting up Xfce==== | |||
In order to get a traditional windowing environment we still need to install a desktop manager as well as a number of supporting packages. Log in and make sure everything is still up to date with: | |||
<div class="source"> | |||
<syntaxhighlight lang=bash> | |||
apt-get update | |||
</syntaxhighlight> | </syntaxhighlight> | ||
</div> | </div> | ||
Then install the following packages: | |||
== | <div class="source"> | ||
<syntaxhighlight lang=bash> | |||
apt-get install xserver-xorg lxde xfce4 | |||
</syntaxhighlight> | |||
</div> | |||
If the SBC asks you if you want to continue, just type "Y" and press enter. | |||
This will install the xfce desktop environment and any other necessary programs on the SBC. When it's done, restart the SBC. When it boots back up it should boot directly to a login screen instead of the terminal interface. Log in, and you are good to go. It won't be particularly fast, but don't worry, the SBC does not have a dedicated video processor on it so it's perfectly normal for it to be slow. What's important is that it works. | |||
[[File:lilliputdesktop.jpg|center|400px|link=]] | |||
====Calibrating the touch screen==== | |||
Unfortunately, by default the screen is calibrated to believe the bottom of the screen is on the right hand side. This has the effect of making the touch functionality more or less useless until it has been properly calibrated. To do this, install the following package: | |||
<div class="source"> | <div class="source"> | ||
<syntaxhighlight lang=bash> | <syntaxhighlight lang=bash> | ||
apt-get install xinput-calibrator | |||
</syntaxhighlight> | </syntaxhighlight> | ||
</div> | </div> | ||
The | Now use xinput calibrator to measure the parameters of your screen. Launch xinput calibrator (called Calibrate Touchscreen in the programs menu) and follow the instructions on the screen. The screen should now be functioning at full potential. | ||
===Using a Different Wireless Adapter=== | |||
The support for the wireless adaptor that Phidgets sells is written into the SBC kernel. Hence, we do not support using other adaptors. | |||
However, Linux is very flexible, and it is possible (though not easy) to write a custom kernel for the SBC and add support for a new wireless adaptor. We can't help you with this, but we do provide some basic guidelines for [[#Custom Kernel and Filesystem|building your own kernel]]. You can also have a look at our thoughts on our own experience with choosing a Wifi adapter: [[Alternative Wi-Fi Adapters on the SBC]]. | |||
===Using a Different Webcam=== | |||
In addition to the webcam that Phidgets sells, you have the option to use many different webcams with the SBC. There is a [http://www.ideasonboard.org/uvc/#devices long list] of compatible webcams. | |||
The common thread for these webcams is that they use UVC - the USB Video Class - drivers for Linux. You can then use [[#mount|mount]] to find out what video device your webcam is mounted under. | |||
===Taking Pictures With the Webcam=== | |||
Probably the most straightforward way to use a webcam for pictures rather than video is to use the {{Code|opencv}} library. You can get it by: | |||
<div class="source"> | <div class="source"> | ||
<syntaxhighlight lang=bash> | <syntaxhighlight lang=bash> | ||
apt-get install libcv2.1 | |||
</syntaxhighlight> | </syntaxhighlight> | ||
</div> | </div> | ||
If there is no {{Code|libcv2.1}} package, you can perform {{Code|apt-cache search libcv}} to find the current version. | |||
The opencv libraries can also be used within Python, by installing the link between them: | |||
<div class="source"> | <div class="source"> | ||
<syntaxhighlight lang=bash> | <syntaxhighlight lang=bash> | ||
apt-get install python-opencv | |||
</syntaxhighlight> | </syntaxhighlight> | ||
</div> | </div> | ||
Then taking pictures from within code becomes quite simple. For example, in Python, taking and saving an image is four lines: | |||
<div class="source"> | <div class="source"> | ||
<syntaxhighlight lang=bash> | <syntaxhighlight lang=bash> | ||
#! /usr/bin/python | |||
import cv | |||
# The webcam is located at /dev/video0 | |||
# OpenCV only needs the number after video | |||
webcam = cv.CaptureFromCAM(0) | |||
frame = cv.QueryFrame(webcam) | |||
cv.SaveImage("image.jpg", frame) | |||
</syntaxhighlight> | </syntaxhighlight> | ||
</div> | </div> | ||
For the complete OpenCV documentation, see [http://docs.opencv.org/ The OpenCV Reference], and specifically the section on reading and writing images. | |||
'''Note:''' The SBC is probably not as powerful for image processing and transport when compared to your desktop computer. Try running your image processing code on the SBC from an early point in development. During those test runs, you can visit the first System page of the [[#SBC Web Interface|SBC Web Interface]] to check the processor and memory use. For more information on processor power, check the specification for your SBC (on the product page on [{{SERVER}} our main website]) as well as our discussion of [[#Pushing Processor Limits|pushing processor limits]] below. | |||
===Checking System Logs=== | |||
The SBC maintains two logs: a kernel log and a system log. | |||
The kernel log is for low-level occurrences, such as devices attaching and leaving the USB hub, recording what drivers are being used, and so on. | |||
The system log (syslog) is for normal chatter from the operating system. Any program with the right permissions can use it (though you need to know the method to write to it, information all around the Internet can help) and it contains everything from the Ethernet going up and down, to webserver requests, and so on. If you don't run many programs or services on the SBC, the syslog will essentially be a mirror of the kernel log, because the kernel is the only thing talking. | |||
You can check these logs by using the web interface in the {{Code|System → Logs}} tab. | |||
Or you can perform more powerful filtering and displaying via an SSH terminal. For example, {{Code|dmesg}} is the command to display the kernel log, and {{Code|tail}} prints the last ten lines of input. So, if you are trying to see if you can get a device to be detected on USB, you can run <code>dmesg | tail</code> to print the latest ten lines of kernel log data. | |||
The actual locations of the log files (for filtering and reading) are: | |||
* {{Code|/var/log/syslog}} | |||
* {{Code|/var/log/dmesg}} | |||
But don't edit them directly! Always follow the advice and procedures around the Internet on how to properly log items to syslog. | |||
===X Forwarding=== | |||
Although most tasks can be done using the [[#SBC Web Interface|SBC Web Interface]] or [[#SSH|SSH]], you can also set up X11 forwarding on the SBC. X11 is the window manager base, which provides a graphical windowing system on the SBC. Although you probably won't connect directly to the X11 manager (i.e. by plugging a screen directly into the SBC), X11 also gives a user the ability to forward graphical windows over SSH. You will need the following packages installed: | |||
* {{Code|x11-common}} | |||
* {{Code|xbase-clients}} | |||
After installing, make sure that the line in {{Code|/etc/ssh/sshd_config}} has a line that says: | |||
:{{Code|X11Forwarding yes}} | |||
Then log out and log back into the SBC. This second time you log in, use the {{Code|-X}} switch to turn on X forwarding for that connection: | |||
:{{Code|ssh -X root@phidgetsbc.local}} | |||
Then you should be able to run programs that launch a window, and it will launch remotely and appear on the computer you have the SSH connection from. | |||
===Pushing Processor Limits=== | |||
The SBC, though more powerful than many embedded computers out there, is probably about as powerful as your smartphone. If you hook up 1 ms Phidget sampling devices to all six of its USB ports, events and packets will probably get lost. The exact data rates you can accomplish depend on: | |||
* What else is running on the SBC | |||
* How efficient your code is for external operations (like File I/O) | |||
* Other minor details (e.g. the temperature of the SBC, etc) | |||
If you want to achieve data rates as fast as possible, try these tips: | |||
* Program in C, not in an interpreted language (Python, Java, .NET) | |||
* Perform file I/O as little as possible. Locally cache data, manage your writing to a file in a separate thread, and use low-level write calls. | |||
* Change the [[#Custom Kernel and Filesystem|filesystem]] to a faster, non-compressed file system. | |||
** Alternatively, use a high-data-rate USB key. | |||
* Keep other running processes to a minimum. | |||
** If you are running code locally right on the SBC, turn off the Phidget WebService. | |||
===Custom Kernel and Filesystem=== | |||
You can compile your own kernel and flash it to the board. It is left up to the user to configure an appropriate cross-compiler for kernel development. You may also be able to compile a new kernel on-board. We have a kernel development kit, complete with patch file and README: | |||
* [{{SERVER}}/downloads/phidgetsbc/1072/phidgetsbc2-kerneldev.tar.gz SBC Kernel Development Package] | |||
Compiling a new, custom kernel is somewhat complex. If the SBC is your first experience with Linux, writing a custom kernel will be difficult. However, it will probably also be very rewarding because you can put whatever you like into it. We might be able to offer additional suggestions, but ultimately you're on your own here. | |||
You may be able to write a custom kernel right on the SBC, but the easiest way is to develop the kernel on an external computer. And the easiest way to develop on an external computer is for that computer to also be Linux, even just in a Virtual Machine. The time spent loading a copy of Linux into a virtual machine (such as VirtualBox, which is free) onto your computer will probably be less time than setting up a standard compiler on Windows to cross-compile. | |||
On your external Linux system, you will need: | |||
* A cross-compiling toolchain for the ARM processor, which we briefly describe on the [[OS - Linux#Cross-Compiling with a Custom Toolchain | main Linux page]], and | |||
* The [{{SERVER}}/downloads/phidgetsbc/1072/phidgetsbc2-kerneldev.tar.gz SBC Kernel Development Package] from the Phidgets website. | |||
The kernel development kit has a brief README file which describes how to obtain the proper kernel and patch, configure, customize, and build it. | |||
We have an application guide in progress, which walks through building a custom kernel to add Bluetooth support to the SBC. Please contact us if you would like more information. Even if you are trying to add support for hardware other than a bluetooth modem, or wondering if support even exists in the kernel for your modem (3G, alternate wireless, etc) you will probably find the application guide helpful. Follow it up to the point where you run the program {{Code|menuconfig}} (you don't need an SBC to do this), which will give you a menu of all drivers you can enable in the SBC kernel. | |||
After making your new kernel, you should have a uImage and modules target for your Makefile. At this point you can transfer your kernel files onto the SBC, make their targets, and transfer them into the nand memory. This involves erasing the old kernel, flashing the new kernel, installing the new kernel modules, and rebooting. From the SBC, in the kernel directory: | |||
<div class="source"> | <div class="source"> | ||
<syntaxhighlight lang=bash> | <syntaxhighlight lang=bash> | ||
make uImage; make modules | |||
flash-eraseall /dev/mtd3 | |||
nandwrite -p /dev/mtd3 arch/arm/boot/uImage | |||
make modules-install | |||
reboot | |||
</syntaxhighlight> | |||
</div> | |||
# | Custom kernels can also be flashed from the [[#Recovery System | Recovery System]]. | ||
If you need to create a root filesystem image, the filesystem type is UBIFS, and the commands to create it are: | |||
====For SBC2:==== | |||
<div class="source"> | |||
<syntaxhighlight lang=bash> | |||
mkfs.ubifs -m 2KiB -e 126KiB -c 4050 -r $ROOTFS/ system_ubifs.img | |||
ubinize -o system_ubi.img -m 2KiB -p 128KiB -s 512 ubinize.cfg | |||
</syntaxhighlight> | |||
</div> | |||
Where {{Code|ubinize.cfg}} contains: | |||
<div class="source"> | |||
<syntaxhighlight lang=bash> | |||
# Section header | |||
[rootfs] | |||
# Volume mode (other option is static) | |||
mode=ubi | |||
# Source image | |||
image=system_ubifs.img | |||
# Volume ID in UBI image | |||
vol_id=0 | |||
# Volume size | |||
vol_size=64128KiB | |||
# Allow for dynamic resize | |||
vol_type=dynamic | |||
# Volume name | |||
vol_name=rootfs | |||
# Autoresize volume at first mount | |||
vol_flags=autoresize | |||
</syntaxhighlight> | |||
</div> | |||
====For SBC3:==== | |||
<div class="source"> | |||
<syntaxhighlight lang=bash> | |||
mkfs.ubifs -F -m 4KiB -e 248KiB -c 4000 -r $ROOTFS/ system_ubifs.img | |||
ubinize -o system_ubi.img -m 4KiB -p 256KiB ubinize.cfg | |||
</syntaxhighlight> | |||
</div> | |||
Where {{Code|ubinize.cfg}} contains: | |||
<div class="source"> | |||
<syntaxhighlight lang=bash> | |||
# Section header | |||
[rootfs] | |||
# Volume mode (other option is static) | |||
mode=ubi | |||
# Source image | |||
image=system_ubifs.img | |||
# Volume ID in UBI image | |||
vol_id=0 | |||
# Volume size | |||
vol_size=83MiB | |||
# Allow for dynamic resize | |||
vol_type=dynamic | |||
# Volume name | |||
vol_name=rootfs | |||
# Autoresize volume at first mount | |||
vol_flags=autoresize | |||
</syntaxhighlight> | </syntaxhighlight> | ||
</div> | </div> | ||
You then flash ‘system_ubi.img’ (not ‘system_ubifs.img’) from the recovery system. | |||
Again, like the custom kernel creation, the need to create a custom root filesystem is essentially non-existent except for those advanced users who already know they need it... and furthermore, you are almost entirely on your own. | |||
===Saving a file system to flash to multiple SBC's=== | |||
You may want to create a complete backup of your SBC root filesystem, which can then be flashed to other SBCs. This is how it could be done: | |||
You will need a USB drive - we have had issues using cheap flash drives, so a real USB drive is recommended. Make sure it's empty, as it will be reformatted. | |||
All of these commands are executed on your SBC, while logged in over SSH. | |||
First, re-format the USB drive as ext3. Assuming the USB drive is sda and has a single partition: | |||
<div class="source"> | <div class="source"> | ||
<syntaxhighlight lang=bash> | <syntaxhighlight lang=bash> | ||
umount /dev/sda1 | |||
mkfs.ext3 /dev/sda1 | |||
mount -t ext3 /dev/sda1 /media/usb0 | |||
</syntaxhighlight> | </syntaxhighlight> | ||
</div> | </div> | ||
Then, remount / as readonly, so it doesn't change as we're copying it. To do this, we need to kill all running processes except sshd: | |||
<div class="source"> | |||
<syntaxhighlight lang=bash> | |||
service udev stop | |||
service ifplugd stop | |||
service rsyslog stop | |||
service avahi-daemon stop | |||
service phidgetwebservice stop | |||
service ntp stop | |||
service busybox-httpd stop | |||
service dbus stop | |||
service cron stop | |||
pkill dhclient | |||
mount -o remount,ro / | |||
</syntaxhighlight> | |||
</div> | |||
''' | If the remount says that / is busy, do a 'ps auxww' and 'pkill' anything else that may be running until it remounts properly. | ||
Then, | Then, copy / to the flash drive: | ||
<div class="source"> | <div class="source"> | ||
<syntaxhighlight lang=bash> | <syntaxhighlight lang=bash> | ||
mkdir /media/usb0/root | |||
mount --bind / /mnt/ | |||
cp -a /mnt/* /media/usb0/root/ | |||
</syntaxhighlight> | </syntaxhighlight> | ||
</div> | </div> | ||
Then, clean up the copy - removing files specific to this board. We also remove the APT cache to save space. | |||
<div class="source"> | |||
<syntaxhighlight lang=bash> | |||
find /media/usb0/root/var/log -type f -print0 | xargs -0 rm -f | |||
rm -rf /media/usb0/root/var/lib/apt/lists/* | |||
mkdir /media/usb0/root/var/lib/apt/lists/partial | |||
rm -f /media/usb0/root/var/cache/apt/*.bin | |||
rm /media/usb0/root/etc/udev/rules.d/70-persistent-net.rules | |||
rm /media/usb0/root/etc/ssh/ssh_host_* | |||
</syntaxhighlight> | |||
</div> | |||
then, create the ubinize.cfg file: | |||
For SBC3: | |||
<div class="source"> | |||
<syntaxhighlight lang=bash> | |||
cd /media/usb0 | |||
cat > ubinize.cfg << EOF | |||
[rootfs] | |||
mode=ubi | |||
image=/media/usb0/system_ubifs.img | |||
vol_id=0 | |||
vol_size=83MiB | |||
vol_type=dynamic | |||
vol_name=rootfs0 | |||
vol_flags=autoresize | |||
EOF | |||
</syntaxhighlight> | |||
</div> | |||
For SBC2: | |||
<div class="source"> | <div class="source"> | ||
<syntaxhighlight lang=bash> | <syntaxhighlight lang=bash> | ||
cd /media/usb0 | |||
cat > ubinize.cfg << EOF | |||
[rootfs] | |||
mode=ubi | |||
image=/media/usb0/system_ubifs.img | |||
vol_id=0 | |||
vol_size=64128KiB | |||
vol_type=dynamic | |||
vol_name=rootfs | |||
vol_flags=autoresize | |||
EOF | |||
</syntaxhighlight> | </syntaxhighlight> | ||
</div> | </div> | ||
NOTE: you may need to increase vol_size if your filesystem is larger. | |||
then, create the UBI image from the copy: | |||
For SBC3: | |||
<div class="source"> | |||
<syntaxhighlight lang=bash> | |||
mkfs.ubifs -F -m 4KiB -e 248KiB -c 4000 -r /media/usb0/root /media/usb0/system_ubifs.img | |||
ubinize -o /media/usb0/system_ubi.img -m 4KiB -p 256KiB ubinize.cfg | |||
</syntaxhighlight> | |||
</div> | |||
For SBC2: | |||
For | |||
<div class="source"> | <div class="source"> | ||
<syntaxhighlight lang=bash> | <syntaxhighlight lang=bash> | ||
mkfs.ubifs -m 2KiB -e 126KiB -c 4050 -r /media/usb0/root /media/usb0/system_ubifs.img | |||
ubinize -o /media/usb0/system_ubi.img -m 2KiB -p 128KiB -s 512 ubinize.cfg | |||
</syntaxhighlight> | </syntaxhighlight> | ||
</div> | </div> | ||
then, unmount the drive to ensure everything is written out properly: | |||
<div class="source"> | <div class="source"> | ||
<syntaxhighlight lang=bash> | <syntaxhighlight lang=bash> | ||
umount /dev/sda1 | |||
</syntaxhighlight> | </syntaxhighlight> | ||
</div> | </div> | ||
Then, you can remove the /root/ folder and system_ubifs.img. system_ubi.img can be flashed to other SBCs using the recovery system. | |||
==Software Details== | |||
For even more advanced uses of the SBC, it may help to know the gritty details of the SBC software system. | |||
;Operating System | |||
:Debian/GNU Linux | |||
:Kernel 2.6.X or higher (generally kept up to date with latest releases, use {{Code|uname -r}} to check the kernel version) | |||
;Main Filesystem (rootfs) | |||
:UBIFS (a raw flash type of file system) | |||
:Mounted in a 460 MB Nand partition (in Read/Write mode) | |||
;Kernel | |||
:uImage format | |||
:Has its own 3MiB partition on bare Nand | |||
;Web Interface Scripts and Configuration Data | |||
:Located in {{Code|/etc/webif}} | |||
:Modifying these scripts can be done; however, it is very easy to enter invalid data that could cause the system to behave unexpectedly or not boot. | |||
;User Applications uploaded through Web Interface | |||
:Located in {{Code|/usr/userapps}} | |||
;Webcam Device Location | |||
:{{Code|/dev/video0}} | |||
:Numbers increase with more webcams | |||
;Date and Time | |||
:Set using ntp (network time protocol) at boot | |||
:The ntp daemon continues to run in the background and will periodically update the clock | |||
:The network keeps the SBC very close to real time | |||
:Also there is a real-time clock with battery backup which will preserve date/time across reboots, power removal | |||
:The real-time clock is synced to system time during reboot/shutdown | |||
:If power is unplugged suddenly, and the network not restored, the real-time clock may not have the correct time | |||
;Wireless Networking System | |||
:Wireless adapter support for the wireless adapter that Phidgets sells is written into the kernel | |||
:It supports WEP and WPA | |||
:It is best configured through the configuration interface. | |||
;Nand Layout | |||
:The board contains 512MiB on Nand. This nand is split into 7 partitions as follows: | |||
:0: u-boot size: 256K Read Only | |||
:1: u-boot_env size: 128K Read Only | |||
:2: recovery_kernel size: 2M Read Only | |||
:3: kernel size: 3M Writable | |||
:4: flashfs size: ~3.625M Read Only | |||
:5: recovery_fs size: ~ 43M Read Only | |||
:6: rootfs size: ~ 460M Writable | |||
: The final size of flashfs/recovery_fs/rootfs depends on the image size at production, and on the number/location of bad blocks in the NAND. | |||
: '''Note''': U-Boot and recovery kernel and filesystem cannot be written from Linux - this is a safety measure. | |||
;Boot Loader | |||
:U-Boot is used for setting up the processor and booting Linux, and is only accessible via a serial connection. | |||
:Normal users will not need to use or modify it. | |||
:Be very careful when modifying the u-boot partition. If it is damaged or overwritten, it is difficult to fix. | |||
:When using U-Boot, a prompt will appear via serial shortly after power on. | |||
:The environment variables will help you determine how to boot Linux on the SBC | |||
:You can also refer to the [http://www.denx.de/wiki/DULG/Manual U-Boot documentation] | |||
;Boot Process | |||
:From power on... | |||
:1. Processor loads first 4 bytes from NAND into Steppingstone and runs it. | |||
:2. Steppingstone sets up RAM, copies u-boot from NAND into RAM and runs U-Boot. | |||
:3. U-Boot initializes the processor, sets GPIO state, etc., copies the linux kernel into RAM, sets up the kernel command line arguments, checks that the kernel image is valid, and boots it. | |||
:4. Linux boots, bringing up USB, Networking, NAND, etc. and then mounts the rootfs NAND partition on /. | |||
:5. init gets run as the parents of all processes, as uses the /etc/inittab script to bring up the system. This includes mounting other filesystems, settings the hostname, and running the scripts in /etc/init.d, among other things. | |||
:6. inittab then turns the green LED on. | |||
:7. inittab then sets up a getty on the first serial port, ready for interfacing using the debug board. | |||
==Common Problems and Solutions== | ==Common Problems and Solutions== | ||
{{ProblemSolution| | {{ProblemSolution|PHP Curl|Curl doesn't install smoothly}} | ||
There is an issue with the embedded version of PHP5.3, try forcing it to install the specific version that you need. This can be done with the following command: | |||
{{Code|apt-get install php5-common<nowiki>=</nowiki>5.3.3-7+squeeze14}} | |||
{{ProblemSolution|FTDI Errors|FTDI adapters do not appear to work with the SBC}} | |||
The 3.1.6 version of the Linux kernel which is used on some versions of the SBC has a bug that causes issues with FTDI drivers and makes them malfunction. To solve this problem you must upgrade the kernel to a newer version. You can find the files [[#Quick Downloads| here]]. | |||
{{ProblemSolution|USB Memory Key mounting|Sometimes USB Memory Keys mount at more than one location}} | |||
When you insert a memory key, the SBC will load it as a device (e.g. {{Code|/dev/sda1}}) and it will also ''mount'' the key for reading and writing within the {{Code|/media/}} directory. The {{Code|/media/}} directory version will be called something like {{Code|usb0}}. | |||
At times, an inserted memory key will get mounted in more than one location. You can observe if this occurs by checking the currently mounted devices with the command {{Code|mount}}: | |||
<div class="source"> | |||
<syntaxhighlight lang="text"> | |||
root@phidgetsbc:~# mount | |||
tmpfs on /lib/init/rw type tmpfs (rw,nosuid,mode=0755) | |||
proc on /proc type proc (rw,noexec,nosuid,nodev) | |||
sysfs on /sys type sysfs (rw,noexec,nosuid,nodev) | |||
udev on /dev type tmpfs (rw,mode=0755) | |||
tmpfs on /dev/shm type tmpfs (rw,nosuid,nodev) | |||
devpts on /dev/pts type devpts (rw,noexec,nosuid,gid=5,mode=620) | |||
rootfs on / type rootfs (rw) | |||
procbususb on /proc/bus/usb type usbfs (rw) | |||
/dev/sda1 on /media/usb0 type vfat (rw,noexec,nodev,sync,noatime,nodiratime) | |||
/dev/sda1 on /media/usb1 type vfat (rw,noexec,nodev,sync,noatime,nodiratime) | |||
</syntaxhighlight> | |||
</div> | |||
You will note that the same device ({{Code|/dev/sda1}}) is now mounted at ''both'' {{Code|/media/usb0}} and {{Code|/media/usb1}}. To fix this problem as it occurs, you can use {{Code|umount}} (notice there is no letter 'n') to unmount the second instance: | |||
<div class="source"> | |||
<syntaxhighlight lang="text"> | |||
root@phidgetsbc:~# umount /media/usb1 | |||
</syntaxhighlight> | |||
</div> | |||
In practice, this should not be a problem, because writing to or reading from either {{Code|usb0}} or {{Code|usb1}} will have the same effect on the memory key. However, if you hard-code a media location into your program (i.e. expecting {{Code|/media/usb0}} to be the first USB key you insert and {{Code|/media/usb1}} to be the second key) your program will sometimes work and sometimes fail. | |||
To get around this within code, find the mount point for each device as it appears. The devices, such as {{Code|/dev/sda1}} will always refer to the actual memory key. But, they cannot be written to directly without being mounted, so you will have to parse the mount table (what is returned from {{Code|mount}}) within your code to find the device and its corresponding mount point. | |||
This is a problem with the standard embedded Debian automount program, and we have no known fix. | |||
{{ProblemSolution|Perl Locale Errors on SSH|No Locales Installed}} | |||
By default, no locales are installed on the SBC. If you use [[#apt|apt]] a lot to install and manage your software on the SBC, you will get messages like this: | |||
<div class="source"> | |||
<syntaxhighlight lang="text"> | |||
perl: warning: Setting locale failed. | |||
perl: warning: Please check that your locale settings: | |||
LANGUAGE = (unset), | |||
LC_ALL = (unset), | |||
LANG = "en_CA.UTF-8" | |||
are supported and installed on your system. | |||
perl: warning: Falling back to the standard locale ("C"). | |||
locale: Cannot set LC_CTYPE to default locale: No such file or directory | |||
locale: Cannot set LC_MESSAGES to default locale: No such file or directory | |||
locale: Cannot set LC_ALL to default locale: No such file or directory | |||
</syntaxhighlight> | |||
</div> | |||
To squelch these messages, you should install and reconfigure your locale like this: | |||
<div class="source"> | |||
<syntaxhighlight lang="bash"> | |||
apt-get install locales | |||
dpkg-reconfigure locales | |||
</syntaxhighlight> | |||
</div> | |||
The last command will show you a long list from which you should pick your location, by language. For example, en_CA is english_Canada. Here in Calgary, we use en_CA.UTF-8 and so for the first question we would input locale "114" and for the second (system) question we would input {{Code|en_CA}} for the locale. | |||
This might give you a locale undefined error, in which case you can generate the locale (for us, again, it is en_CA): | |||
<div class="source"> | |||
<syntaxhighlight lang="bash"> | |||
locale-gen en_CA | |||
</syntaxhighlight> | |||
</div> | |||
Latest revision as of 21:30, 31 July 2019
| On the Single Board Computer (SBC), Phidgets can be either plugged directly into one of the USB ports or run over a network using the WebService. |
Quick Downloads
Unlike our other supported operating systems, the SBC does not require downloads unless you are doing something advanced like loading the firmware or developing your own kernel. You will know if you need these downloads, otherwise, the SBC should work as described on the SBC3 Getting Started Guide right out of the box.
For PhidgetSBC (1070):
For PhidgetSBC2 (1072):
- changelog
- SBC2 Firmware
- SBC2 Kernel Development Package (How-to and patch file)
The PhidgetSBC3 has different firmware packages based on the kernel version. In order to determine the device version of your SBC3, see the web configuration page.
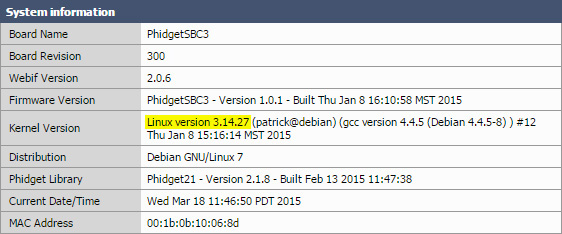
For PhidgetSBC3 (1073) kernel version 3.6.3:
- changelog
- SBC3 Firmware
- SBC3 Kernel Development Package
- SBC3 Kernel upgrade package (3.6.3 -> 3.14.27)
For PhidgetSBC3 (1073) kernel version 3.14.27:
Note that, instead of using the firmware to update your SBC, updates should normally be done via the System -> Packages page on your SBC3 web interface. It is rarely necessary to completely re-flash your device..
Getting Started with the Phidget SBC Debian Linux
The Single Board Computer (SBC) is a unique Phidget. It is a computer with a Linux operating system. It can compile code, save files, manage background jobs, host information over the web, and more.
If this is your first time using the Phidget SBC, you will want to start with the Getting Started Guide for the SBC. After that, here we will get you started on topics beyond those in the getting started guide, including how to write Phidget code to run on the SBC. You do not need this page if you are simply using the SBC to broadcast data from Phidgets over the network - it does that automatically. We describe how to verify and use this in the Getting Started Guide.
This page will show you how to:
- Install the ability to write and develop code on the SBC itself
- Use the command line for basic coding tasks
- Troubleshoot the SBC's network
It will also give additional specifications, which are useful for doing more advanced things with the SBC hardware and software.
Before reading this page, you should have done the following via the Getting Started Guide:
- Set up networking on your SBC, via either Ethernet or wireless
- Set up an admin password
- Learned the IP address or link local address of the SBC
We will use this information in setting up the libraries and drivers to use the SBC for writing and running code.
Conceivably, you could simply use the SBC like any Linux computer, and do all of your development and compiling of Phidget code on the SBC itself. In practice this gets complicated as the SBC does not have a keyboard or screen. So usually, you will want to develop your code an external computer and copy files and settings over to the SBC via a network. This makes this Getting Started section unique, in that we show you how to set up both computers:
- Your External Development Computer, usually your main desktop or laptop which will transfer files and settings to and from the SBC
- The SBC itself, which needs programming language libraries to use Phidgets.
Getting Started - External Computer
You have two ways to connect to the SBC from an external computer: via the SBC Web Interface and over the more powerful but complex Secure Shell (SSH).
SBC Web Interface
You have already worked extensively with the web interface in the Getting Started Guide for the SBC. This was the tool within a web browser which was opened either via the Phidget Control Panel on Windows, or by simply entering the IP or link local address into an internet browser. It allowed you to set the password, set up internet connectivity, and so on.
This section doesn't have more information on the interface; rather, it simply serves as a reminder that you have the web interface as an available tool. Examples, including screenshots, are placed where appropriate in this document. The web interface will probably stay your initial go-to way to connect to the SBC, especially for tasks that benefit from graphical interaction, like setting up wireless or using the webcam.
SSH
The most flexible way to transfer files and commands to and from the SBC is via a program called ssh. The ssh program provides command line text access over a network into the SBC. Using it, you can run programs and give the SBC commands. The ssh program has a companion program called scp which can copy files back and forth. If you are unfamiliar with ssh, you can think of it like the command line or a Mac terminal, but with a remote connection to a different computer. It is a minimal yet effective way to interact with a remote computer.
Before connecting over ssh, you will need:
- The IP address (such as 168.254.3.0) or link local address (such as phidgetsbc.local) of the SBC
- The admin password for the SBC
Both of these items can be found by following the steps in the Getting Started Guide for the SBC.
You will also need to enable SSH on the SBC side. This can be done through the Web Interface, under Network → Settings, by changing the SSH Server radio button to Enabled and saving your changes:
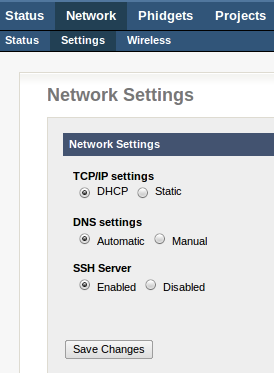
SSH on Windows
The ssh program is not installed on Windows by default. But, there are a variety of SSH programs available for free. One simple and commonly used program is PuTTY, and it has the advantage that the executable doesn't need to install, it just runs.
With PuTTY, when you first run the program it will ask you what to connect to. Enter the IP address or link local address of the SBC, and then click the SSH radio button right below the address, which will change the port to 22. Then click open, and you'll have an ssh connection to the SBC open in a terminal. It will prompt you for a user name (root) and password (the admin password).
To copy files back and forth, there is an SCP component to PuTTY, called PSCP, which is available from the same PuTTY download page. Use of PSCP will be similar with the address, username, and password, except that you will be transferring files instead of sending commands.
SSH on Linux and Mac OS
Linux and Mac OS already have ssh installed by default. To run ssh simply open a terminal...
Ctrl-Alt-Ton LinuxApplications → Utilities → Terminalon Mac OS
...and type:
ssh root@phidgetsbc.local
If you have re-named your SBC, include that name instead of the phidgetsbc.local link address. Or, you can use the SBC's IP address, e.g. something like ssh root@168.254.3.0
To copy files back and forth, the command follows the form of: scp from to
So, to copy a file /root/data.txt from the SBC to your local machine, type:
scp root@phidgetsbc.local:/root/data.txt .
Note the use of the dot . to indicate that scp should put the file in the current local directory. If you're not sure what folder the terminal is operating in type pwd to print the working directory. Terminals usually start by default in your home folder.
Getting Started - The SBC (Debian Linux)
The SBC runs Linux, which is a full operating system. It is stripped down compared to a full desktop release of Linux, but you can compile code on it, run programs, schedule tasks, create and manage files, run a web server, and much, much more.
At this point you have connected to the SBC via the web interface, and probably also through SSH. This section will help you install libraries and drivers that you probably want - i.e. support for C, Java, and Python. After this section, you'll be well into the depths of using the SBC as a computer, and so you'll probably want to keep the Using SBC Linux section open for reference while you work if you are not already familiar with Linux.
The SBC comes with the following Phidget functionality installed:
- The Phidget C libraries
libphidget21.so - The Phidget WebService
(If you are simply curious what these are and how they get installed, we describe the process on the general Linux page.)
But to compile C programs, or run Java programs, or use Python, you will need to install these languages onto the SBC.
Before installing anything on the SBC, however, (even via a button on the web interface) make sure that the Include full Debian Package Repository option is checked in the web interface under System → Packages.
Installing C/C++ and Java
The simplest way to install C/C++ and Java on the SBC is via the web interface. There is a button under System → Packages to install C support (including gcc) and another button to install Java support:
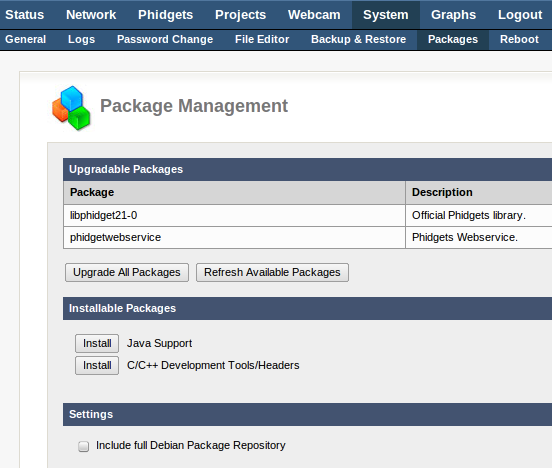
You have to check that you are running the same version of Java on your development machine (where you plan on compiling the java programs) as the SBC is running. To do this type the following into the terminal on your computer and from ssh on the SBC:
Java -version
If you need to update the version of Java on your SBC, use the following commands:
apt-get install openjdk-7-jre-headless
su
update-alternatives --config java
Now you're ready to begin programming. We have programming pages for both C/C++ and for Java. Remember that if you're unfamiliar with Linux, we have help on using files and running programs automatically in the Using SBC Linux section.
If you want to avoid using the SSH interface on the SBC entirely, and you want to write your program in Java and run it continuously from boot (which is the only option if you want to avoid SSH), we have a very in-depth section on that topic.
Installing Python
Installing Python has two steps. First, you'll need to install the basic ability to run python, and then you'll need to install the Phidget Python module. Both steps (and both options) require that you issue the relevant commands through an SSH terminal.
Basic Python
The base Python functionality can be downloaded and installed in one step with apt (i.e. in a terminal, type):
apt-get install python
This will give you Python, and now you just have to install the Phidget Python module to gain Phidget functionality. If the installation fails because it can't find python, you need to enable the full repository as described in this section, and then perform an apt-get update.
Install Phidget Python Method 1: Use a USB Key
Copy the Python Libraries onto a USB key. Unpack the zip file into a folder on the USB key. Insert the key into the SBC.
You will have to figure out where the USB key (and the Phidget Python library folder) is now located. We describe how in the general Using USB Data Keys section.
After you know the place where the USB key is mounted, in a terminal go to that directory (e.g. type cd /media/usb0/), enter the unpacked Phidget Python Library folder, and run:
python setup.py install
Now, you're ready to begin writing Python code for the SBC. For more help on writing and using Python with Phidgets, we have an whole page on that topic. Remember that if you're unfamiliar with Linux, we have help on using files and running programs automatically in the Using SBC Linux section.
Install Phidget Python Method 2: Use the Internet
Rather than using a USB key to transfer the file, the SBC can download it directly from the internet. You will need wget and unzip installed, both of which are small:
apt-get install wget
apt-get install unzip
Copy the web link address for the Python Libraries.
In an SSH terminal to the SBC, type: wget http://www.python_library_link where instead of http://www.python_library_link you insert the link you just copied. Copying into a terminal can usually be done via the right-click menu.
This will download the Phidget python libraries to the folder you ran the wget command in. Unzip the downloaded file using the command unzip file, where file is the filename from wget. Or try typing ls to list the names of a file in the directory, which should include the unzipped folder. Enter the unzipped folder (e.g. use cd to change directory), and install the Phidget Python libraries:
python setup.py install
Now, you're ready to begin writing Python code for the SBC. For more help on writing and using Python with Phidgets, we have a whole page on that topic. Remember that if you're unfamiliar with Linux, we have help on using files and running programs automatically in the Using SBC Linux section.
Installing Other Languages
You may also be able to program on the SBC using Ruby and C# under Mono, though we do not offer in-depth support for these languages on the SBC. The installation procedures should more or less follow that of installing python on the SBC, except you will be installing Ruby or Mono. Performing package searches using apt cache search can help you find the relevant software.
For C#, as of 2012 the mono-complete package is broken on the Debian Squeeze repository. Rather, you have to install the Mono runtime and Mono compiler separately.
To install the runtime package (and its dependencies), use apt:
apt-get install mono-runtime
Then, to install the C# compiler:
apt-get install mono-gmcs
Or the Visual Basic compiler:
apt-get install mono-vbnc
Then, the system and library packages do not link correctly for the version 2.0 of Mono. If this is the case, your code will compile fine, but when you try to run it, you will get an error like:
The assembly mscorlib.dll was not found or could not be loaded.It should have been installed in the `/usr/lib/mono/1.0/mscorlib.dll' directory.
In this case, you need to install these two packages:
apt-get install libmono-corlib1.0-cil
apt-get install libmono-system1.0-cil
Here we found these packages to work by working through the tree structure. As a general rule, you can find these dependencies by using install (here, apt-get install mono-complete) to get a sense of the package tree structure. This will possibly tell you that the packages are broken, but at the same time this will list the dependencies of the packages. Trying to install individual dependencies will show you that although a root-package fails, the sub-packages will sometimes succeed, and install what you need.
If you want to use a specific dll or library that is not available in this reduced version of mono, you can install mono complete by switching from Emdebian+Debian to just Debian. To do this:
In /etc/apt/preferences make the following changes:
Package: *Pin: release a=stablePin-Priority: 1010
In /etc/apt/sources.list/mutistrap-debian.list remove the emdebian line.
Apply the changes:
apt-get update
apt-get dist-upgrade
Many packages will be 'downgraded' from the emdebian to debian versions. Delete the /etc/apt/preferences file and install mono-complete:
apt-get install monodoc-http mono-complete
Choose monodoc-http explicitly, because otherwise the install fails on monodoc-browser.
After this process, you can compile your C# Code.cs Phidget source file the same way as on a generic Linux with Mono system. Please refer to that page on how to obtain the *.dll Phidget resource file and compile your code. On the SBC, however, because you are already running as root (the Super User), you do not need 'sudo' and indeed the SBC will give you an error if you use it. Instead, compiling and running will look like:
gmcs Code.cs -r:Phidget21.NET.dll
mono Code.exe
Using SBC Linux
Now that you've set up communication with the SBC, and installed whichever programming language support you need, you're probably ready for a short tour of useful tools on the SBC's version of Linux.
First, you will by default be running on the SBC as root, which is the super-user. For Linux users, this probably makes you nervous because you know you can overwrite important system files without the system asking for additional permission. As a Windows or Mac OS user - although you may usually run your computer as an administrator - your familiar system usually prompts you to confirm before you do anything really dangerous, and this will not happen on the SBC as the root user.
Next, there is no installed help on the SBC. Help on Linux is usually called 'man pages' which is short for 'the manual pages'. On a full Linux system, usually if you need help with any command you can type, for example, man ls and it will give you help with the program ls. But these help pages take up significant space, and they are widely available online. So, if you need more help with a certain command, you can always type man command into your favourite search engine.
Finally, the SBC has no windowing system. For Linux users, this means no X-windows (Gnome, KDE, etc). And as a Windows or Mac user, you can think of it as running all of your programs and commands through the terminal or DOS prompt command line. The SBC provides all of the functionality of an operating system (e.g. process scheduling, file management, etc) but without any graphical interface. The only exception is the web interface, which gives graphical access to a limited part of what the SBC can do.
Some Useful Commands
If you are doing more with the SBC than simply running pre-written programs in Java to run continuously from boot, you will be interacting with the SBC's Linux operating system over the command line by using SSH. This section discusses useful programs already installed on the SBC, and how to run them on the command line.
ls
The ls program lists the contents of a directory.
It will show both files and folders, but not files that start with a "." (these are hidden files on Linux).
- If you also want to show hidden files, use
ls -a - If you want more information, such as size and date modified, use
ls -l - Commands can be combined, like
ls -al
cd
The cd program changes to a new directory.
For example, cd /root changes into the directory at the base of the file tree called root.
Note:
- Linux uses forward slashes
- The base of all directories is "/" (not "C:\")
- The tilde symbol (~) is short for your home directory (i.e. when you are root, this is short for "/root")
- The double dot ".." means move one directory higher (for example from
/root/data/to/root/)
pwd
The pwd program prints the current directory you are working in. ('P'rint 'W'orking 'D'irectory)
For example:
root@phidgetsbc:~# pwd/root
cp, mv, and rm
These programs are copy (cp), move (mv), and remove (rm).
Copy copies a file from one location and pastes it to another.
For example, if you have a file data.txt, typing cp data.txt data_backup.txt will put a copy of the file data.txt into data_backup.txt
Move moves a file (this is also useful for renaming files) to a new destination.
For example, if you have a file data.txt, typing mv data.txt data_backup.txt will put the contents of data.txt into data_backup.txt, and then will remove data.txt.
Remove deletes a file.
For example, typing rm data.txt will delete data.txt.
Note that rm is final. Once you remove a file using rm, it is gone forever. There is no recycle bin, no temporary trash, nothing other than backups you may have personally created in the past!
Directories can only be removed with rmdir, and then only if they are empty. If you want to remove a directory and all the files in it, use rm -rf directory but be very, very careful with this command. Trying to remove everything within a directory (e.g. rm -rf *) is one of the most dangerous commands you can run on a Linux system, as running it from the wrong directory will result in Linux happily removing everything under that directory -- which could be your entire filesystem.
find
The find program does what it says - it finds things.
Unfortunately for the casual user, the find program is very flexible and powerful, and thus not especially intuitive to use. But, here are some examples:
| SSH Command | What it Does | Example |
|---|---|---|
find folder -name file.txt
|
Looks for all files in a folder (/ for root - or all - folders) with a certain name (* for wildcard) | find / -name *.jpg
|
find folder -mtime +X
|
Looks for all files in a folder modified less than X days ago | find /root -mtime +30
|
grep
The grep program takes text input and searches for a term.
For example, if you type mount to view what devices are mounted (e.g. loaded) on your SBC, you will see:
root@phidgetsbc:~# mount
tmpfs on /lib/init/rw type tmpfs (rw,nosuid,mode=0755)
proc on /proc type proc (rw,noexec,nosuid,nodev)
sysfs on /sys type sysfs (rw,noexec,nosuid,nodev)
udev on /dev type tmpfs (rw,mode=0755)
tmpfs on /dev/shm type tmpfs (rw,nosuid,nodev)
devpts on /dev/pts type devpts (rw,noexec,nosuid,gid=5,mode=620)
rootfs on / type rootfs (rw)
procbususb on /proc/bus/usb type usbfs (rw)
/dev/sda1 on /media/usb0 type vfat (rw,noexec,nodev,sync,noatime,nodiratime)
This may be a lot of information you don't need. If you are only interested in a USB key attachment (as described in the Using USB Data Keys section), you can use grep to filter that one response:
root@phidgetsbc:~# mount | grep sda1
/dev/sda1 on /media/usb0 type vfat (rw,noexec,nodev,sync,noatime,nodiratime)
nano
The nano program is a small text editor that you can use within an SSH terminal.
Nano can be surprisingly useful for writing short lengths of code right on the SBC, so there is no need to transfer files and keep track of different file versions on different computers.
Nano has all keyboard commands which are listed at the bottom of the screen at all times as a reminder (Ctrl-O to save, Ctrl-X to exit, these expand with a larger terminal window). And, nano provides what is called 'syntax highlighting', which colours reserved keywords, comments, strings, and so on as appropriate to the programming language you are using. Nano detects the programming language via the extension of the file (.java for Java, .c for C/C++, and .py for Python).
Typing nano test.py on an SSH command line and then entering a few lines of Python into the new empty file results in:
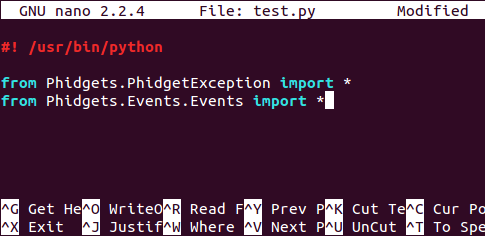
apt
The apt program allows you to install, uninstall, upgrade, and search software available for the SBC. For a non-Linux user, the apt framework may be daunting at first, but it actually allows you to keep your system up to date and install and manage software quickly, easily, and for free.
Note: Before installing anything on the SBC, make sure that the Include full Debian Package Repository option is checked in the web interface under System → Packages.
| SSH Command | What it Does | Example |
|---|---|---|
apt-cache search term
|
Looks for all programs (packages) that have term in the title or description
|
apt-cache search opencv
|
apt-cache show package
|
Shows a lot of data about package including size, version, etc
|
apt-cache show unzip
|
apt-get update
|
Gets the most recent listing of available software | apt-get update (No options)
|
apt-get install program
|
Installs program from the internet
|
apt-get install python
|
mount
The program mount shows you all of the mounted devices on your SBC.
For example:
root@phidgetsbc:~# mount
tmpfs on /lib/init/rw type tmpfs (rw,nosuid,mode=0755)
proc on /proc type proc (rw,noexec,nosuid,nodev)
sysfs on /sys type sysfs (rw,noexec,nosuid,nodev)
udev on /dev type tmpfs (rw,mode=0755)
tmpfs on /dev/shm type tmpfs (rw,nosuid,nodev)
devpts on /dev/pts type devpts (rw,noexec,nosuid,gid=5,mode=620)
rootfs on / type rootfs (rw)
procbususb on /proc/bus/usb type usbfs (rw)
/dev/sda1 on /media/usb0 type vfat (rw,noexec,nodev,sync,noatime,nodiratime)
For the non-Linux user, the concept of a device may be quite strange. To give a short summary, everything on Linux that you can read or write is a file. Webcams are files (i.e. you can 'read' photos from them), USB keys are files, and each filesystem (tmp storage, the kernel portion, the main filesystem) are also themselves files. These files specify what and how something can be written. These are not necessarily linear, for example, you can see above that the USB key (/media/usb0 is mounted within the root file system rootfs which is /.
So mount gives you an idea of what devices have been 'mounted' for reading or writing, and how you can read and write to them. More information on mount (and its various forms, like umount) is available widely around the Internet.
which
The program which tells you if and where a program is installed.
For example, on a default SBC, typing which python will return no results. But after successfully installing python, it will return /usr/bin/python as the location of the python program/binary/executable.
Some Useful Commands to Install
These are other programs you may find useful on the command line. Although they are not on the SBC by default, these and other programs can usually be installed simply by using apt-get install, with the exception of gcc. For example, apt-get install wget will download and install wget.
Note: This section and the section on pre-installed commands can hardly cover all of the complexities and power of the Linux operating system. There are many excellent tutorials online, and between them and using apt to find and install programs you should be able to learn a lot and perform any number of complex useful tasks.
gcc
The gcc program is the C compiler for Linux.
If you are an experienced C/C++ user on Mac or Linux, or if you've already read our C Language page, you might think you need to install gcc via apt-get to compile C code. However, gcc is not in the package repository for the SBC, so apt-get install gcc will fail. Rather, to install gcc, you can do it via the web interface, as described in the Installing C/C++ and Java section.
After installing it via the SBC web interface, you can use gcc normally.
less
The less program displays the contents of a text or source code file. When displaying the file, less allows you to scroll up and down to read it.
This is useful if you are writing your sensor readings to a data file, and you want to read the data file while it is being written by your main code. If your data file is called data.txt, you can type less data.txt and see the lines in the file, and what they are.
The less program output can also be piped into another program. For example, you can use less and the word search program grep to find lines within a file with a search term. For instance, if you have a C source code file Program.c on the SBC, and you want to see all the lines in Program.c that contain a variable name var, you can type:
less Program.c | grep var
wget
The wget program allows you to get an online file (over http) and download it to the SBC.
For example, to get the source file (HTML) from the Phidgets home page, you can type:
wget http://www.phidgets.com
This is most useful for downloading libraries, drivers, or anything (zip, tar, etc) you need from the web which is not available by using apt.
Writing a Phidget Program
We provide two ways to write and upload a Phidget Program:
- The web interface:
- This is useful for simple projects written in Java that you want to start only at boot
- You can also use C projects, but they must be compiled off the SBC for an ARM processor
- Over SSH, which will allow you to write or transfer source code directly to and from the SBC
- This is useful for all other projects, such as:
- Projects that run at scheduled times (e.g. once per minute)
- Projects that use languages other than Java or ARM-compiled C
- This is useful for all other projects, such as:
Note that you can still run an SSH project at boot, you just have to write and install a startup script. This is a bit complex, but we do have an example that starts the program phidgetwebservice21 at boot using a script.
Once you know which method you'd like to use, you can continue on to learn how to Program in Java with the Web Interface, or how to Program with SSH using Java, C, or Python. If you are actually typing in source code on the SBC, you'll find our developing code on the SBC section useful.
Program in Java with the Web Interface
To show how to write, compile, and install Java programs on the SBC, we'll use the Java Hello World example code. You can download the HelloWorld example by downloading the whole Java example package. Make sure you have the same version of Java installed on the SBC as you have on your external development machine. Instruction for checking and updating are found on the installation page.
Here's how to get the HelloWorld code running on the SBC. On your external computer:
1. Download the SBC version of the Phidget Java libraries (phidget21.jar). You can download this from the web interface, on the page under Projects → Projects, under the Notes section.
2. Place the SBC version of phidget21.jar into a directory on your external computer. This will be your working directory that you will use to compile the Java files.
3. Also copy the HelloWorld.java file into that working directory.
4. Compile the HelloWorld.java file from within that working directory. From the command line prompt on Windows, this will be:
javac -classpath .;phidget21.jar HelloWorld.java
In a terminal on Linux or Mac OS, this will be:
javac -classpath .:phidget21.jar HelloWorld.java
5. You should now have three compiled class files: HelloWorld.class, HelloWorld$1.class, and HelloWorld$2.class. You don't need to try and run them, and if you do you may encounter an error because the SBC phidget21.jar may be slightly different than the Phidget support you have installed on your external computer.
Now we move onto the SBC:
6. Create a new project on the SBC, in the web interface under Projects → Projects. Call it HelloWorld:
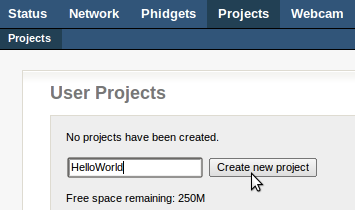
7. On the next screen, you will be prompted to upload your files. We will upload the three Java class files, and then click the Start button:
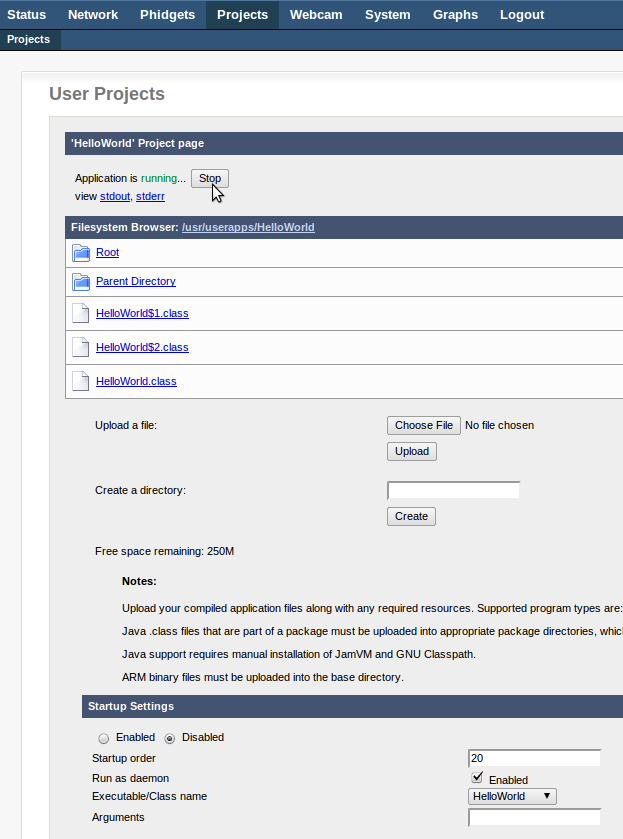
8. You'll note that as it runs, there are two links below the Stop button: One called stdout, which is Standard Output, and one called stderr, which is Standard Error. Usually, when you run a program on the command line, you see both standard out and standard error at the same time - i.e. you get all program output right there in your terminal or command prompt. But when running a program in the background, Linux splits the output up into normal output and error output as this is very useful for debugging (i.e. you can check if standard error is empty).
Here, however, if you're not sure whether the program will run correctly, you should first check stderr to see if any errors were generated, and then check stdout to see if the output looks as expected.
To write your own Java program, follow the same process but use your own source code instead of the HelloWorld.java example.
Now that you have a running program, we offer additional help on running a program automatically using the web interface.
Program with SSH
Similarly to starting a program via the web interface, we use the Phidget Java HelloWorld example here.
Make sure you have Java installed on the SBC. To compile and run the HelloWorld example:
1. Open an SSH terminal to the SBC
2. Download the Phidget Java Examples to the SBC, using wget (you may need to install wget using apt.)
3. Unpack the examples using unzip (you may need to install unzip using apt.)
4. The location of phidget21.jar on the SBC is /usr/share/java/phidget21.jar. Within the unzipped example directory, compile the HelloWorld.java example:
javac -classpath .:/usr/share/java/phidget21.jar HelloWorld.java
5. To run the HelloWorld program, use:
java -classpath .:/usr/share/java/phidget21.jar HelloWorld
Now that you have a running program, you'll probably want to learn to run this Java program automatically.
Permissions Note: If you're used to using Linux with Phidgets already, you'll probably notice that you don't need to switch into root using sudo on the SBC in order to run programs. This is because you already are running as root, not because the udev rules are set up. So if you set up another user, or run a cron job as anything other than root or system, you'll need to add permission for the Phidget program to run in your udev rules.
Developing Code on the SBC
When you're not just using pre-written source code, and you're writing code actually on the SBC itself, you'll probably want to use nano. Other terminal editors on the SBC include vi which is already installed, and emacs, which you can install using apt. Both vi and emacs are much more efficient for the experienced user, but they contain modes and keyboard shortcuts that can seem strange or almost hindering to the casual user.
Regardless of which editor you choose to use, some of your keyboard habits may not transfer well. For example, in the Linux command line, the command Ctrl-C means stop the currently running program, (i.e. your open editor) not copy. Within most SSH terminals, you can copy and paste using the right-mouse button, and on some terminals (and all native Linux terminals) you can copy by simply highlighting text, and you can paste it using the middle (scroll) mouse button. On the other hand, if you write a program that hangs on the command line, Ctrl-C can actually be useful to terminate it.
Also Ctrl-Z does not mean undo, rather it means run the current program in the background. This is useful because running a program in an SSH terminal simply hangs your SSH input until the program is done. So typing Ctrl-Z while the program is running frees up the command line for more input. But if you accidentally hit Ctrl-Z while running an editor like nano, the editor will immediately exit to the command line. Don't worry though, it will not stop or lose your work. You can bring it back up by using the fg (e.g. 'foreground') command, like fg nano, and this will automatically bring your nano process back to the front.
Running a Program Automatically
For testing your program, you will certainly want to run it via SSH or via the Start button on the project page on the web interface until you are quite sure it runs well. However, eventually you will probably want the program to run without your input, either continuously, and starting at boot, or via a task scheduled to run to completion at certain times.
Both have their advantages and disadvantages. Usually, you would want to use the continuous, from-boot methods for event driven code that has to handle a wide variety of user input that could occur at any time. You would want to use the scheduled method when the SBC needs to perform a repeated task (e.g. reading sensor data) again and again. The main difference is:
- With the continuous (boot) method you can have any Phidgets (including sensors, LEDs, input switches, etc) attached and giving events to your code all the time, and
- With the scheduled (cron) method you have much less of a chance to run into long-term memory management and instability problems with any code you write, because your program runs for only a short time before exiting and getting cleaned up.
Via the Web Interface
To use this method, you must have created the program you want to run as a Java or ARM-compiled C project in the web interface. If you would like to use another language, or another way of uploading your project, but you still want to start at boot and run continuously, you will need to use a boot script.
In the web interface, go to the Projects tab, and click on the project you would like to run. Near the bottom of the project page (the one with the Start and Stop buttons at the top), there will be a section called Startup Settings. You can see a screenshot of the whole project page, including these settings, in the web interface project section.
Select the Enabled radio button. The other defaults should be fine, unless you specifically know otherwise:
- For Boot Order, lower numbers boot first. Booting later means more programs are available for use, booting earlier means other programs can use your program.
- Run as a daemon starts the program as a daemon, which is a program that runs in the background. Unless you have explicitly written your program as a daemon, leave this checked. (If you don't know what a daemon is, don't worry, you haven't written one, so leave it checked.) Unchecking this when your program is a normal program will cause the SBC to hang while booting.
- The Executable or Class name should be automatically sensed to be your main Java class
- Arguments are any command line arguments you need, just as you would type them into the command line
Note: Your program must be very, very stable to run properly via the web interface. Imagine your program running continuously for days, or months on end. Any memory leaks, over time, will render your program (and the SBC) unusable until a reboot. Counts or other variables that increase within your program and never reset may create a segmentation fault eventually.
If, for stability purposes, you want your program to start, run for a little while, and then exit so that the SBC operating system can clean up the memory each time, you'll probably want to use Cron to run your program instead.
Via Cron
Cron can automatically schedule programs - known as 'jobs', or 'cron jobs' - at most once per minute. Less often than that, it is very flexible, allowing you to run it on certain months, weekdays, hours, etc. Cron simply reads a special file (your crontab) and runs whatever programs are listed, with whatever timing they are listed with. The cron program runs all the time in the background, making it what is known as a Linux daemon, but the programs it starts as jobs run only as long as they naturally would, and then they exit.
If you need your program to run more often than once per minute, have the program schedule itself while still running. For example, to run every five seconds, run a fast loop, and sleep for five seconds. Do this twenty times and exit. Then schedule this once per minute using cron, and your program will in essence run every five seconds.
Setting up a cron job simply entails editing your crontab file.
First, you'll probably want to specify your default editor to be nano. Otherwise it will default to vi and you'll have to figure out vi in order to add lines to your crontab:
export EDITOR=nano
Then, to edit your crontab file, simply type:
crontab -e
Each line of the crontab file is one scheduled job. Lines that start with a hash "#" are comments and are ignored. There is an example line in the crontab, and a reminder line at the very end. Essentially, each line should contain:
minute hour dayOfMonth month dayOfWeek command
Where:
commandis the program you want to run (with absolute path, and arguments)- For example,
./myprogram argument1won't work, but/root/code/myprogram argument1will
- For example,
- Each time argument is either a number, a list of numbers separated by commas, or an asterisk
- For example, * * * * * means every minute for all days and months, 0,30 * * * * means every thirty minutes (i.e. at the top of the hour and at 30 minutes in) for all days and months
If you already have jobs scheduled, you'll see them in the file that comes up. You can edit, add, or delete.
After you save, you'll see a little message back in the terminal that says the new crontab file was installed, and it is now scheduled! Cron always starts every boot, and so if you have edited and installed your crontab as above, the scheduling of your program will start properly even after a reboot of the SBC. However, if you are having strange scheduling problems, you may want to familiarize yourself with the software details of how the SBC as a whole determines the current date and time.
My Cron Job Doesn't Work!
It is actually very common for a script or program to work on the command line but then not work as a cron job. The most common reason for this, by far, is that you specify relative paths in your program to access files rather than absolute paths. For example:
code/project.cis a relative path (bad for cron)/root/code/project.cis an absolute path (good for cron)
The cron jobs are not executed from your home directory, or your code directory, so they will not be using the same location you may be using to test your code. So always use absolute paths.
Another common reason is you may be using environment variables or other settings that are true in a terminal but are not true by default in the raw system. You can end up taking many things for granted in a shell, for example the shortcut "~" means home directory in a shell, but not by default in the raw system. The things that get loaded for a shell (but which are not present in the raw system) are:
- The settings loaded by
/etc/profile - Any settings in
~/.bashrc, which is nothing by default on the SBC
On a full Linux operating system, you would use the logs written to by cron to find the error output and debug it. On the SBC, however, cron does not write logs (otherwise, these logs would eat up the SBC memory very quickly even for routine jobs). For short-term debugging, you can write output from your program to a file, and read that file afterwards to figure out what your program is doing.
Via a Boot Script
If you want to run your program constantly and for it to start at boot like the web interface would do, you can install your program into the boot order using a script. This is a somewhat involved process, and you should be familiar with shell programming in Linux. For this process, we only offer a similar example which installs and runs the program phidgetwebservice21 within the boot sequence.
Using USB Data Keys
After plugging the USB key in, it won't just appear on your desktop, so to speak, so you'll need to figure out where you can read and write to it within the SSH directory structure.
The web interface program can help with this. After you plug a USB key in, it will show up under Status → System. Or, the USB key and all other attached devices can be seen at Status → USB:
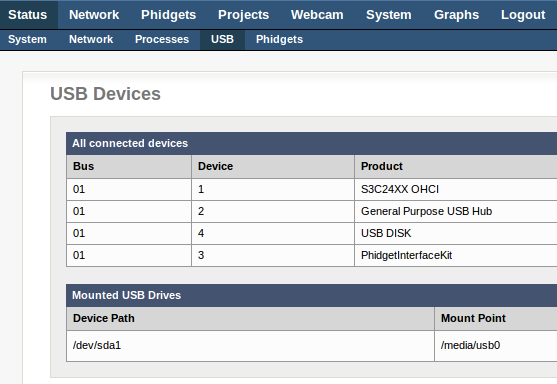
In the screenshot above, you can see that the USB key is located in /media/usb0.
Alternately, you can use the SSH command mount, and the searching program grep which will filter the response of mount and only return the lines with your search term (usb):
root@phidgetsbc:~# mount | grep usb
/dev/sda1 on /media/usb0 type vfat (rw,noexec,nodev,sync,noatime,nodiratime)
In this case, the USB key can be written to and read from using the /media/usb0 directory. Copying a file to /media/usb0 will copy a file to the USB key. The same goes for removing, renaming, opening files within your program, etc.
Note: Mount points like /media/usb0 should not be hard-coded into any of your programs. (See the Common Problems and Solutions section for more information.) If you need to obtain the mount point for a freshly mounted USB key within your code, have your code obtain the mount tables and search on the device (e.g. /dev/sda1 or /dev/sdb1) and obtain the corresponding mounted /media/usbN location, where N is a number 0-9.
Saving and Retrieving Data
This section covers getting data on and off of the SBC. There are two main methods of simply moving data on and off the SBC - via a USB key, and via copy over the network - and a third method for moving and installing data when it concerns backing up lower level system data.
Via a USB Key
After plugging in a USB data key, first you need to find out the location where that data key was mounted.
Let's say the location of the USB key is /media/usb0/, and we want to copy the file data.txt to the USB key. Your SSH session might look something like this, using ls and mount:
root@phidgetsbc:~# ls
data.txt
root@phidgetsbc:~# mount
tmpfs on /lib/init/rw type tmpfs (rw,nosuid,mode=0755)
proc on /proc type proc (rw,noexec,nosuid,nodev)
sysfs on /sys type sysfs (rw,noexec,nosuid,nodev)
udev on /dev type tmpfs (rw,mode=0755)
tmpfs on /dev/shm type tmpfs (rw,nosuid,nodev)
devpts on /dev/pts type devpts (rw,noexec,nosuid,gid=5,mode=620)
rootfs on / type rootfs (rw)
procbususb on /proc/bus/usb type usbfs (rw)
/dev/sda1 on /media/usb0 type vfat (rw,noexec,nodev,sync,noatime,nodiratime)
root@phidgetsbc:~# cp data.txt /media/usb0/
The cp program copies data from a source to a destination. The syntax is cp from to, where here we are copying from data.txt to /media/usb0/.
Caution: Even if there is no USB key mounted at /media/usb0/, this use of cp will still work with no errors! This is because there is still a file called /media/usb0/, there is just no USB key file system mounted to that point. So be sure to run mount or use some other method of determining that there is, in fact, a USB data key attached and where it is mounted to.
Over the Network (SCP)
SCP is a command line program already installed on Linux and Mac OS, and downloadable for free on Windows. We discuss it and give examples in the SSH section, but remember it here when you're trying to get data on and off of the SBC. With SSH or a terminal already open, you'll probably find it to be much faster and easier than dealing with a USB key.
Backing Up Your Data
For the web interface, you can save and restore all web interface settings under the System → Backup & Restore tab.
To save the settings of what packages are installed for later re-installation, you can type:
dpkg --get-selections > installedPrograms.txt
Then save the file installedPrograms.txt externally. If you have to completely wipe the SBC, you can just reinstall the whole list by moving the installedPrograms.txt file back onto the SBC, and then typing:
dpkg –set-selections < installedPrograms.txt
apt-get dselect-upgrade
Also remember to externally save:
- Your
~/.bashrcsettings file if you've changed it - Your
crontabfile if you've edited it - Any data files or code you've created
It is important to save these settings often, and at points where you know the system is running well. It may be tempting to create a backup right before you wipe the SBC and start from scratch, but often the reason you are having problems then is some setting or change, and backing these up and reinstalling them will only reinstall the problem.
To truly back the files up, you must copy them to an external computer or location using either a USB Key or over the network. Then they can be copied back if needed later.
If you are looking to restore data on an SBC that will not boot properly, you'll want to be in the partial recovery portion of our Troubleshooting section.
Troubleshooting
The SBC can be quite tricky to debug, because it is a complex and flexible computer. Common problems and solutions include:
- You can't find the SBC on the network at all - refer to the Initial Internet Setup section
- You have changed some setting or file such that the SBC doesn't run anymore, or doesn't run as expected - refer to the Recovery section
If you are having trouble using Phidgets on the SBC, you should go through the Troubleshooting section on the general Linux page. Some of the problems on the Linux page (such as library problems) are easier to fix by simply working through the Recovery section when they occur on the SBC.
Namely, it often helps to simply perform a factory reset on the SBC (save your files and installed program list first, as described here). Sometimes you change a file or setting within the operating system when you are trying to get something up and running, and this unintentionally affects other programs too. Performing a factory reset starts you with a clean slate.
If your problem doesn't seem to be fixed by these steps, or the information within this guide, please ask us!
Initial Internet Setup
To set up the SBC, you almost always need a wired Ethernet connection with DHCP (Dynamic Host Configuration Protocol), and without a firewall. This connection should be to a router, not directly plugged in to your computer.
Even if you do not have this type of a connection at home, these types of connections are very common at both offices and universities. On a Windows or Mac OS computer, you can bring up the Phidget Control Panel as described in the SBC's Getting Started Page. Failing this, or on a Linux computer, we discuss some alternate setup methods in this section. Keep in mind that without a wired, open DHCP connection these setup methods can be difficult and fickle.
No Wired-Only Connection
Sometimes it can work to plug the SBC, using Ethernet, directly into an Ethernet port on your home wireless router. Do not plug it directly into your computer! (Although in some instances, a direct connection can be made to work on Linux, see the No DHCP section below)
This direct-router method is a very picky process, however, and can fail because:
- Some home and office routers place a firewall between wireless connections (clients) and wired connections (the local area network)
- Some home and office routers do not by default allow both Ethernet DHCP and wireless DHCP.
- Some routers and DHCP hubs only provide access to an internet connection, and do not provide local area network inter-connections (this is common on mobile device tethering hubs)
Routers are quite complex, and even with admin privileges it can be a painstaking process to find all the right firewall settings to turn off in order to allow two computers on the network to talk to one another, rather than just connect to the internet. This is why university or office networks are often ideal for the purpose of setting up the SBC, because these institutions depend on computers on a local network being able to talk together. University libraries in particular can be a good source of wired DHCP connection ports.
Covering all of the different router configuration possibilities here, and how to change them to make the SBC work, is essentially impossible. If you try using the SBC at home or at work, the SBC does not work on the first try when plugged directly into the router via Ethernet, and you want to make that connection work rather than seeking out an alternate for the initial setup, you should find documentation specific to your router (usually available online) and properly configure it.
The good news is that if you can find an Ethernet DHCP connection just once for a short time, you can use that connection to configure the SBC to work on your home wireless network. During that initial connection, you can enable wireless and set up as many wireless DHCP connections (with passwords) that you need. Once wireless is enabled and set up, you can take the SBC home to your wireless router and the SBC will automatically seek out and connect to its remembered networks as they appear. At that point, you can also use wireless like a normal internet, web interface, and SSH connection.
No Link Local Addressing
If you have a wired DHCP connection, no firewall, and no link local addressing (e.g. bonjour or avahi is not installed) then you will need access to the DHCP router logs. From the router logs, you should see the connection (or attempted connection) by the SBC within the logs. From that log entry, you should either be able to determine the IP address for the SBC, or see what happens when the router blocks access. The IP address can be used in place of the link local address for both the web interface and for SSH.
No DHCP
The SBC will first try to use DHCP, but then it will revert to responding to a link local address under bonjour and avahi. If you are depending on this, please wait at least three minutes after the SBC boots for the SBC to fail in obtaining a DHCP connection and properly revert to link local addressing.
If you have a static IP setup, and want to use link local addressing rather than accessing the router logs, this should usually work by default on Windows and Mac OS (e.g. type the address such as phidgetsbc.local into a web browser). If it doesn't work automatically, there is not much you can do and you should seek out a wired DHCP connection elsewhere.
On Linux, it also should work by default, but you have the additional option of explicitly adding routes that look within the default network settings for the SBC. From a terminal (as root), type:
route add -net 169.254.0.0 netmask 255.255.0.0 dev eth0 metric 99route add default dev eth0 metric 99
You can also compile and use the phidgetsbclist.c example (use the provided Makefile, don't use gcc) in the Phidget Linux Libraries package, under the examples folder. This will allow you to see if the SBC is detected on the network at all. Note that to use this option you must have the Phidget Libraries and the Phidget WebService installed on your Linux computer - in-depth instructions to do this are on the main Linux page.
Recovery System
You can either boot the SBC into recovery mode and attempt to recover files and settings, or you can completely wipe the SBC by performing a factory reset. If the LEDs do not turn on normally (red on constantly, green on at first start, then off, then on when fully booted) then you'll want to read the hardware issues section.
Partial Recovery
The recovery system can be entered in two ways:
- From the
System → Backup & Restoreweb interface page. - By holding down the reset button for 20+ seconds - until the green light has switched from flashing slowly to flashing quickly.
The recovery system runs an SSH server where the username and password both are root.
If the main filesystem has been damaged/misconfigured in such a way that it won’t boot, you may be able to fix the issue or recover important files before running a full factory reset. From an SSH connection to the recovery system, you can mount the main root filesystem with the following commands (assuming it’s not damaged):
# For 1072 - PhidgetSBC2:
ubiattach /dev/ubi_ctrl -m 6

# For 1073 - PhidgetSBC3:
ubiattach /dev/ubi_ctrl -m 7

mount -t ubifs /dev/ubi0_0 /mnt
Factory Reset
This restores the kernel and root filesystem from backup, overwriting any changes that may have been made and completely wiping the system to the state that it got shipped in. (You can save your files and installed program list first, as described here.) This can be enacted one of two ways.
- Use the reset button:
- Enter the recovery mode by holding down the reset button for 20+ seconds as above (until fast flashing)
- Wait for a full boot (i.e. you can see it on the Phidget Control Panel, or can SSH with username and password as
root) - Hold down the reset button again, but this time for only 10 seconds (until slow flashing)
- Wait for the SBC to fully reset and reboot (at least three minutes) - the LED will turn off and on again when this occurs
- Note that after a factory reboot the SSH server will be disabled
- Also note that after a factory reboot the SBC creates new SSH keys, and reverts to the
phidgetsbc.localaddress
- Via the web interface, under
System → Backup & Restore → Go button, where you can follow the instructions
Hardware Issues
The LEDs are an indicator of the hardware working properly. The normal boot process is:
- Red LED: Turns on from moment of power being applied.
- Green LED: Turns on momentarily when power applied, then turns off momentarily, then turns on and stays on when booted.
If the green status LED never turns on (or fails to turn on the second time), the boot process is failing somewhere. This could be due to:
- A damaged OS - Try performing a Factory Reset
- If this fails, it is likely hardware damage (very difficult to diagnose, please contact us)
If neither LED turns on, hardware damage is even more likely. Unless the path to the red LED is the one thing that has been damaged, the device is likely not receiving and using power.
- Try performing a Factory Reset, and if that does not work please contact us
USB Issues
On the Phidget SBC2, there is a hardware issue that is unrelated to the LEDs. It is a USB problem, and manifests in many ways:
- Strange behaviour when some devices but not others are plugged in to the SBC
- Strange behaviour with combinations of devices
- Failure (or intermittent failure) to see Phidgets on the USB hub, or USB keys on the hub
This problem is fixable, either on your own or by sending your SBC back to Phidgets. For an in-depth solution, see the SBC2 Hub Fix Page.
Updating Your SBC
If you've owned your SBC for a while and want to update your packages, you can run:
apt-get update
apt-get upgrade
...to update your software source list and then upgrade to the latest version of all installed software. If you are used to Mac OS or Windows, note that this does not just update the non-kernel parts of the operating system, it updates every additional piece of software you have installed.
To update the SBC software itself (e.g. the kernel), it is easiest to use the web interface, under System → Backup & Restore → Go button, to enter a page that will give you the option to update. You will need to have an update file on a USB key inserted into the SBC, of type:
- UBI Image (system_ubi.img), or
- Kernel image (uImage), or
- Phidget Upgrade package containing both UBI and Kernel images (phidgetsbc*.bin)
These are either obtained from the Phidgets website, or are a custom kernel / filesystem that you can create yourself, if you are experienced.
The reason why this information is in troubleshooting is that you should certainly back up your system before trying this. And, it is quite rare to need to upgrade the kernel or filesystem on the SBC, so something serious should be going on before you attempt it. Try using the recovery system first.
Programming Languages
Now that you have the basic libraries installed, you can pick your language and begin programming!
If you are not using the webservice to control a Phidget over a network, your next step will be to delve into the use of your specific language. Each page has its own set of specific libraries, code examples, and setup instructions.
On SBC Linux, we recommend the following languages:
These languages may also run on the SBC, but we do not yet directly offer SBC support for them:
You can probably figure out how to install and use them by a combination of the language pages linked above, and the section on installing other languages on the SBC.
WebService
The SBC comes with the Phidget WebService installed, and the SBC automatically starts the WebService at boot.
To practice using the WebService, and to learn more about it, we have hands-on examples on the general Linux page, starting in the using the WebService section.
Advanced Uses
Shutting off USB ports to save power
The SBC3 has an on-board USB hub that can control power to the ports. To do this unbind and rebind the USB drivers.
To turn off the ports echo "1-1" >/sys/bus/usb/drivers/usb/unbind
To turn on the ports echo "1-1" >/sys/bus/usb/drivers/usb/bind
These will also cause detach and attach events for the Phidget devices, respectively. While the drivers are unbound, you will not get any hot plug events for any devices on USB.
Using a Touchscreen
Please note that this will ONLY work with an SBC3 since it has a USB 2.0 hub:
Using a touchscreen with the SBC is a great way to get user input and visual feedback from an SBC otherwise devoid of visual output. The SBC does not have any conventional display ports such as VGA, DVI, or HDMI but it does have a number of USB ports and USB displays do exist. With the upgrade to a USB 2.0 hub on the SBC3 from the earlier models which had USB 1 hubs the SBC now has enough capability to operate a screen over USB. We don't recommend running a standard desktop environment since the processor is too slow to really keep up with a typical desktop it does make for an excellent interface for a kiosk, instrumentation control panel or other, similar use case. This document is going to go through the process of enabling support for a typical USB display as well as installing a fairly compact desktop environment called xfce on the SBC.
The screen I will be using is from a company called Lilliput. Specifically a UM-70 model. Before you begin, please make sure that you have the screen plugged into the SBC, it will also be useful to have a spare USB keyboard and mouse handy as you will need them once you are no longer using an SSH terminal to communicate with the SBC.
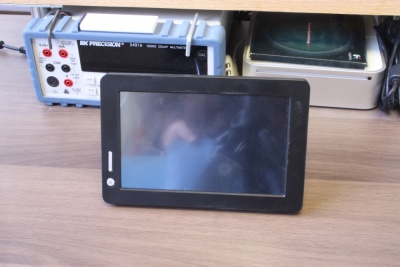
Getting the display to function
Begin by logging into the web configuration page for your SBC and upgrading all of the packages on the SBC. Be sure to include the full Debian package repository. For more information on how to do this refer to the getting started section of the Phidget SBC documentation. Once you are fully up to date open an SSH session with the SBC and navigate to the "/etc" folder. Open inittab with a terminal-based text editor such as nano and add the following to the bottom of the file, just above the T0:23:respawn:/sbin/getty -L ttyAMA0 115200 vt100 line:
1:2345:respawn:/sbin/getty 38400 tty1
2:23:respawn:/sbin/getty 38400 tty2
3:23:respawn:/sbin/getty 38400 tty3
4:23:respawn:/sbin/getty 38400 tty4
5:23:respawn:/sbin/getty 38400 tty5
6:23:respawn:/sbin/getty 38400 tty6
Now reboot your system. After a few minutes you should see the LCD screen come up with a standard Linux terminal interface and a login prompt. This is all well and good but this isn't really appreciably better than simply using an SSH session to communicate with the SBC.
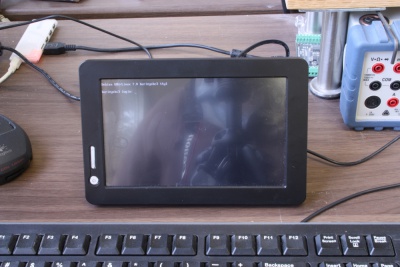
Setting up Xfce
In order to get a traditional windowing environment we still need to install a desktop manager as well as a number of supporting packages. Log in and make sure everything is still up to date with:
apt-get update
Then install the following packages:
apt-get install xserver-xorg lxde xfce4
If the SBC asks you if you want to continue, just type "Y" and press enter.
This will install the xfce desktop environment and any other necessary programs on the SBC. When it's done, restart the SBC. When it boots back up it should boot directly to a login screen instead of the terminal interface. Log in, and you are good to go. It won't be particularly fast, but don't worry, the SBC does not have a dedicated video processor on it so it's perfectly normal for it to be slow. What's important is that it works.
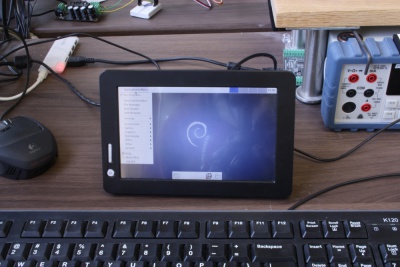
Calibrating the touch screen
Unfortunately, by default the screen is calibrated to believe the bottom of the screen is on the right hand side. This has the effect of making the touch functionality more or less useless until it has been properly calibrated. To do this, install the following package:
apt-get install xinput-calibrator
Now use xinput calibrator to measure the parameters of your screen. Launch xinput calibrator (called Calibrate Touchscreen in the programs menu) and follow the instructions on the screen. The screen should now be functioning at full potential.
Using a Different Wireless Adapter
The support for the wireless adaptor that Phidgets sells is written into the SBC kernel. Hence, we do not support using other adaptors.
However, Linux is very flexible, and it is possible (though not easy) to write a custom kernel for the SBC and add support for a new wireless adaptor. We can't help you with this, but we do provide some basic guidelines for building your own kernel. You can also have a look at our thoughts on our own experience with choosing a Wifi adapter: Alternative Wi-Fi Adapters on the SBC.
Using a Different Webcam
In addition to the webcam that Phidgets sells, you have the option to use many different webcams with the SBC. There is a long list of compatible webcams.
The common thread for these webcams is that they use UVC - the USB Video Class - drivers for Linux. You can then use mount to find out what video device your webcam is mounted under.
Taking Pictures With the Webcam
Probably the most straightforward way to use a webcam for pictures rather than video is to use the opencv library. You can get it by:
apt-get install libcv2.1
If there is no libcv2.1 package, you can perform apt-cache search libcv to find the current version.
The opencv libraries can also be used within Python, by installing the link between them:
apt-get install python-opencv
Then taking pictures from within code becomes quite simple. For example, in Python, taking and saving an image is four lines:
#! /usr/bin/python

import cv

# The webcam is located at /dev/video0
# OpenCV only needs the number after video
webcam = cv.CaptureFromCAM(0)

frame = cv.QueryFrame(webcam)

cv.SaveImage("image.jpg", frame)
For the complete OpenCV documentation, see The OpenCV Reference, and specifically the section on reading and writing images.
Note: The SBC is probably not as powerful for image processing and transport when compared to your desktop computer. Try running your image processing code on the SBC from an early point in development. During those test runs, you can visit the first System page of the SBC Web Interface to check the processor and memory use. For more information on processor power, check the specification for your SBC (on the product page on our main website) as well as our discussion of pushing processor limits below.
Checking System Logs
The SBC maintains two logs: a kernel log and a system log.
The kernel log is for low-level occurrences, such as devices attaching and leaving the USB hub, recording what drivers are being used, and so on.
The system log (syslog) is for normal chatter from the operating system. Any program with the right permissions can use it (though you need to know the method to write to it, information all around the Internet can help) and it contains everything from the Ethernet going up and down, to webserver requests, and so on. If you don't run many programs or services on the SBC, the syslog will essentially be a mirror of the kernel log, because the kernel is the only thing talking.
You can check these logs by using the web interface in the System → Logs tab.
Or you can perform more powerful filtering and displaying via an SSH terminal. For example, dmesg is the command to display the kernel log, and tail prints the last ten lines of input. So, if you are trying to see if you can get a device to be detected on USB, you can run dmesg | tail to print the latest ten lines of kernel log data.
The actual locations of the log files (for filtering and reading) are:
/var/log/syslog/var/log/dmesg
But don't edit them directly! Always follow the advice and procedures around the Internet on how to properly log items to syslog.
X Forwarding
Although most tasks can be done using the SBC Web Interface or SSH, you can also set up X11 forwarding on the SBC. X11 is the window manager base, which provides a graphical windowing system on the SBC. Although you probably won't connect directly to the X11 manager (i.e. by plugging a screen directly into the SBC), X11 also gives a user the ability to forward graphical windows over SSH. You will need the following packages installed:
x11-commonxbase-clients
After installing, make sure that the line in /etc/ssh/sshd_config has a line that says:
X11Forwarding yes
Then log out and log back into the SBC. This second time you log in, use the -X switch to turn on X forwarding for that connection:
ssh -X root@phidgetsbc.local
Then you should be able to run programs that launch a window, and it will launch remotely and appear on the computer you have the SSH connection from.
Pushing Processor Limits
The SBC, though more powerful than many embedded computers out there, is probably about as powerful as your smartphone. If you hook up 1 ms Phidget sampling devices to all six of its USB ports, events and packets will probably get lost. The exact data rates you can accomplish depend on:
- What else is running on the SBC
- How efficient your code is for external operations (like File I/O)
- Other minor details (e.g. the temperature of the SBC, etc)
If you want to achieve data rates as fast as possible, try these tips:
- Program in C, not in an interpreted language (Python, Java, .NET)
- Perform file I/O as little as possible. Locally cache data, manage your writing to a file in a separate thread, and use low-level write calls.
- Change the filesystem to a faster, non-compressed file system.
- Alternatively, use a high-data-rate USB key.
- Keep other running processes to a minimum.
- If you are running code locally right on the SBC, turn off the Phidget WebService.
Custom Kernel and Filesystem
You can compile your own kernel and flash it to the board. It is left up to the user to configure an appropriate cross-compiler for kernel development. You may also be able to compile a new kernel on-board. We have a kernel development kit, complete with patch file and README:
Compiling a new, custom kernel is somewhat complex. If the SBC is your first experience with Linux, writing a custom kernel will be difficult. However, it will probably also be very rewarding because you can put whatever you like into it. We might be able to offer additional suggestions, but ultimately you're on your own here.
You may be able to write a custom kernel right on the SBC, but the easiest way is to develop the kernel on an external computer. And the easiest way to develop on an external computer is for that computer to also be Linux, even just in a Virtual Machine. The time spent loading a copy of Linux into a virtual machine (such as VirtualBox, which is free) onto your computer will probably be less time than setting up a standard compiler on Windows to cross-compile.
On your external Linux system, you will need:
- A cross-compiling toolchain for the ARM processor, which we briefly describe on the main Linux page, and
- The SBC Kernel Development Package from the Phidgets website.
The kernel development kit has a brief README file which describes how to obtain the proper kernel and patch, configure, customize, and build it.
We have an application guide in progress, which walks through building a custom kernel to add Bluetooth support to the SBC. Please contact us if you would like more information. Even if you are trying to add support for hardware other than a bluetooth modem, or wondering if support even exists in the kernel for your modem (3G, alternate wireless, etc) you will probably find the application guide helpful. Follow it up to the point where you run the program menuconfig (you don't need an SBC to do this), which will give you a menu of all drivers you can enable in the SBC kernel.
After making your new kernel, you should have a uImage and modules target for your Makefile. At this point you can transfer your kernel files onto the SBC, make their targets, and transfer them into the nand memory. This involves erasing the old kernel, flashing the new kernel, installing the new kernel modules, and rebooting. From the SBC, in the kernel directory:
make uImage; make modules
flash-eraseall /dev/mtd3
nandwrite -p /dev/mtd3 arch/arm/boot/uImage
make modules-install
reboot
Custom kernels can also be flashed from the Recovery System.
If you need to create a root filesystem image, the filesystem type is UBIFS, and the commands to create it are:
For SBC2:
mkfs.ubifs -m 2KiB -e 126KiB -c 4050 -r $ROOTFS/ system_ubifs.img
ubinize -o system_ubi.img -m 2KiB -p 128KiB -s 512 ubinize.cfg
Where ubinize.cfg contains:
# Section header
[rootfs]
# Volume mode (other option is static)
mode=ubi
# Source image
image=system_ubifs.img
# Volume ID in UBI image
vol_id=0
# Volume size
vol_size=64128KiB
# Allow for dynamic resize
vol_type=dynamic
# Volume name
vol_name=rootfs
# Autoresize volume at first mount
vol_flags=autoresize
For SBC3:
mkfs.ubifs -F -m 4KiB -e 248KiB -c 4000 -r $ROOTFS/ system_ubifs.img
ubinize -o system_ubi.img -m 4KiB -p 256KiB ubinize.cfg
Where ubinize.cfg contains:
# Section header
[rootfs]
# Volume mode (other option is static)
mode=ubi
# Source image
image=system_ubifs.img
# Volume ID in UBI image
vol_id=0
# Volume size
vol_size=83MiB
# Allow for dynamic resize
vol_type=dynamic
# Volume name
vol_name=rootfs
# Autoresize volume at first mount
vol_flags=autoresize
You then flash ‘system_ubi.img’ (not ‘system_ubifs.img’) from the recovery system.
Again, like the custom kernel creation, the need to create a custom root filesystem is essentially non-existent except for those advanced users who already know they need it... and furthermore, you are almost entirely on your own.
Saving a file system to flash to multiple SBC's
You may want to create a complete backup of your SBC root filesystem, which can then be flashed to other SBCs. This is how it could be done:
You will need a USB drive - we have had issues using cheap flash drives, so a real USB drive is recommended. Make sure it's empty, as it will be reformatted.
All of these commands are executed on your SBC, while logged in over SSH.
First, re-format the USB drive as ext3. Assuming the USB drive is sda and has a single partition:
umount /dev/sda1
mkfs.ext3 /dev/sda1
mount -t ext3 /dev/sda1 /media/usb0
Then, remount / as readonly, so it doesn't change as we're copying it. To do this, we need to kill all running processes except sshd:
service udev stop
service ifplugd stop
service rsyslog stop
service avahi-daemon stop
service phidgetwebservice stop
service ntp stop
service busybox-httpd stop
service dbus stop
service cron stop
pkill dhclient
mount -o remount,ro /
If the remount says that / is busy, do a 'ps auxww' and 'pkill' anything else that may be running until it remounts properly.
Then, copy / to the flash drive:
mkdir /media/usb0/root
mount --bind / /mnt/
cp -a /mnt/* /media/usb0/root/
Then, clean up the copy - removing files specific to this board. We also remove the APT cache to save space.
find /media/usb0/root/var/log -type f -print0 | xargs -0 rm -f
rm -rf /media/usb0/root/var/lib/apt/lists/*
mkdir /media/usb0/root/var/lib/apt/lists/partial
rm -f /media/usb0/root/var/cache/apt/*.bin
rm /media/usb0/root/etc/udev/rules.d/70-persistent-net.rules
rm /media/usb0/root/etc/ssh/ssh_host_*
then, create the ubinize.cfg file:
For SBC3:
cd /media/usb0
cat > ubinize.cfg << EOF
[rootfs]
mode=ubi
image=/media/usb0/system_ubifs.img
vol_id=0
vol_size=83MiB
vol_type=dynamic
vol_name=rootfs0
vol_flags=autoresize
EOF
For SBC2:
cd /media/usb0
cat > ubinize.cfg << EOF
[rootfs]
mode=ubi
image=/media/usb0/system_ubifs.img
vol_id=0
vol_size=64128KiB
vol_type=dynamic
vol_name=rootfs
vol_flags=autoresize
EOF
NOTE: you may need to increase vol_size if your filesystem is larger.
then, create the UBI image from the copy:
For SBC3:
mkfs.ubifs -F -m 4KiB -e 248KiB -c 4000 -r /media/usb0/root /media/usb0/system_ubifs.img
ubinize -o /media/usb0/system_ubi.img -m 4KiB -p 256KiB ubinize.cfg
For SBC2:
mkfs.ubifs -m 2KiB -e 126KiB -c 4050 -r /media/usb0/root /media/usb0/system_ubifs.img
ubinize -o /media/usb0/system_ubi.img -m 2KiB -p 128KiB -s 512 ubinize.cfg
then, unmount the drive to ensure everything is written out properly:
umount /dev/sda1
Then, you can remove the /root/ folder and system_ubifs.img. system_ubi.img can be flashed to other SBCs using the recovery system.
Software Details
For even more advanced uses of the SBC, it may help to know the gritty details of the SBC software system.
- Operating System
- Debian/GNU Linux
- Kernel 2.6.X or higher (generally kept up to date with latest releases, use
uname -rto check the kernel version)
- Main Filesystem (rootfs)
- UBIFS (a raw flash type of file system)
- Mounted in a 460 MB Nand partition (in Read/Write mode)
- Kernel
- uImage format
- Has its own 3MiB partition on bare Nand
- Web Interface Scripts and Configuration Data
- Located in
/etc/webif - Modifying these scripts can be done; however, it is very easy to enter invalid data that could cause the system to behave unexpectedly or not boot.
- User Applications uploaded through Web Interface
- Located in
/usr/userapps
- Webcam Device Location
/dev/video0- Numbers increase with more webcams
- Date and Time
- Set using ntp (network time protocol) at boot
- The ntp daemon continues to run in the background and will periodically update the clock
- The network keeps the SBC very close to real time
- Also there is a real-time clock with battery backup which will preserve date/time across reboots, power removal
- The real-time clock is synced to system time during reboot/shutdown
- If power is unplugged suddenly, and the network not restored, the real-time clock may not have the correct time
- Wireless Networking System
- Wireless adapter support for the wireless adapter that Phidgets sells is written into the kernel
- It supports WEP and WPA
- It is best configured through the configuration interface.
- Nand Layout
- The board contains 512MiB on Nand. This nand is split into 7 partitions as follows:
- 0: u-boot size: 256K Read Only
- 1: u-boot_env size: 128K Read Only
- 2: recovery_kernel size: 2M Read Only
- 3: kernel size: 3M Writable
- 4: flashfs size: ~3.625M Read Only
- 5: recovery_fs size: ~ 43M Read Only
- 6: rootfs size: ~ 460M Writable
- The final size of flashfs/recovery_fs/rootfs depends on the image size at production, and on the number/location of bad blocks in the NAND.
- Note: U-Boot and recovery kernel and filesystem cannot be written from Linux - this is a safety measure.
- Boot Loader
- U-Boot is used for setting up the processor and booting Linux, and is only accessible via a serial connection.
- Normal users will not need to use or modify it.
- Be very careful when modifying the u-boot partition. If it is damaged or overwritten, it is difficult to fix.
- When using U-Boot, a prompt will appear via serial shortly after power on.
- The environment variables will help you determine how to boot Linux on the SBC
- You can also refer to the U-Boot documentation
- Boot Process
- From power on...
- 1. Processor loads first 4 bytes from NAND into Steppingstone and runs it.
- 2. Steppingstone sets up RAM, copies u-boot from NAND into RAM and runs U-Boot.
- 3. U-Boot initializes the processor, sets GPIO state, etc., copies the linux kernel into RAM, sets up the kernel command line arguments, checks that the kernel image is valid, and boots it.
- 4. Linux boots, bringing up USB, Networking, NAND, etc. and then mounts the rootfs NAND partition on /.
- 5. init gets run as the parents of all processes, as uses the /etc/inittab script to bring up the system. This includes mounting other filesystems, settings the hostname, and running the scripts in /etc/init.d, among other things.
- 6. inittab then turns the green LED on.
- 7. inittab then sets up a getty on the first serial port, ready for interfacing using the debug board.
Common Problems and Solutions
PHP Curl: Curl doesn't install smoothly
There is an issue with the embedded version of PHP5.3, try forcing it to install the specific version that you need. This can be done with the following command:
apt-get install php5-common=5.3.3-7+squeeze14
FTDI Errors: FTDI adapters do not appear to work with the SBC
The 3.1.6 version of the Linux kernel which is used on some versions of the SBC has a bug that causes issues with FTDI drivers and makes them malfunction. To solve this problem you must upgrade the kernel to a newer version. You can find the files here.
USB Memory Key mounting: Sometimes USB Memory Keys mount at more than one location
When you insert a memory key, the SBC will load it as a device (e.g. /dev/sda1) and it will also mount the key for reading and writing within the /media/ directory. The /media/ directory version will be called something like usb0.
At times, an inserted memory key will get mounted in more than one location. You can observe if this occurs by checking the currently mounted devices with the command mount:
root@phidgetsbc:~# mount
tmpfs on /lib/init/rw type tmpfs (rw,nosuid,mode=0755)
proc on /proc type proc (rw,noexec,nosuid,nodev)
sysfs on /sys type sysfs (rw,noexec,nosuid,nodev)
udev on /dev type tmpfs (rw,mode=0755)
tmpfs on /dev/shm type tmpfs (rw,nosuid,nodev)
devpts on /dev/pts type devpts (rw,noexec,nosuid,gid=5,mode=620)
rootfs on / type rootfs (rw)
procbususb on /proc/bus/usb type usbfs (rw)
/dev/sda1 on /media/usb0 type vfat (rw,noexec,nodev,sync,noatime,nodiratime)
/dev/sda1 on /media/usb1 type vfat (rw,noexec,nodev,sync,noatime,nodiratime)
You will note that the same device (/dev/sda1) is now mounted at both /media/usb0 and /media/usb1. To fix this problem as it occurs, you can use umount (notice there is no letter 'n') to unmount the second instance:
root@phidgetsbc:~# umount /media/usb1
In practice, this should not be a problem, because writing to or reading from either usb0 or usb1 will have the same effect on the memory key. However, if you hard-code a media location into your program (i.e. expecting /media/usb0 to be the first USB key you insert and /media/usb1 to be the second key) your program will sometimes work and sometimes fail.
To get around this within code, find the mount point for each device as it appears. The devices, such as /dev/sda1 will always refer to the actual memory key. But, they cannot be written to directly without being mounted, so you will have to parse the mount table (what is returned from mount) within your code to find the device and its corresponding mount point.
This is a problem with the standard embedded Debian automount program, and we have no known fix.
Perl Locale Errors on SSH: No Locales Installed
By default, no locales are installed on the SBC. If you use apt a lot to install and manage your software on the SBC, you will get messages like this:
perl: warning: Setting locale failed.
perl: warning: Please check that your locale settings:
	LANGUAGE = (unset),
	LC_ALL = (unset),
	LANG = "en_CA.UTF-8"
    are supported and installed on your system.
perl: warning: Falling back to the standard locale ("C").
locale: Cannot set LC_CTYPE to default locale: No such file or directory
locale: Cannot set LC_MESSAGES to default locale: No such file or directory
locale: Cannot set LC_ALL to default locale: No such file or directory
To squelch these messages, you should install and reconfigure your locale like this:
apt-get install locales
dpkg-reconfigure locales
The last command will show you a long list from which you should pick your location, by language. For example, en_CA is english_Canada. Here in Calgary, we use en_CA.UTF-8 and so for the first question we would input locale "114" and for the second (system) question we would input en_CA for the locale.
This might give you a locale undefined error, in which case you can generate the locale (for us, again, it is en_CA):
locale-gen en_CA