Weatherproofing Phidgets
A five-part article on weatherproofing Phidgets for outdoor applications
by Kat
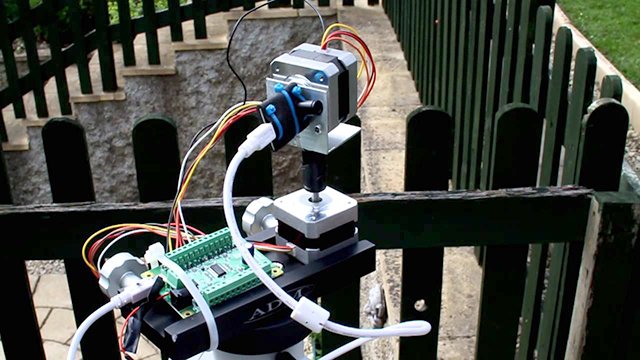
There are many instances where Phidgets might get stuck outdoors: weather stations, RC vehicles (quadcopters, underwater vehicles, robots, etc), outdoor installations, and applications we haven't imagined yet. One specific example of Phidgets in the outdoors is this giant drum machine.
In this series, we explore how to protect Phidgets from outdoor conditions, like rain and dust. In this post, we look at the basics of enclosures and connectors. In future posts, we'll expand on this to look at special considerations for certain Phidgets, like humidity sensors and infrared sensors.
The greatest risk of putting Phidgets (and electronics) outside is water, i.e .rain and humidity. Dust is another culprit, posing signifiant problems for electronics (increasing insulation, holding static charge, holding water thus increasing humidity), especially in the long term. Most of the weather-proofing solutions offered will apply to dust and water, with some noted differences.
Temperature is another condition to be aware of. Operating temperatures for each device are given on the product pages. Interface boards (like the SBC3 and 8/8/8) operate within 0˚C and 70˚C, and sensors operate in both wider and narrower ranges. Solutions for maintaining ideal operating temperature will be covered in next week's post.
Part 1: Selecting the Right Connector and Enclosure
First, consider the application and your budget. Like most things in life, the better solution is going to be more expensive. Think about the length of time the Phidgets will spend outdoors (a weekend, a few months, or several years). Consider all the possible weather conditions that they could endure during this time. How reliable do your results need to be?
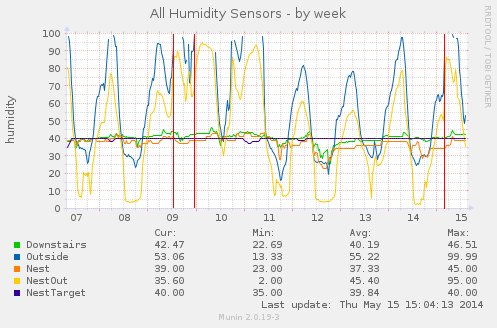
Patrick set up some sensors in and around his home to monitor temperature and humidity. He considered this a bit of a whim and didn't want to spend too much money on the setup. He placed a Phidgets Temperature/Humidity Sensor under a protrusion of wood (as seen to the right). This setup has been working for five years, but not without consequences. In the graph below, the blue line is the humidity read by the Phidget whereas the yellow line is humidity information that the Nest has pulled off the internet. After five years of being outside, an offset has developed in the Phidgets' data. As a result, every time it rains (marked by red vertical lines in the graph) the Phidget fails to give humidity data. Calibration can be done in the software to correct the error, but it's not always practical to do so. The temperature sensor seems to have held out better (no graph displayed).
In order to understand weatherproofing, let's talk about International Protection Marking, or IP codes, which you'll see a lot when looking into weatherproof connectors and enclosures. These codes rate the degree of protection provided against intrusion, from casings that only protect against large objects such as a human body parts (IP10) to being hermetically sealed from all particles (IP68 and greater). The first number of the rating gives you the solid ingress protection and the second number gives the liquid ingress protection. You probably don't need a hermetically sealed container for all applications, especially if your sensor needs to be exposed to the air. Here are a few examples of the IP codes (and their respective NEMA ratings, which you could also see) that you might need in various situations:
- IPX3 would be the minimum code you could use, granted you're in a fairly clear-air environment. (The first digit can be anything) This protects against large body parts as well as water falling as a spray at any angle of up to 60˚. You might need to go down this low if you're using Phidgets that need to be exposed to the air (i.e temperature and humidity sensors). (There is no equivalent NEMA rating).
- IP53 could be used in a dusty environment for the Phidgets that need to be exposed to air. The liquid protection is the same as above, but it offers more protection from dust as to not interfere with the operation of equipment. A NEMA3 rating will provide slightly more liquid protection.
- IP64 is good for protecting electronics so long as the casing is not going to be submersed in water and won't be subjected to heavy storms. These items will be dust-tight and protected against splashing water. Usually it's the connectors and interconnects that have an IP64 rating, whereas most cases and enclosures start at IP65 if you're looking for something dust-tight. (There is no equivalent NEMA rating.)
- IP65 could sustain a storm (save tornadoes, hurricanes and the like). A NEMA4 or 4X rating is the same thing.
- Once you start building submerssibles, you'll be looking for IP68 or greater. The manufacturer will specify the depth their product is tested to. This is equivalent to a NEMA6P rating.
There are a few more varieties of IP codes, so it's worth looking at the Wikipedia entry about them. Not everything will have an IP code or NEMA rating, but some products will say things like “environment resistant” or “weathertight”. All this means is that it hasn't been tested to the specifications of a specific rating, so choose accordingly. No matter what IP rating you decide you need, there's still going to be a number of options, here's a few things you can choose from, and their advantages and disadvantages.
For enclosures:
- Pelican cases are durable, watertight, dust proof, and crush proof (starting with IP codes of IP54).
They're used by the military and in tons of outdoor applications. They're great if you'll be accessing the contents
on a regular basis. While they are not temperature regulated, we've found that with the foam and the heat generated
by a running SBC, that's enough to keep the temperature above the necessary 0˚C, even when operating in a nearly -30˚C
environment (tested over five months). Pelican makes a range of sizes, and prices start around $35 for new, but you
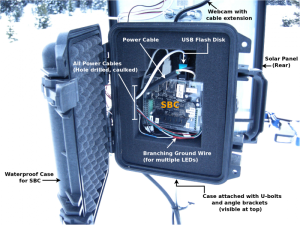
can find used cases for less online. Phidgets put a weather station out in Kananaskis and chose a Pelican 1200 case
for it since we'd be switching USBs on a weekly basis and needed some insulation.

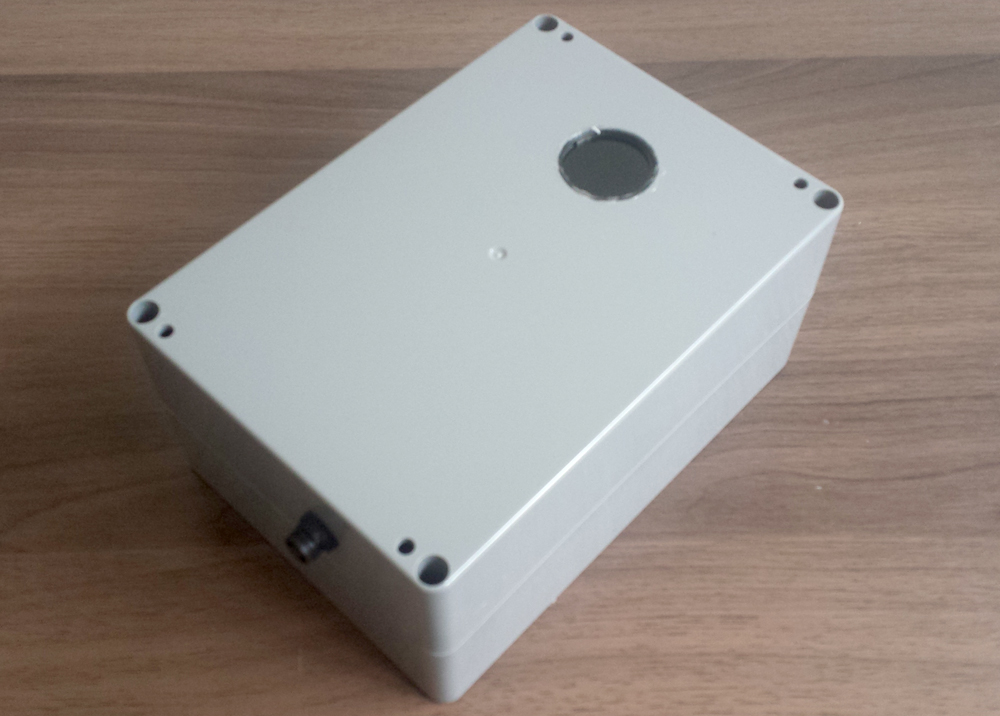
A Pelican case installed in a Kananaskis weather station to house an SBC - Various manufacturers found on Digi-Key make plastic, polycarbonate and/or ABS boxes with IP54 ratings and above. These boxes sport features like PCB support, hinged doors and mounting ability. They come in a variety of sizes as well, but for 99% of them, you will have to figure out your own insulation. Some boxes provide semi-permanent enclosure (no easy access to the contents once it's installed). A practical sized box will start around $3.25, but for a decent enclosure, you're probably looking for something that starts at $25. There's a lot to choose from, although you'll spend some time browsing to find what you need.
It's wise to put a desiccant in the case to absorb any moisture. You'll need 5 grams of desiccant per gallon of space. You will not need to replace the desiccant if you aren't re-opening your container. If you do re-open your container, you'll need to replace the desiccant when it has absorbed all the moisture it can (which will depend on your air quality and frequency of re-openings). Digi-key sells desiccants, but if you're not looking for 150 packets, then you can find something small and cheap on Ebay.
For cabling
Cabling itself does not pose a problem, but it's important to realize that because we need to run cabling into and out of the enclosures, that cabling “pass-through” is going to create a place for dust and water to enter the enclosure. If everything were wireless, we wouldn't need to worry about connections and putting holes in boxes, but the fact is we do.
Even when using an SBC, you'll have to connect an external power supply, that will likely be located outside of the enclosure.
In general, we would recommend only passing sensor cables through connectors (unless you're using USB couplings, mentioned later). Trying different strategies out for ourselves, we found the USB cables difficult to work with. For one, USB cables have five connections, as opposed to the three of a sensor cable, which means more soldering or crimping work, and more places for problems to arise. Because of how small most connectors are, having less wires is definitely an advantage. It's also difficult to attach the shielding of a USB onto the connectors, which can compromise the performance of the cable and risk crashing the Phidgets. Not to mention, USB cables have a maximum length of 5 meters (3 meters for slower speed data transfer), which means that you're going to need a computer fairly close to the enclosure. Luckily, a lot of sensors work over long sensor cables, allowing you to put the outdoor installation farther away from the computer running your program than if you use USB cables.
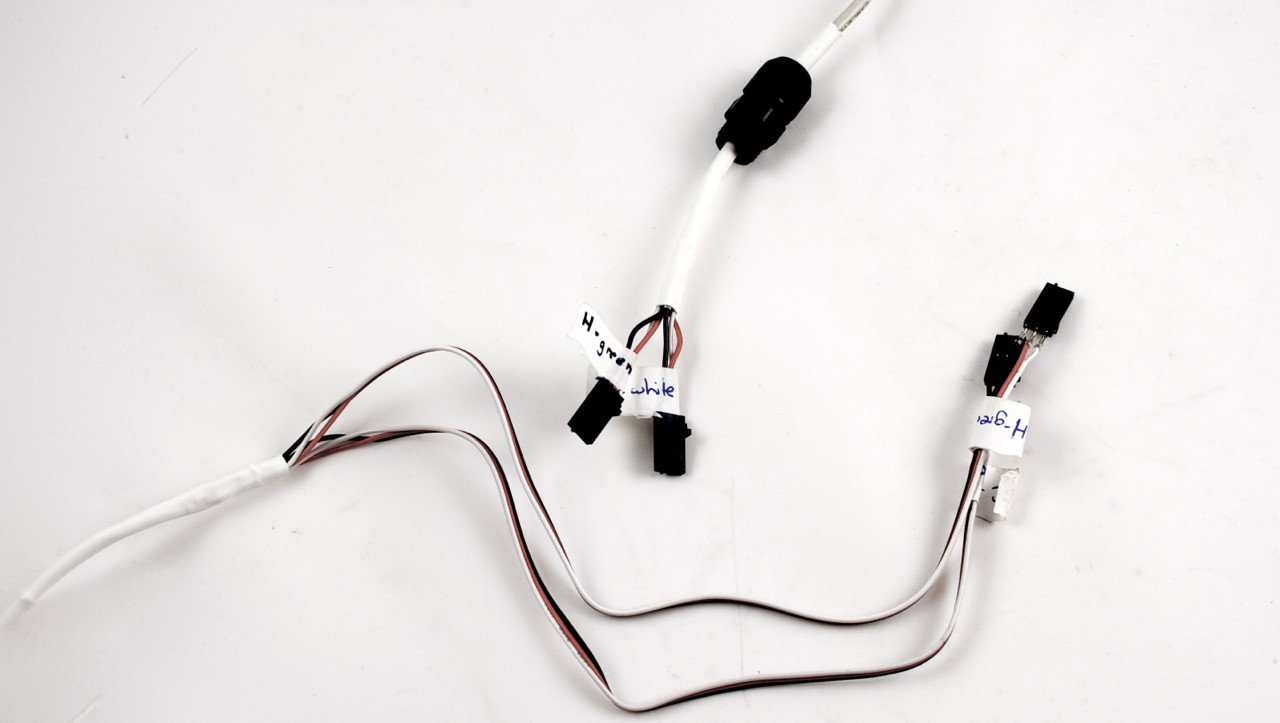
Phidgets sensor cables can run outdoors, but the problem they pose is being oddly shaped, so as to not fit tightly in connectors. A relatively simple fix is to run the sensor cable through a USB cable (get instructions on the Phidgets blog), which is round and will seal off nicely when run through a hole or cable grip. When doing this, you don't have to worry about the shielding in the USB cable.
For connectors:
- USB Circular Couplings range in price from $15 to a whopping $178. Even the ones on the lower end of the price spectrum can offer IP67 ratings. These are especially easy to use. Just install the the female connector into your weatherproof case and plug the USB cable from the Phidget in.
- Cable grips and cable glands range in price from $0.35 (for polyamide and plastic) to $130 (for brass and metal). You can also get grips made of Nylon and various other materials. Even the dollar-priced grips can have an IP68 rating so this is a really affordable way to protect the cable connections. Unlike circular connectors, you don't have to deal with delicate soldering. The downside is that you will need to cut the cable and re-solder it in order to get the grip around it. This is not always going to be ideal.
- Circular connectors (also called MIL spec connectors) cost anywhere from $15 to $50 for each side of the connection. Look for ones with crimp terminations. The circular connectors are particularly useful if you plan on taking them down and setting them up repeatedly, if you are using a semi-permanently sealed container and/or if you need to change the connections. They're also quite handy if you're not using standard cables. The downsides are that they are difficult to install, pricier and prone to wear if you plan on plugging and unplugging frequently.
- 100% silicone caulk offers a really cheap and readily available solution. If applied properly, it will seal out moisture and hold up in direct sunlight and temperature extremes for a time. However, after a couple of years it will start to peel and lose its bond. If you want to replace any cables, you'll have to deal with removing the seal. Also, the weatherproofed-ness for the seal is heavily dependent on the quality of your application.
Before you settle on a solution, you'll need to understand your project, decide on a budget and select parts that are going to be effective. Pelican cases are really easy to set up, but may not provide the protection you need. Silicone caulk is cheap, but difficult to apply well enough to get the best protection. There are advantages and disadvantages to all of the solutions offered here, but hopefully you can now start choosing what you need.
Part 2: Phidgets That Need to be Exposed to Air (Temperature, Humidity, Air Pressure)
Phidgets, like the humidity/temperature sensor, sound sensor and the gas pressure sensors (used for barometric pressure) can be placed outdoors, but still need to be protected from elements. The temperature sensor must be guarded against heat radiation (preferably even put in a white housing so that the sun rays are reflected off the enclosure), and all sensors need protection from precipitation and excessive dust.
There are many clever solutions to keeping Phidgets safe from weather while still allowing them to be in the open-air. As shown last week, Patrick's humidity/temperature sensor has proven its worth in the outdoors by simply being mounted to the underside of a piece of wood next to a house. However, over time the humidity values have become offset. What can be done?
- A Stevenson Screen is for serious weather monitoring with louvres to protect against direct radiation and precipitation, and will work with the sound sensor as well. These screens start as low as $110, but most quality-made ones are going to cost in excess of $1000. They can be bought from meteorological weather stores like Hoskin Scientific, Russell Scientific, the Weather Shop (very expensive, well researched designs), and MetCheck (the best value). You can also make your own Stevenson-type screen using white plastic vents, wood, guttering or pot saucers ( weatherforschools.me.uk offers some great instructions for making these). Because of the louvre design, it is harder for dust to collect on the electronics, thus extending the time that you'll get accurate readings.
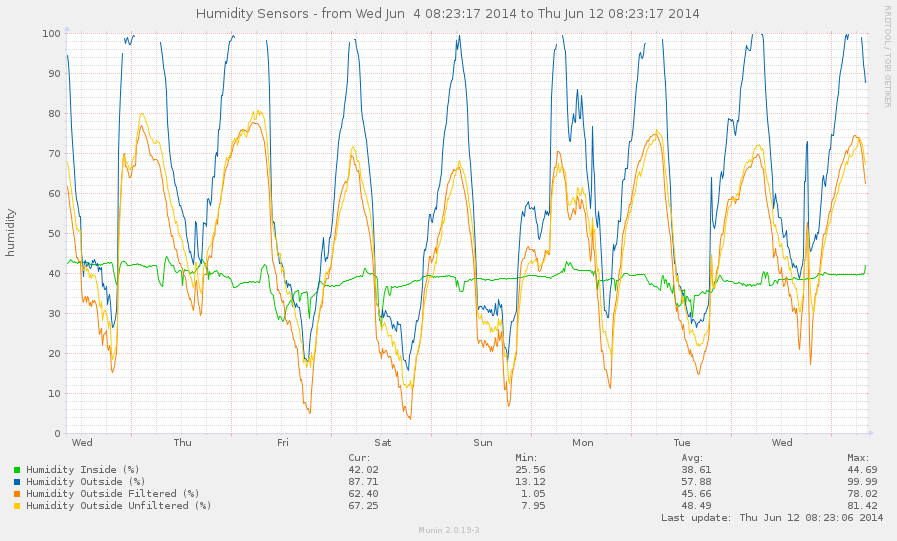
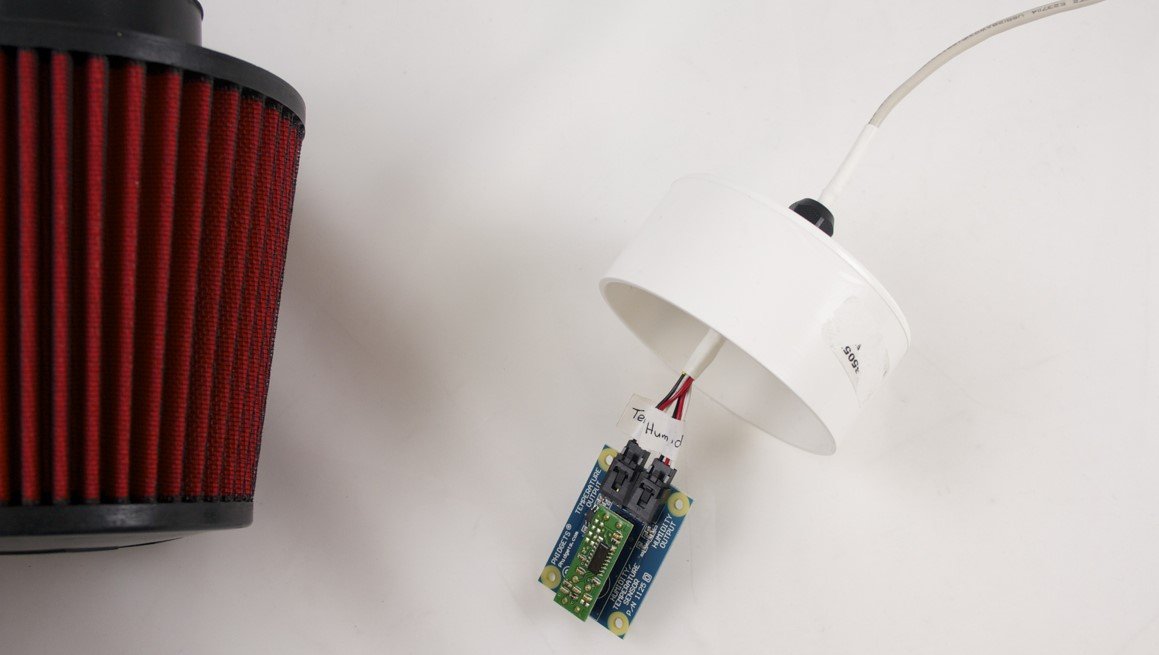
- A KN Filter and housing is your best bet for the humidity sensor if you're really worried about dust (especially in Sub-Saharan countries). While testing this filter, we noticed inconsistencies in the readings that don't follow a steady offset, so they can't be calibrated. In the graph below, you can see the extent of these inconsistencies. The blue line is the 5-year old humidity sensor we've talked about before at Patrick's house, the orange line is the humidity in the KN filter and the yellow line is a brand new humidity sensor installed outdoors with no filter. We've observed that humidity will increase about 10% during and shortly after a rain as the humidity peaks in the KN filter.
KN Filter Assembly
To make your KN filter assembly you'll need:
- a KN filter
- 3″ PVC pipe cap
- USB2 cable of the correct length for you application
- Phidgets sensor cables
- 3mm cable grip/gland (we used a tight cable grip with internal diameter 2.5-6.5mm by American Electrical; the diameter of the grip will depend on the thickness of your cable)
- Scrap sheets of wood or plywood, about 4 square feet
- Mounting materials
To put it together:
- Cut off the ends of the USB2 cable and place the cable grip onto it, without the lock nut. Run two sensor cables through
the USB cable, by following these directions.
Make sure that the end that will be put into the KN filter is very well waterproofed with heat shrink and does not
have a lot of loose sensor cable.
- Drill a hole the same as the outer diameter of the cable grip in the middle of the PVC pipe cap. Pull the prepared cable
through the hole and secure with the lock nut on the other side. Attach the sensor to the sensor cables coming out
of the pipe cap.
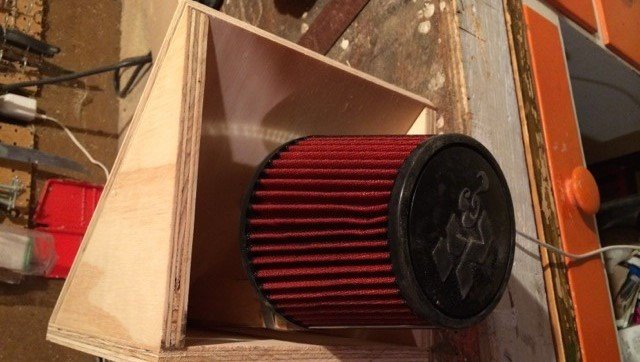
- Place the pipe cap on the open end of the KN filter.
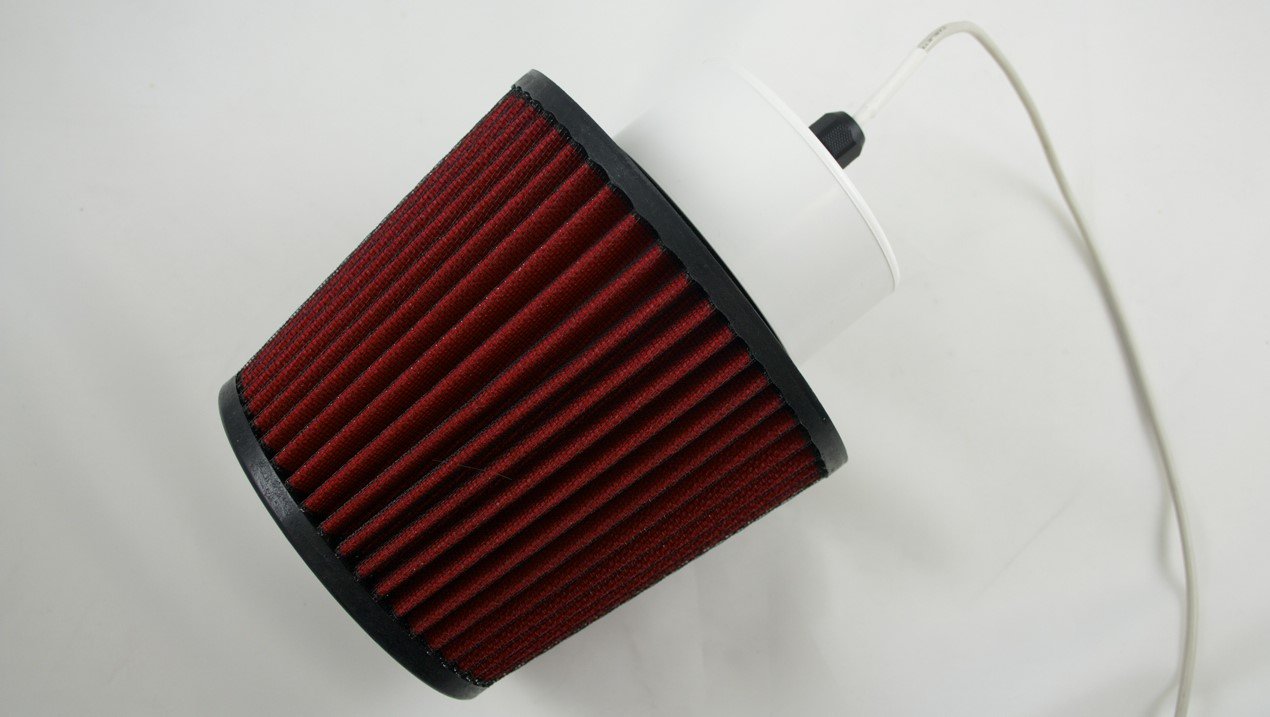
- Use the spare wood to craft a simple protective housing to shield of rain from hitting the filter directly.
- You can then run the other end of the sensor cables to an interface kit that is located indoors.
Now you have a couple of options to explore for installing Phidgets that need to be exposed to air. If you don't live in a dusty environment then a Stevenson screen is a very reasonable solution, but some people may require a slightly stronger filter, like the KN filter.
Part 3: Encasing Light Sensors and Infrared Phidgets (Distance, Temperature, Motion)
For infrared Phidgets, on top of putting them inside of a weatherproof enclosure, as discussed previously, you'll need to install a window in the casing, which the sensor can see through. Different kinds of sensors will require different materials for the window.
The easiest sensors to find a screen for is the Light Phidget. A single, un-distorted, flat pane with an anti-reflective coating gives the best results.
The 1045 Phidget Temperature Sensor IR uses long wavelength infrared (5.5 to 14 µm). Technically, a germanium filter should work, but in our tests with a germanium ND40k (optical natural density) filter, we had no success whatsoever. The fresnel filter seemed to pick up some readings, but the sensor needs calibration if you want accurate readings, and this will depend on the kind of fresnel filter you are using. The best way to use the Phidget IR temperature sensor is to have it pointing down and placed under a small tent to protect it from rain, or to only use the sensor outdoors when needed, then take it back inside when finished taking measurements.
The 1111 Motion Sensor works with a fresnel filter, but doesn't offer quite the same range of values as when the sensor is fully exposed. Keep in mind that the sensor has a horizontal detection range of 38˚ and a vertical detection range of 22˚, which will change when the sensor is enclosed. If you're using the motion sensor more or less as a switch, then the fresnel filter won't pose any problems for your project. The 1102 and 1103 Distance Sensors (5mm and 10cm, respectively), worked best with the fresnel filter. Much like the motion sensor, they're best used as a switch for detecting nearby objects. The filter does not change any of the readings.
For the Sharp Distance Sensors (4-30cm Phidgets 3520 ,10-80cm Phidgets 3521, and 21-150cm Phidgets 3522) there are a few options. These sensors emit light with a wavelength of about 950nm, in the near-infrared spectrum. We used a 950nm infrared optical grade filter. When using this filter in front of the 3520 and 3521, the sensors returned accurate results without needing any calibration. Fresnel filters also worked on these two sensors, but they need recalibration. Non-reflective glass is the only medium that works for all three Sharp distance sensors, although recalibration is still needed.
For quick reference, here are the kinds of filters that work for the different Phidgets IR sensors:
| Sensor | Fresnel Filter Results: | 950nm IR Optical Grade Filter Results: | Non-reflective Glass Results: |
|---|---|---|---|
| Temperature Light Sensor |
Needs calibration |
||
| Temperature Temperature Sensor IR |
Needs calibration |
||
| Motion Motion Sensor |
|||
| Distance (5mm) Distance Sensor 5mm |
|||
| Distance (10cm) Distance Sensor 10cm |
|||
| Distance (4-30cm) Sharp Distance Sensor (4-30cm) |
Needs calibration |
||
| Distance (10-80cm) Sharp Distance Sensor (10-80cm) |
Needs calibration |
Needs calibration |
|
| Distance (21-50cm) Sharp Distance Sensor (21-50cm) |
Detects, but doesn't measure |
Detects, but doesn't measure |
Needs calibration |
Installing the Lens
Now that you know what filter to use, you'll still need to install it in an adequately weatherproof case. With these sorts of filters, it's very unlikely you'll be able to get more protection than IP64.
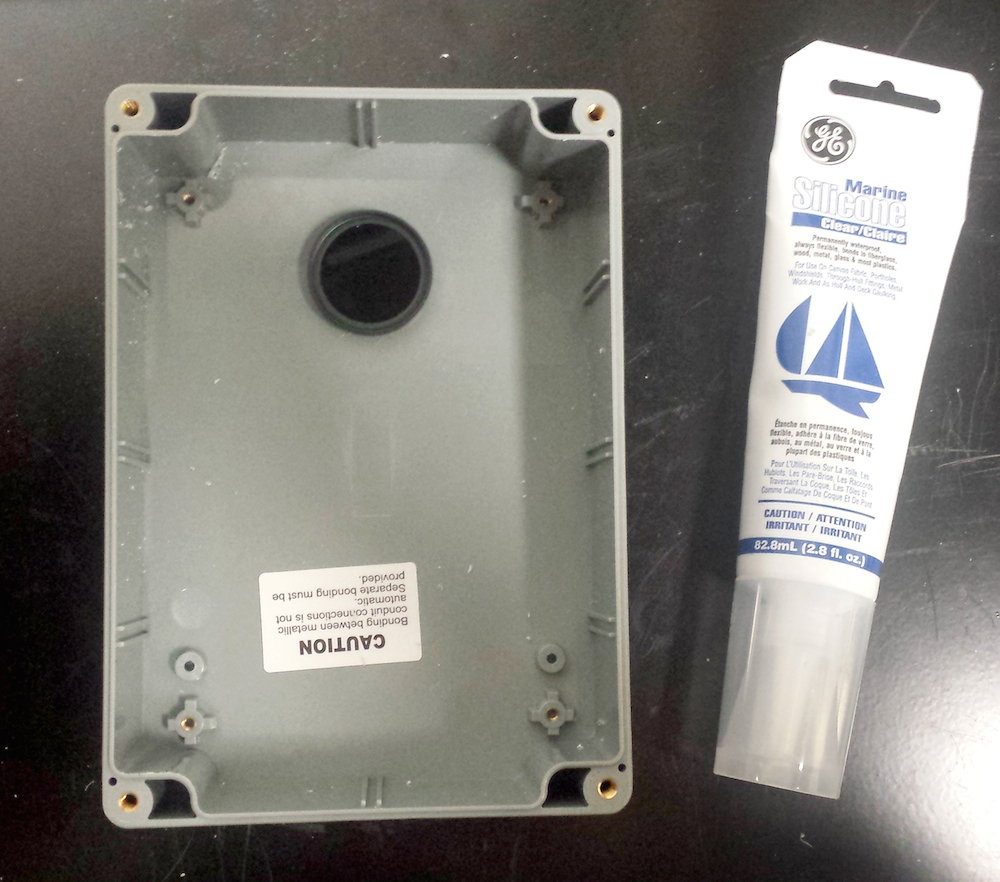
- Choose a lens that's the right size for your sensor and an enclosure that will fit the rest of the hardware and provide you with the adequate amount of weatherproofing. I chose a 30mm lens, which fit the distance sensor very snugly. If I do this again, I'll use a larger lens. It won't hurt anything.For the case, I went with the BUD Industries PN-11327, which gave a good amount of space to work in.
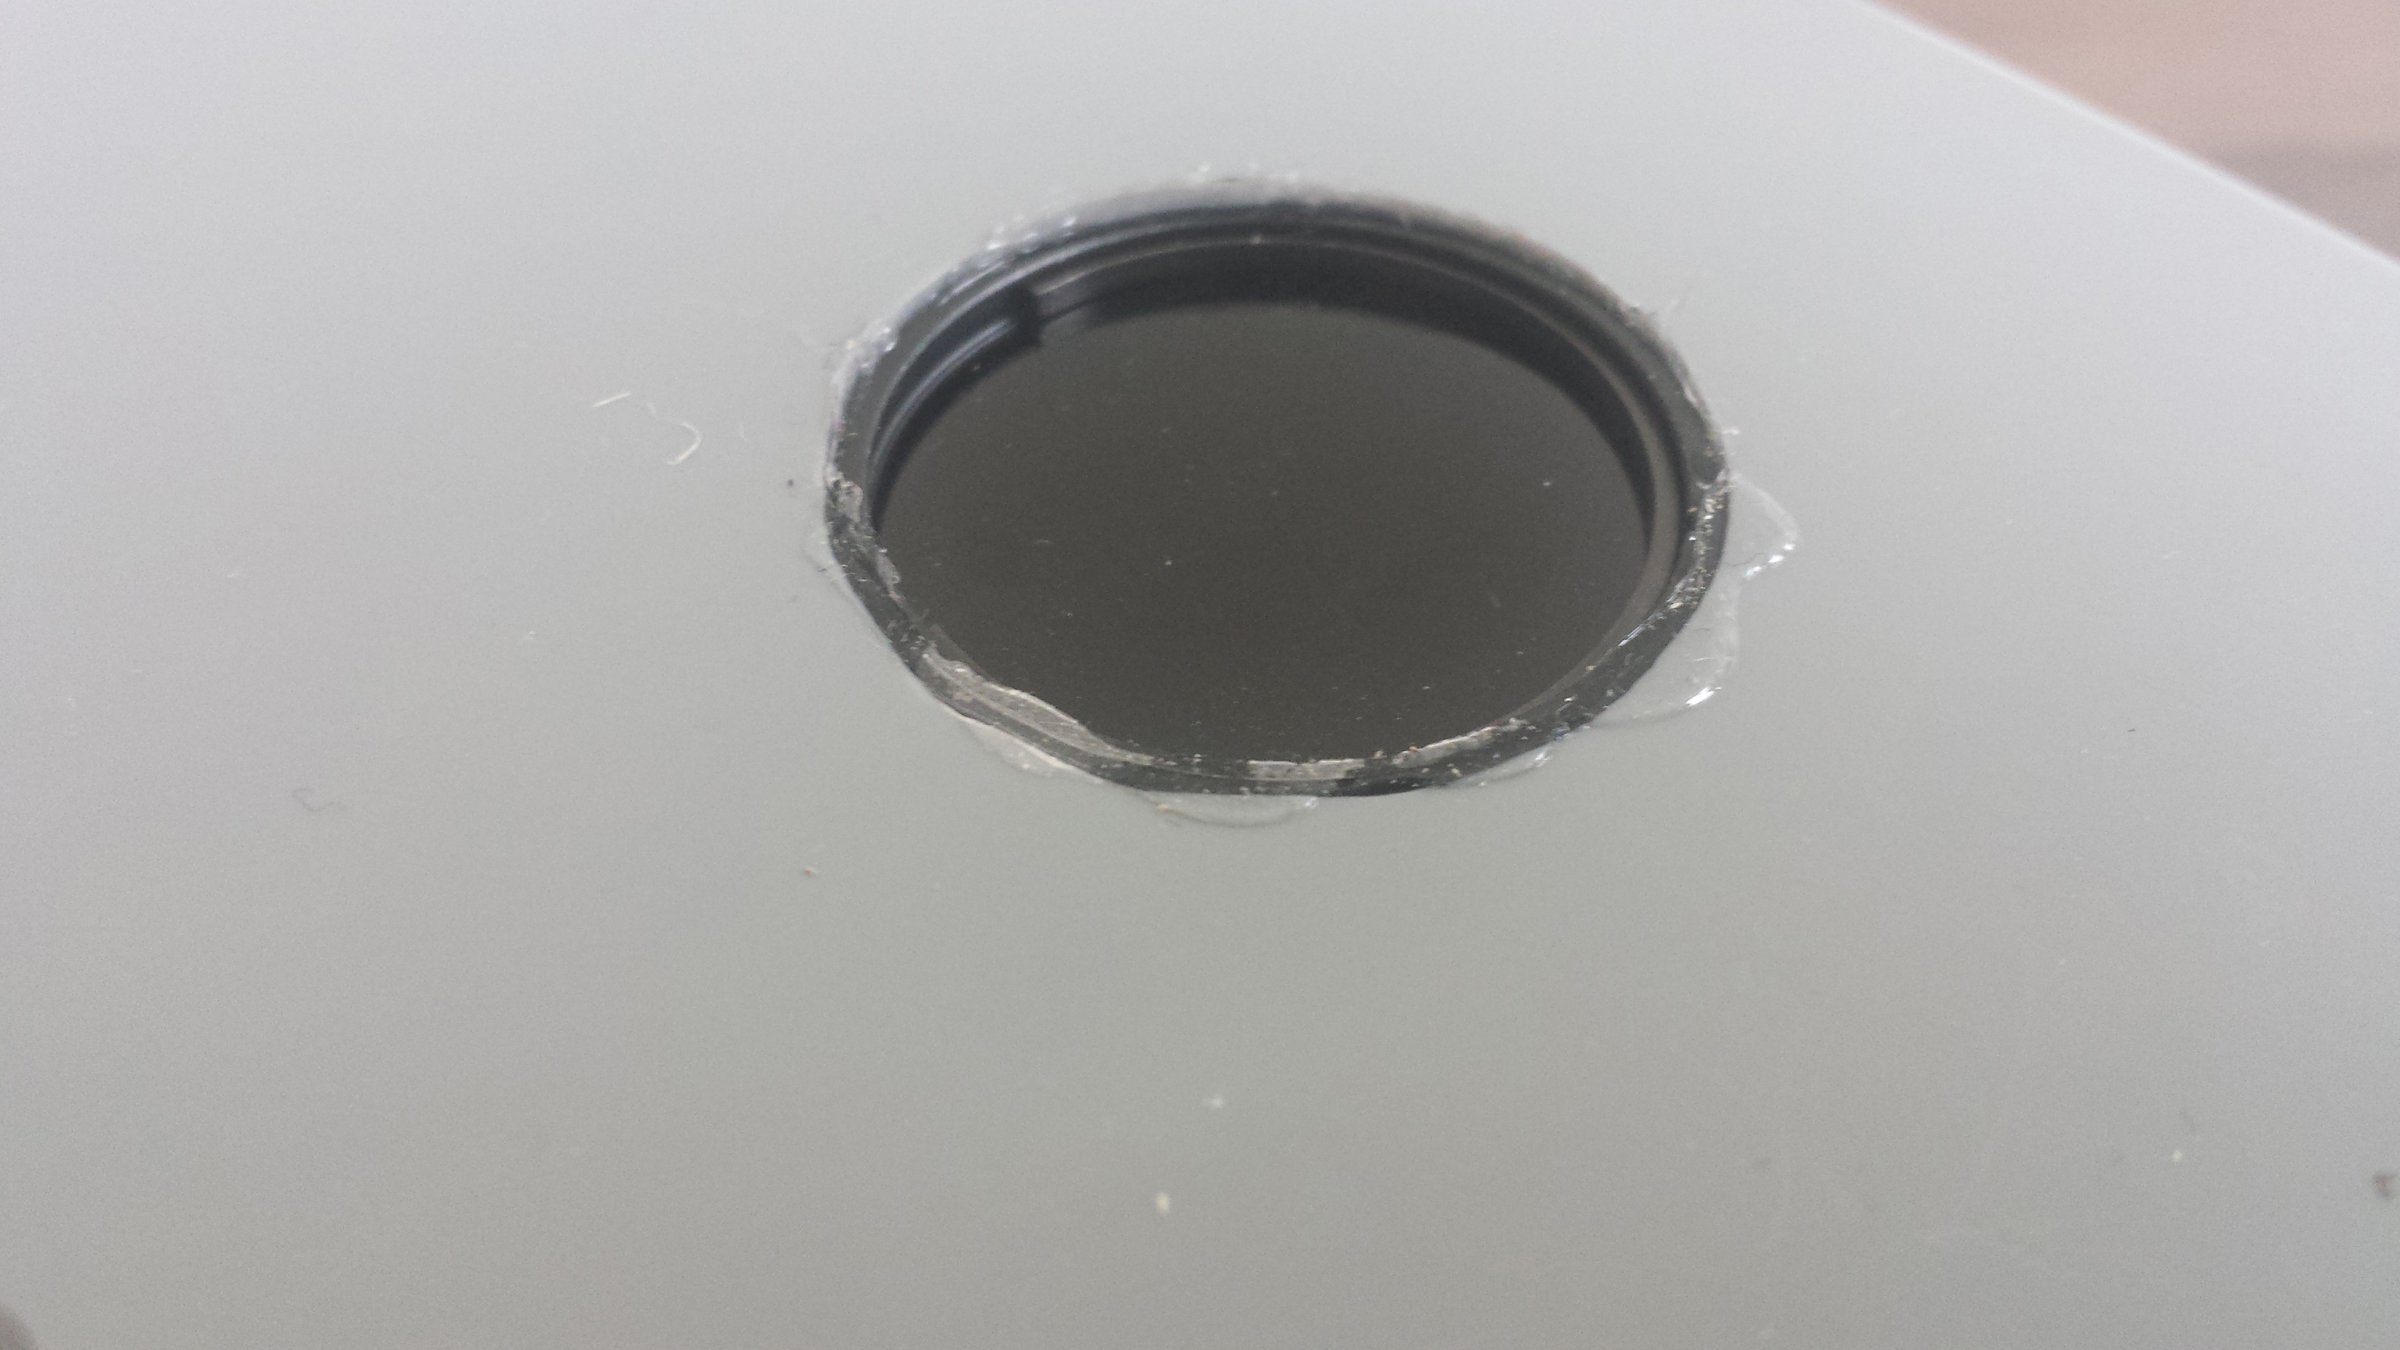
- Drill a hole in the enclosure, so that the lens will fit very snugly. Apply a bead of silicone around the perimeter
of the hole and fit the lens in. Follow the directions provided with the silicone to make sure the seal sets properly.
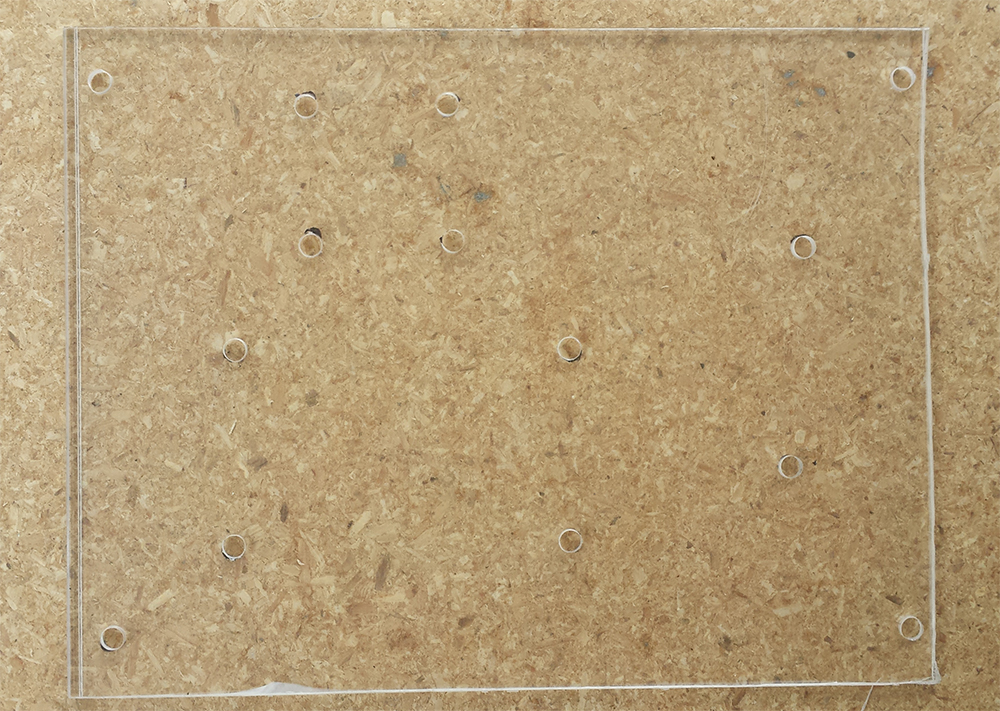
- I used a piece of plexiglass to mount the hardware, but other materials, like wood or metal, work equally well. Once
the plexiglass is cut to fit the container, drill holes to (a) mount the plexiglass in the case and (b) mount the hardware
on the plexiglass. Be careful to line everything up properly. I drilled the holes for mounting in the case first. I
then installed the piece of plexiglass and figured out where the other holes would need to be drilled. Make sure to
take into account where the wires are going to be running.
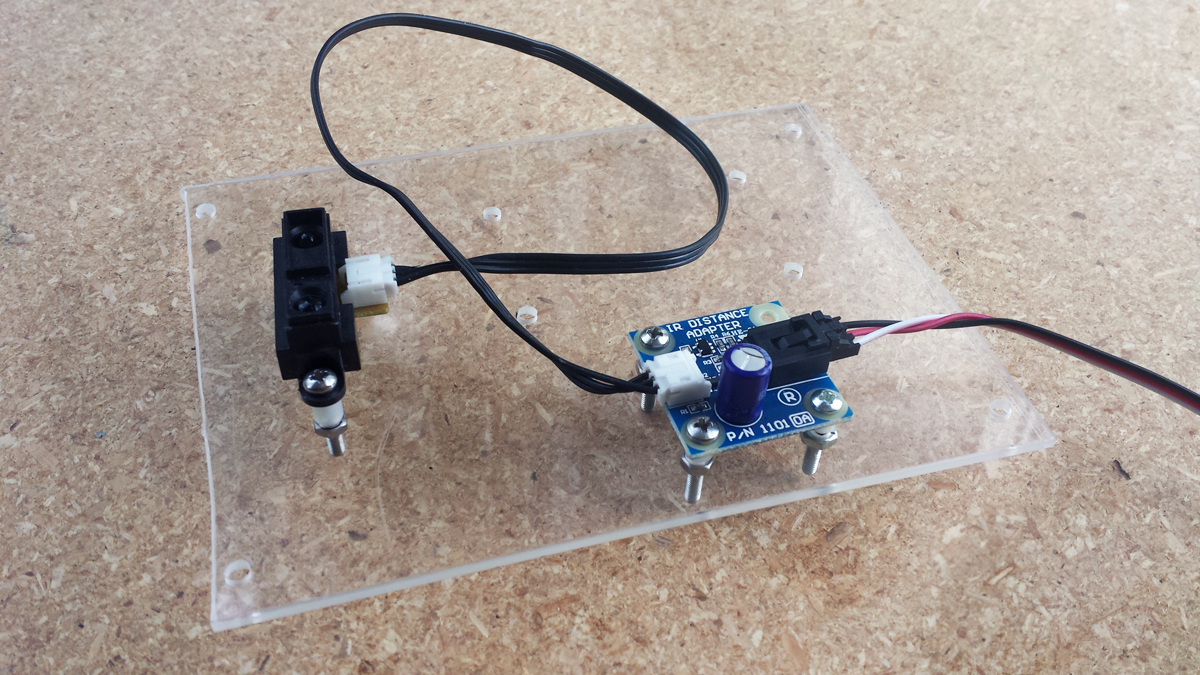
- Install the sensors using the mounting hardware that comes with Phidgets: 4 nuts and bolts (M3 x 18mm), 4 plastic spacers.
Be sure to use spacers and try to minimize the gap between the sensor and the lens.
- Now's a good time to install the connector onto the case. Once you've chosen what kind of connector you are going to use, drill a hole for it and connect it up. Depending on the approach you've chosen, this could involve some soldering. Make sure that if you're using cable glands or circular connectors that you put them onto the cables before soldering any other connections (I've made this mistake more than twice). I used a USB connector that the interface kit will connect to.
- Put the plexiglass mount in the case and screw it in. Connect your cables. Seal up the box.
Now all you have to do is mount the box where you want it, and you're ready to go. The same installation technique can be applied to any type of lens, sensor and connector combination you choose for your project. Now, you know how to use any of the Phidgets infrared sensors in the outdoors.
Part 4: Phidgets that can't be Weatherproofed
The Sonar Sensor
The 1128 Maxbotics EZ-1 Sonar Sensor that Phidgets sells is no good when outside for extended periods of time. However, Maxbotics sells waterproof sonar sensors that you can install in your outdoor applications.
Temperature Sensor
The 1045 Temperature Sensor IR works by reading temperature of the specific area that is in the field of view, so most filters don't work, or skew the readings. The best way to use the sensor is to keep the sensor exposed, pointed at what you're monitoring. As discussed in Part 3 of this article, a fresnel filter will work, but it still requires calibration after installed. In environments with moderate weather, you can use the acrylic enclosure sold by Phidgets or build your own shield to protect it.
Knobs and Sliders
The 1106 Force Sensor, 1112 Slider and 1113 Mini Joy Stick Sensor cannot be completely sealed off from the environment without inhibiting their functionality. The 1116 Multi-turn Rotation Sensor can provide an alternative to the other rotation sensor by using its nut and some sealant around the hole in the enclosure.
There are lots of creative ways to use Phidgets outdoors, and even though the Phidgets mentioned in this post are impossible to weatherproof, doesn't mean they can't ever be used outside, they just can't stay there. The key is to know your environment and protect the Phidgets accordingly. Electronics and water are always a bad combination and dust can cause damage over the long term. You'll also want to check operating temperatures and ensure you're not operating the Phidgets outside of that range. Working with these limitations, it's not that hard to create anything from a temporary outdoor sensing system to a lasting outdoor installation.
Part 5: Temperature Control and Insulation
Operating temperatures for each device are given on the product pages. Interface boards (like the SBC3 and 8/8/8) operate within 0˚C and 70˚C, and sensors operate in both wider and narrower ranges.
In part 4 of this article, we discussed different kinds of encasements and connectors for Phidgets. When you're not worried about temperature, you can use pretty much any weatherproof case. However, if your project will be sitting outdoors for an extended period of time, chances are temperatures will go outside of the Phidgets operating temperatures, and you'll need insulation.
The simplest and most effective solution is to use a foam insulator. Pelican cases, as we suggested in part 1 of this article, come lined with polyurethane foam, which is a decent insulator. If you plan on installing the Phidgets in more extreme temperatures (i.e. above 70˚C and below -15˚C) for more than 8 hours, the temperature in the Pelican case will begin to equal the temperature outside the case and you may need to look into different solutions (including, possibly, ditching the Pelican case altogether in favour of an insulating case, like a cooler).
Find a product with thermal conductivity under 0.035W/(m*K), like cotton, styrofoam/polystyrene, polyurethane/urethane silica, or plastic insulation foam. Some of these materials have limited temperature ranges. Polystyrene's range is -50˚C to 75˚C and Polyurethane's range is -210˚C and 120˚C (source: engineeringtoolbox.com), but I suspect that you won't be using Phidgets in such extreme conditions anyway. The bigger concern is how thick the insulation will need to be in the environment you're working in. If you're expecting temperatures to get up to 70˚C, you'll need really serious insulation, and a cooling system, to keep the Phidgets operating.
Calculating Insulation Needs
We can use Fourier's law to calculate the thickness of insulation that we need:
`s = (k * A * dT) / q`Where:
- `s` is the thickness of the foam (in m or ft)
- `k` is the thermal conductivity of the material (found here, in W/m⋅K or W/m oC or Btu/(hr oF ft2/ft))
- `A` is the surface area of the case (in m2 or ft2)
- `dT` is the estimated temperature difference between the inside and outside (in K or oC or oF)
- `q` is the heat transfer (in W or J/s or Btu/s)
While we could use integrals and look at varying temperatures over the entire surface of the case and SBC, let's keep it simple and one-dimensional. In this example, we'll also be ignoring the thermal properties of the case itself. You might want to do more involved calculations yourself, but this should give you an idea of where to start.
If we're using styrofoam the `k` = 0.033 W/m⋅k. If we're using an SBC3, the dimensions are about 10cm x 8cm, which gives a surface area of `A` = 0.008 m2, if we pack it nice and tight. We can expect the outdoor temperatures to reach as low as -20˚C, and we want to make sure the SBC stays above 0˚C. That makes `dT` = 20˚C, which equals 20 K. For heat transfer, we can allow the same amount of heat that the Phidget is generating to be transferred through the insulation. The SBC will generate about 1W of heat, while less powerful Phidgets will be lower. Since it's better to low-ball and do a bit more insulation than not enough, we'll use `q` = 0.1W. That gives us:
`s = (0.033*0.008*20) / 0.1 = 0.05`So, we need 5cm of foam around the SBC. Obviously, we've made a lot of assumptions here and took some shortcuts, but hopefully that gets you started on your calculations.
We ran some tests with 2.5cm of styrofoam around an SBC3 in a -20˚C environment. Without taking too many precautions around making a really airtight seal, and using a metal case that wouldn't provide too much additional insulation, the foam was able to keep the SBC3 temperature above 0˚C for outdoor temperatures above -16˚C. Even when the SBC's temperature dipped below 0˚C, it still functioned. Styrofoam is a readily accessible material, and although you may need to make it really thick in extreme temperatures, it should meet the needs of most people. There are also other options for insulation, mentioned earlier, that you can explore.
Other Methods of Temperature Control
You can use the colour of the case to work for you as well. Dark materials absorb heat while light materials reflect. Therefore, choose a dark case if you're working in cold conditions and a bright white case for hot conditions.
You will also want to consider the location. The most significant influence will be direct sunlight, which will cause the case to heat up much faster.
In extreme conditions, you may need to install the Phidgets in a heated or cooled enclosure, whose temperature control would run off electricity, and probably need to be monitored by thermostat. We don't know of any Phidgets customers having to do this though, so it would be a very special case.
Even better than insulation, and a solution that some customers have come up with, is to house whatever you can indoors (like the interface kit) and run cables to the sensors that need to be outside. This only works if you're setting up near a building. Whatever you do set up outside, check its product page for operating temperature.
Another option, if you think the Phidget may be exposed to temperatures outside of that range, is to make it mobile, so you can move it indoors when conditions call for it. Overall though, some thick insulating material should do the trick. If you've tried something, let us know in the comments.